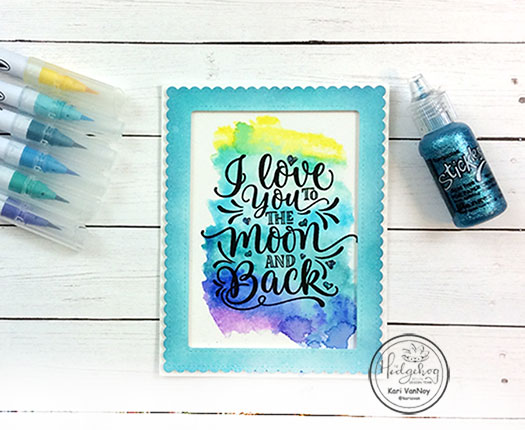
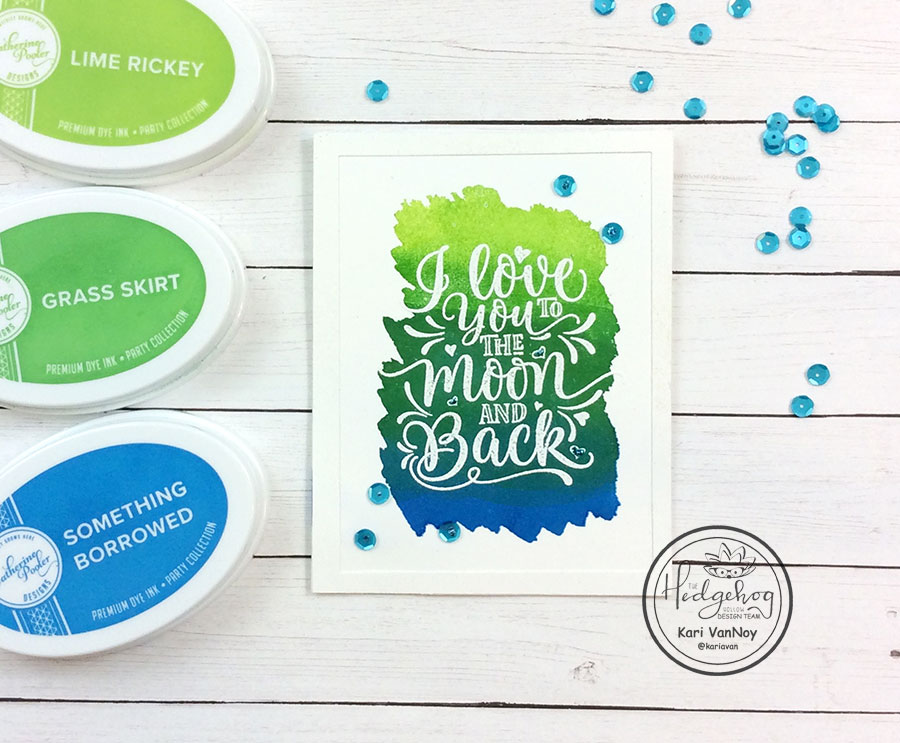
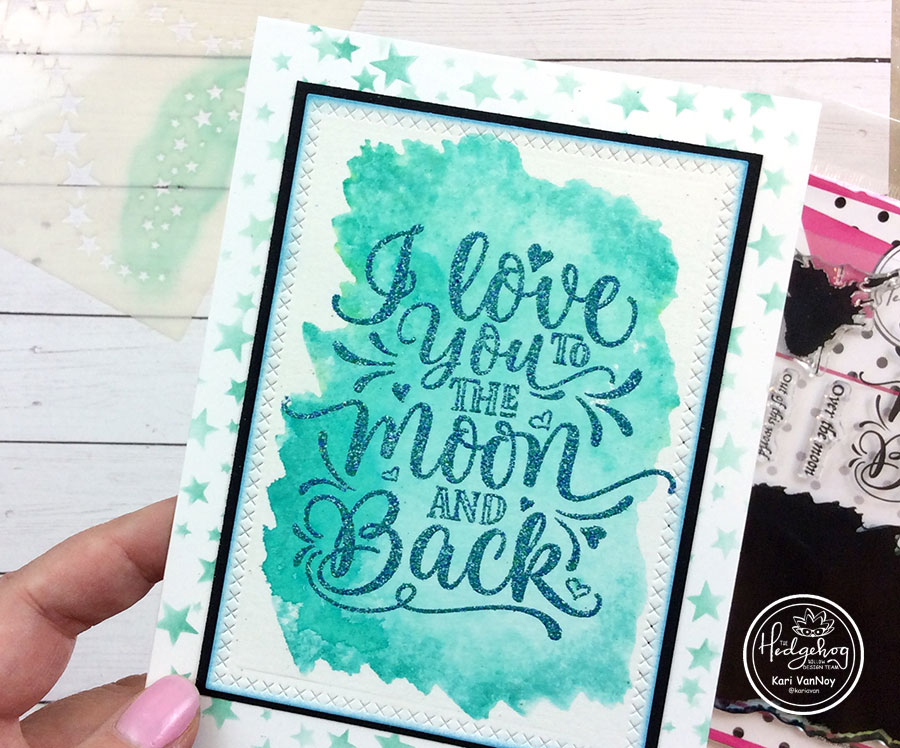
Hello! Happy 2020! Today I’m up on the Hedgehog Hollow blog sharing 5 Ways to get a perfect watercolor background. I’m using the NEW January 2020 Kit and it is so beautiful. I’m also using 5 different mediums to get that watercolor look. Check it out in the video below:
For more information, visit my YouTube channel and the Hedgehog Hollow blog. Here is a list of the products I’ve used, in case you are interested.
I’m often asked what supplies I use to make my cards and projects, so I’ve put together a list using affiliate links when possible. If you make a purchase with these links I may receive a small commission. These help me to keep up with blog costs and continue bringing you fun projects. Thank you so much for your support!
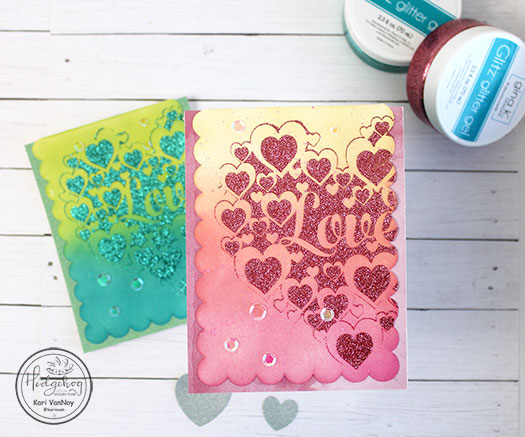
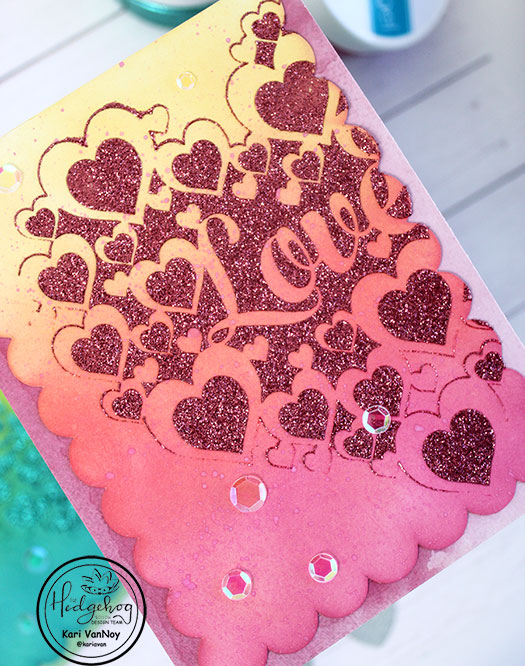
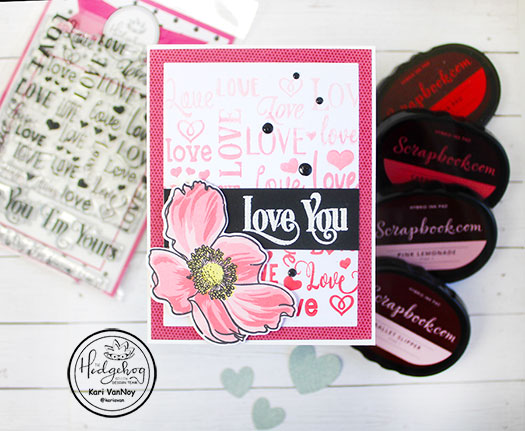
Hello! I’m so excited to share some Glittery, Bright love cards today using two new products from this year: Glitz Glitter Gel and the Stencil Pal.
I have to say, I think that Stencil Pal is going on my list for favorites this year!
I created a video to show you how I put these cards together and sharing some tricks for using them, watch it below or on YouTube:
I’m often asked what supplies I use to make my cards and projects, so I’ve put together a list using affiliate links when possible. If you make a purchase with these links I may receive a small commission. These help me to keep up with blog costs and continue bringing you fun projects. Thank you so much for your support!
Thanks for stopping by today! I hope you had a wonderful Holiday! See you soon with more inspiration.
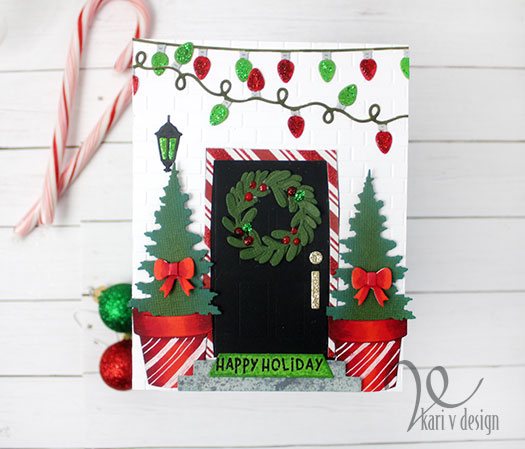
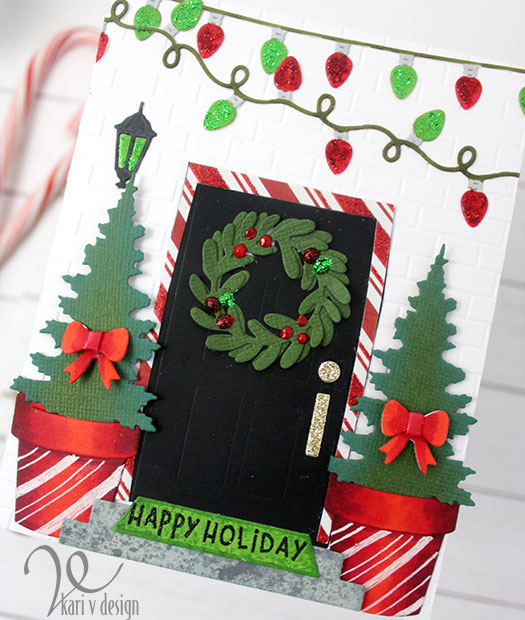
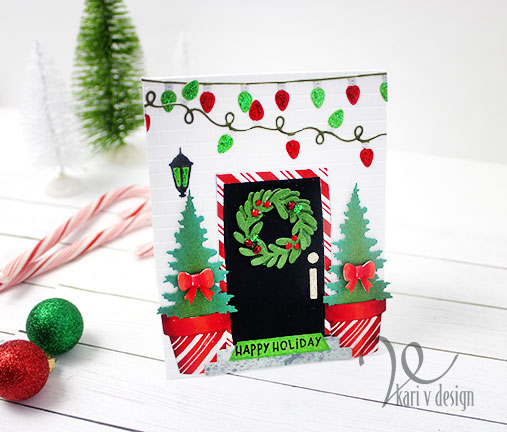
Hello! Today I have a fun card inspired by my neighbor’s holiday decorations. This year they have gone all out with lights, lawn decorations, and blow-up characters. It’s fun to see!
That is what gave me the idea to create a Holiday House on a card.
This house is decked out with glittery lights, Christmas trees in candy cane pots, a holiday wreath and door frame decor, and even a holiday welcome mat. The porch light has been changed to green…and I think whoever lives here just loves this time of year!
I had a great time putting this together and it made me feel a little better to create a decorated home on a card since we didn’t put up any Christmas lights this year! We wanted to, of course, but work and other things got in the way until (I thought) it was just too late to pull out all the lights.
I have a video to show you all the fun, watch it below or on YouTube:
Did you decorate for the holidays this year? We DID decorate inside with our tree, ornaments, and stockings for all the kids and grandkids….it’s just OUTSIDE that looks a little grinch-ish. Lol.
I’m often asked what supplies I use to make my cards and projects, so I’ve put together a list using affiliate links when possible. If you make a purchase with these links I may receive a small commission. These help me to keep up with blog costs and continue bringing you fun projects. Thank you so much for your support!
Wishing you a very happy holiday season. I hope you feel so much love this time of year, whatever your traditions and decorations are. See you soon with more inspiration.
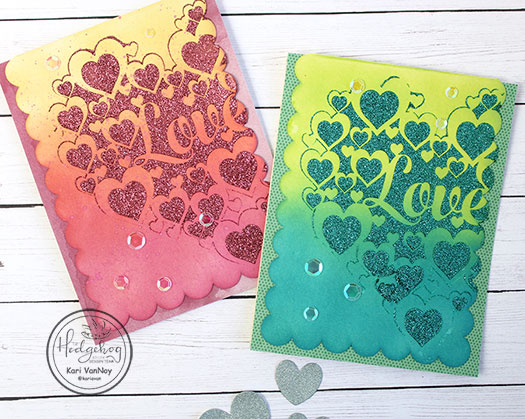
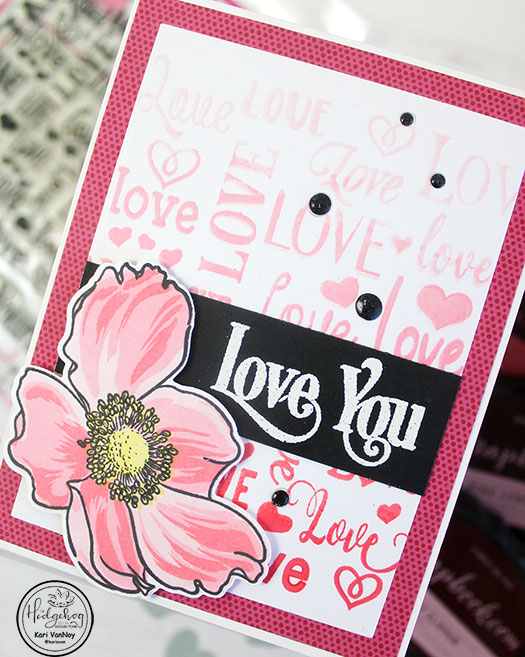
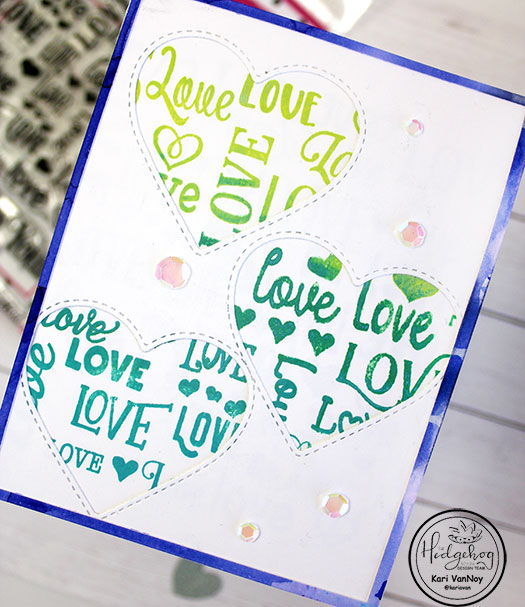
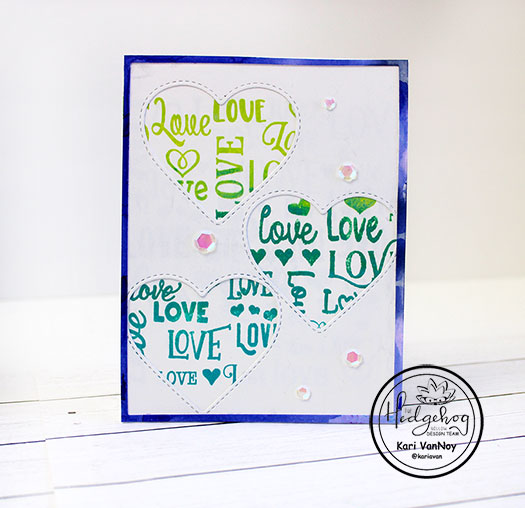
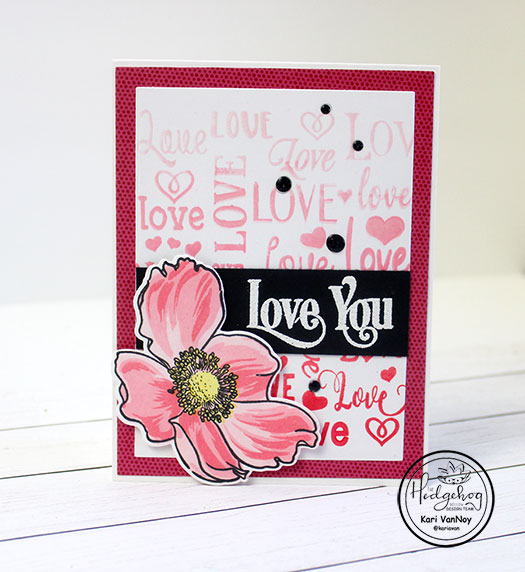
Hello! Today I have a fun ombre stamped background idea for you, with two card ideas! I love a good ombre background, and this stamp set from the Hedgehog Hollow December 2019 kit is so perfect for this technique.
Love you Ombre stamped background
Instead of typing out the details, I made a video to tell you just how to get this look on your cards, watch it below or on YouTube:
I also create a green & blue version. I love making non-traditional Valentine cards…because any time is a good time to send a card to your loved ones!
I’m often asked what supplies I use to make my cards and projects, so I’ve put together a list using affiliate links when possible. If you make a purchase with these links I may receive a small commission. These help me to keep up with blog costs and continue bringing you fun projects. Thank you so much for your support!
Thanks for stopping by today! I’ll be back with more inspiration soon!
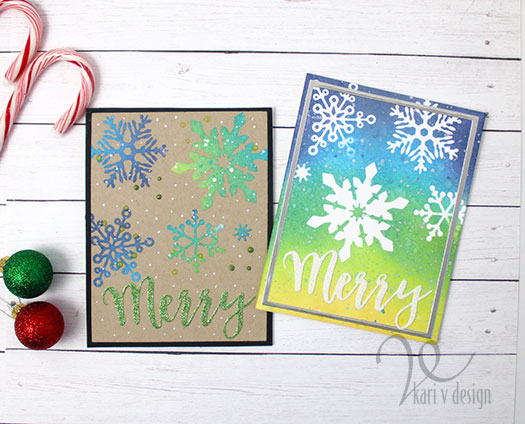
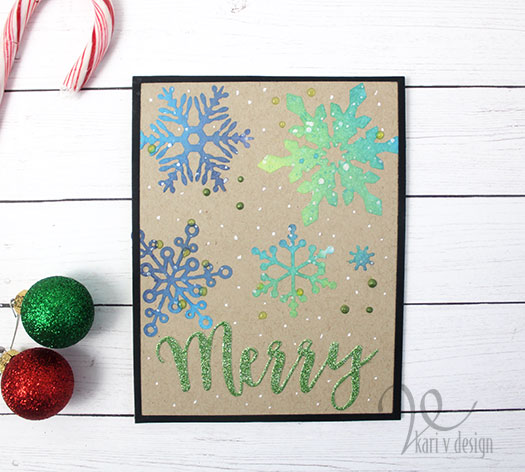
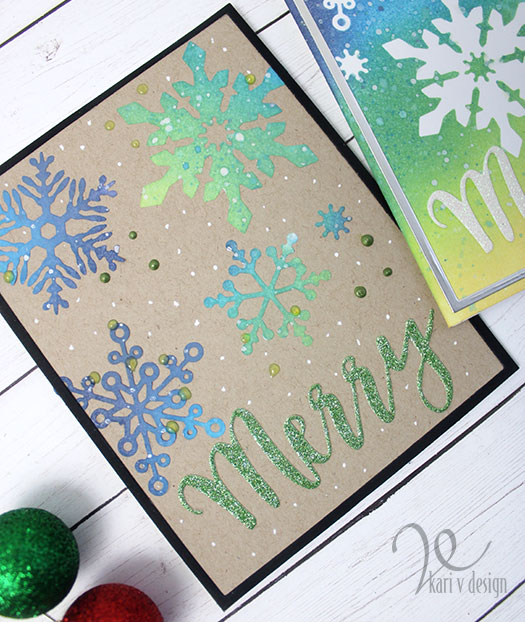
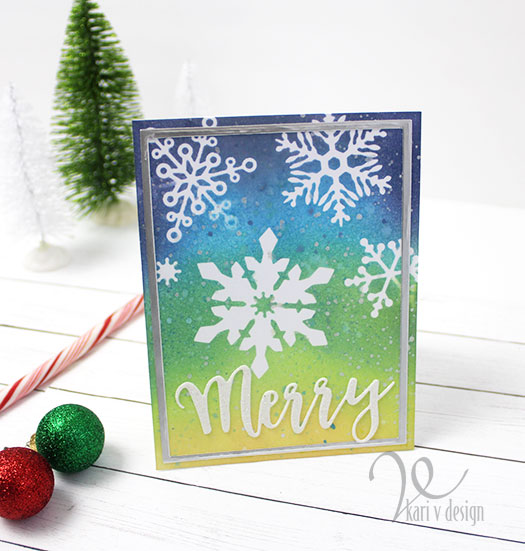
Hello! I have a great new tool for the craft studio to share today. You might think this is a kitchen item, but today it is working GREAT on a card or two! It’s Freezer paper…a little trick I learned in a recent class from Altenew.
For my cards, I first die cut some snowflakes out of the freezer paper. Then I ironed them onto the paper with a warm iron. Then I did a little ink blending with my new favorite blending tool.
Ink blended background on the right
I splattered the background with more ink, and some pearl watercolors. Then I carefully removed the snowflakes…and look at those beautiful white snowflakes left behind!
The “Merry” sentiment is die cut from glitter paper, and added along with a silver foil frame. What an awesome technique! Who would’ve thought to use freezer paper? I love this and think it might even work better than masking paper.
I have a quick video to show you on how to do this, watch below or on YouTube:
Of course, once I removed the snowflakes (cut from the freezer paper), I couldn’t let them go to waste! So I made a second card on Neenah Desert Storm paper. I was interested to see if I could get them to still iron-on to this second card. Did it work?…yes and no. Lol.
Most of them DID iron back on, but I had one problem snowflake. So what did I do?! I used a little liquid adhesive and Nuvo drops to help keep it stuck down!! Lol. There’s more than one way to make a card work.
I added some extra Nuvo drops and white gel pen to this one, to finish it off. Which one do you like better?
I’m often asked what supplies I use to make my cards and projects, so I’ve put together a list using affiliate links when possible. If you make a purchase with these links I may receive a small commission. These help me to keep up with blog costs and continue bringing you fun projects. Thank you so much for your support!
I absolutely love these colors for a holiday card. Thanks for stopping by!
Hi I'm Kari. I'm a creator, a card maker, and a day maker! I am Lucky in love to a supportive husband, blessed to raise 3 kids (all moved away now!), and happy to be watched over by 2 dogs.
I originally started this blog to remind me to be happy amid adversity, and I hope it inspires you, too!