Tag Archives | thank you card
SUNSHINE-Elvis-card-1

Elvis in the House!

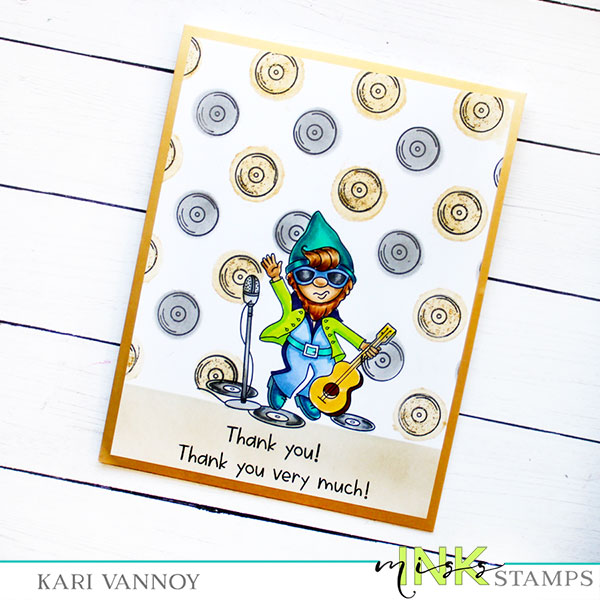
Hello! Today I have a fun Elvis card…in the Hall of Fame! I’m using a cute little set from Miss Ink Stamps called Thank You Very Much.

Did you know Elvis is the only performer that was inducted into the Rock & Roll Hall of Fame, the Country Hall of Fame, AND the Gospel Hall of Fame? That’s so cool.

That is what gave me the the idea to create this card. Watch the video below or in HD on YouTube:

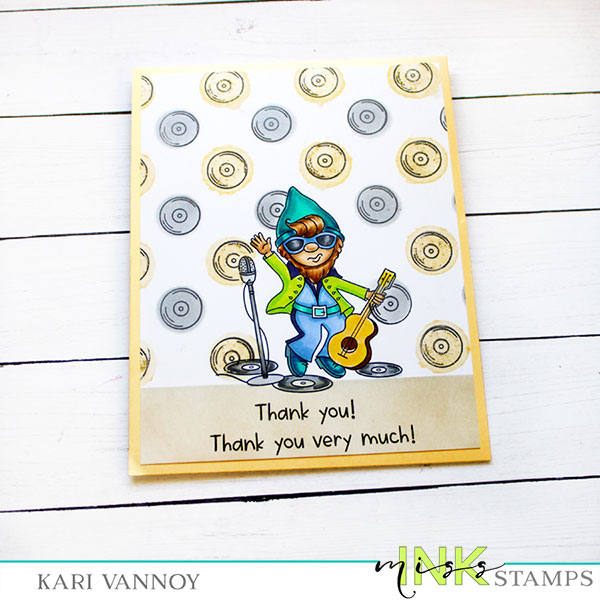
This is such a fun little set, and I used GOLD and SILVER ink to make those records in the background.

I know the REAL Elvis had dark hair, almost black hair, but I made mine with brown hair to match my color scheme. And I felt like a white jump suit was too plain…so my Elvis has a purple/blue jump suit with a lime green jacket! LOL. Now there’s some color!

I’m often asked what supplies I use to make my cards and projects, so I’ve put together a list using affiliate links when possible. If you make a purchase with these links I may receive a small commission. These help me to keep up with blog costs and continue bringing you fun projects. Thank you so much for your support!


I hope you enjoyed this project today! Thanks for stopping by!

Comments { 0 }
SUNSHINE-fruit-thank-you-card-crooked

Combining Kits for a Fruit/Retro Card

Hello! Today I have a card to share where I combined the June 2021 and July 2021 Hedgehog Hollow Kits to create a Fruity Retro card. These kits are fun to combine, here’s what I came up with:

For this card, first I stamped the diamond outline stamp from the July Retro Kit onto a card panel. Then I used the diamond SOLID stamp to fill it in with Pop Art ink. I stamped a few of the star images from that kit onto the background.

I stamped the “thank you” and “so berry much” stamps from the June kit with some purple ink.

Then I stamped and colored up some fruit images with Copic markers. I fussy cut these out and adhered most of them with liquid adhesive. Some of the smaller fruit I popped up with foam tape.

I finished it off by adding it to a purple cardstock mat and a top-folding card base. And that’s it!

Thanks for stopping by today.

Comments { 0 }
copic-colored-crooked

Lots of Color For Your Day

Hello! Today I am sharing a project for AECP inspired by the class called “Color Your Day” taught by Therese Calvird.

I was really inspired by day 5, where Therese talked about all the ways your coloring can look different…depending upon what medium you used, what ink you used, or what embossing you used. So I thought I’d give it a try!

I inked up one of my favorite flowers from the Wonderland Stamp set in a variety of ink & embossing powders. One in clear embossing powder, one in white, and one in black embossing…then I watercolored them with Zigs. Then I also inked one with Amalgam ink to color with Copics. Can you guess which one is which?

A color study…

This was an interesting color study, as different mediums and different inks really make a difference in the way the cards look.

Copic markers and Obsidian Amalgam Ink
Watercolored cards with Clear embossing, white embossing, and black embossing

I do think they have a different feeling, and I chose similar colors and coloring techniques to make them as similar as I could.

I used the same sentiments on all of them also, using some greys and black inks. (I thought the lighter cards needed a softer color sentiment, so I used gray ink).

I used a light blue color around each of the flowers to make it stand out more. I love the differences in these, and it was quite a fun study of color/mediums for cards.

I hope you enjoyed these projects today! Give it a try to see how your cards have a different feel with different mediums & embossing powders. It’s a fun exercise!

Thanks for stopping by today!

Comments { 1 }
SUNSHINE-you-inspire-me-crooked

A Crafty Thank You card

Hello again! I’m back already with another card using products from the Hedgehog Hollow March kit! These stamps got me thinking about people who inspire me, so I put together some of the sentiments for a very colorful and inspirational thank you card.

You inspire me

See how the first “inspire” is a light green, the second “inspire” is a light yellow, and the third “inspire” is a light orange? Well, I’m using clear embossing powder to trap the color below it to get that neat look!

For the process video and to see how this card took on a life of its own, watch the video below or in HD on YouTube:

I’m often asked what supplies I use to make my cards and projects, so I’ve put together a list using affiliate links when possible. If you make a purchase with these links I may receive a small commission. These help me to keep up with blog costs and continue bringing you fun projects. Thank you so much for your support!

Thanks for stopping by today!

Comments { 0 }
Woodland Whimsy Pinterest Graphic

Cheerful Cards with Woodland Whimsy

Hello! Today I’m excited to share three cards using the same stamp set. This set is from Gina K Designs and it’s called Woodland Whimsy. It’s a charming set filled with beautiful flowers and a hanging rod…so many possibilities!

The first card I made uses a beautiful sentiment from the set that says “Everything I am, You helped me to be.” I first wanted a rainbow of sentiments down the card, and it turned into this happy card:

The most important thing for this card, is to mask those flowers and leave a good sized white border. Then the inking is the easy part! I have a video showing you all the cards I made today.

Watch how they all came together in the video below, or in HD on YouTube:

For my second card, I was excited to use that hanging dowel. It made me think of when I used to dry flowers by hanging them upside down, and that is how this card was inspired!

You are remarkable!

I inked the background with that hanging dowel masked off. Then I added some green leaves to the background. The flowers and sentiment are popped up with foam tape to give this a 3D look. I added those topaz gem stones for some fun glamour!

My last card came into existence because I had FIVE flowers leftover that I had already colored. So of course I needed to create another card! So I die cut a simple thank you, inked up my favorite Gina K stencil, and created this thank you card.

One of these flowers is the one I stamped with ink, and the other four are colored with Copics. Can you guess which ones?!

I just love that there are solid stamps that give you the option of inking the flowers (or just coloring them yourself). You still get a great result!

I’m often asked what supplies I use to make my cards and projects, so I’ve put together a list using affiliate links when possible. If you make a purchase with these links I may receive a small commission. These help me to keep up with blog costs and continue bringing you fun projects. Thank you so much for your support!

I hope you enjoyed these cards today. I think they are so happy and cheerful, which is a great card for sending to someone special. See you next time! Thanks for stopping by!

Pin it for later:

Comments { 0 }