poinsettia-card-2

First Holiday card of the Season!

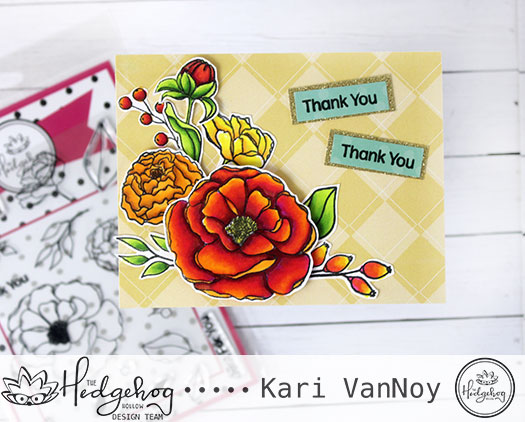
Hello! Today I am sharing my first Christmas card of the season. Also, I have a confession to make. I don’t usually make Christmas cards to mail out. I know, I know…I’m a card maker that doesn’t make my own Christmas cards! Shocking. But I found that it stresses me out too much to make multiples during the busy time of year, so I just don’t.

But today I made a festive poinsettia card that turned out so fun! I was inspired by the Irresistible Inking Techniques class at Altenew Academy and I just had to try it!

Polka dots in the background make me happy!

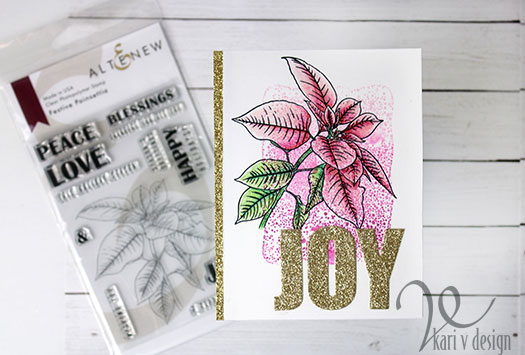
This is an inking technique I HAVE tried before, but this time I got so much better results. The trick is to ink up your acrylic block, spritz it with water using a light mist spray bottle, then stamp it onto your background.

I tried this a number of times using a variety of paper to see what different results I would get. I tested out the number of times to spray the ink before stamping. I tried different colors and time to leave the acrylic block on the paper. And this is my FAVORITE one of the bunch.

To get this cool spotted look, I used 3 different colors of Altenew ink on my block: Rose Quartz, Puffy Heart, and Purple Wine at the bottom. (This gave me a sort of Ombre look when I stamped it.) I spritzed it with TWO spritzes of water from a light mist spray bottle. (one was not enough, three was too much for my paper). Then I stamped it down onto Neenah Solar White 80# cover cardstock. This surprised me that I preferred the Neenah for this technique over a watercolor cardstock!

I love a speckled poinsettia

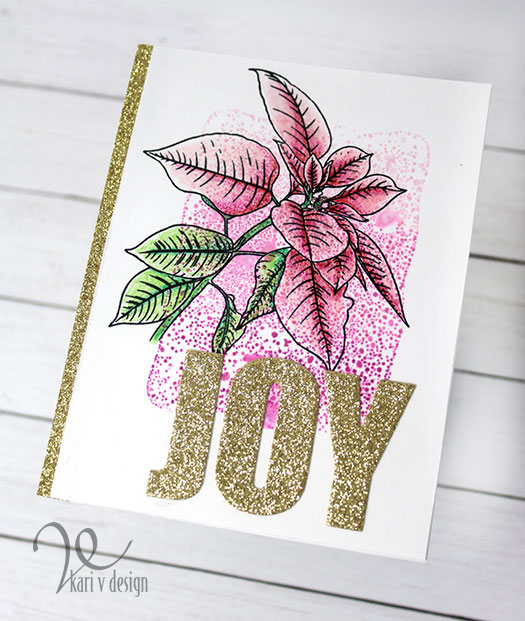
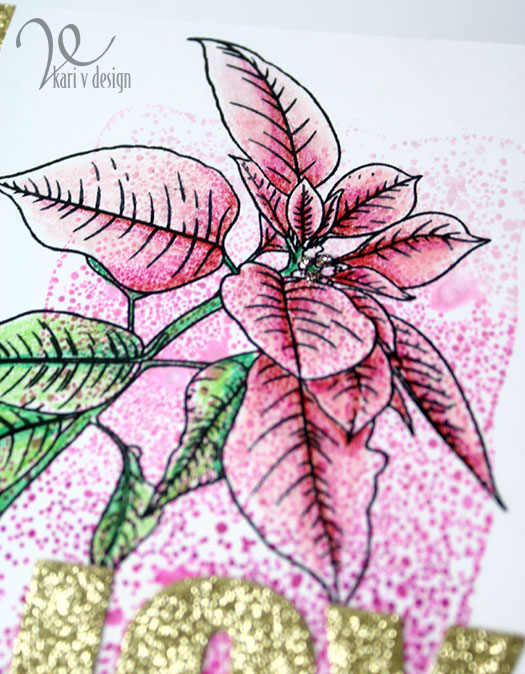
I stamped the poinsettia stamp using Versafine Onyx black ink, then I added just a touch of colored pencil. Just enough to give some color, but still see the spots. It reminds me of a speckled poinsettia….I love those!

To finish off the card, I cut it down a bit to add a strip of gold glitter cardstock on the edge. Then I added the JOY die cut out of the glitter card.

I have a list of the supplies I used below, with affiliate links when possible. When you click using these links I may receive a small commission. This helps me keep up with blog costs and continue bringing you fun projects. Thank you so much!

Oh, I forgot to mention that I also added some Mercury Glass Stickles to the center of the poinsettia to give more glittery shine to the card. When it catches the light just right, it looks so pretty.

Thanks for stopping by!

Comments { 1 }
fall-floral-card-2-no-supplies

Fall Floral card with Glazing

Hello there! Today I have a fall card using beautiful florals from the August 2019 Hedgehog Hollow kit. These florals designed by Alex Syberia are among my favorite florals ever and I keep reaching for them over and over!

Hello, Fall

I always find myself in need of Thank You cards, so I took the Thank you sentiment from the set and stamped it two times on patterned paper, then I backed it with gold glitter paper. I feel like Fall screams for gold glitter paper! Lol.

Deep, rich color

To get these deep, rich, fall colors I used alcohol markers in Pinks (yes! Pink) and yellows first. Then I used a technique called “Glazing”: I went over each floral petal with a light orange. All those colors together created this fall look! Try this glazing technique to see what colors you can get from your markers.

For the background, I used some patterned paper and it made this card come together so quickly!! I popped the top flower up with TWO layers of foam tape, and the smaller orange flower with one layer of foam tape. I love to get that dimensional look with different layers on my cards.

I’m often asked about the supplies I used, so here is the list using affiliate links when possible. When you purchase using these links, I may receive a small commission. Thank you for your support!

Thank you so much for stopping by!

Comments { 0 }
happy-fox-birthday

Cards for Guys

Hello! Today I have a surprise for you. I am making masculine cards! Yes, I know it’s a rarity around here, but I took an inspiring class by Jennifer Rzasa with Altenew and I just had some fun ideas!

I used to have only two rules in making cards for guys: NO PINK, NO GLITTER. Lol. Although, I do admit that I’ve made cards with pink on it for guys and they seemed to like it ok! 🙂

Today I used a combination of geometric elements and galaxy elements, as inspired by Jennifer!

Happy Birthday! YOU DA MAN!!

For both cards I used the Altenew Cube builder stencil and Altenew ink cubes as the geometric element. And then for the galaxy element I used a galaxy panel created with Altenew inks, distress inks, Perfect Pearls in mint, and Gansai Tambi watercolors in white for the splatters. I also colored the balloon to look like a galaxy for the fox card.

I show you the complete process in the video below, or watch it on YouTube:

Sweet birthday fox

Don’t you love a fox sitting atop a stack of cubes!? He has his very own galaxy balloon to match.

I created this galaxy balloon with colored pencils, smoothed out with gamsol, and added some white gel pen stars and highlights. This fox is a favorite of mine.

Did I mention that yesterday was my Dad’s birthday? That is who this card was for! It is probably the first card I made without a bear on it for him (bears are his favorite)!

This card is out of this world…

For this second card, I created the galaxy background using a variety of inks and watercolors. I was looking for a little more teal in the galaxy to match the cubes, but next time I know to add more teal!

I popped up these letters with fun foam to give it more dimension. I also offset the letters just a touch to get that shadow look.

Perfect pearls adds a touch of mica

I love how these cards turned out for my AECP projects. I hope you enjoyed them, too. I’m often asked what supplies I’ve used so I have a list below, using affiliate links when possible. When you purchase using these links I may receive a small commission at no additional cost to you. This helps me keep up with blog costs and continue to bring you fun projects. Thank you very much!

Thanks for stopping by!

Comments { 1 }
enjoy-the-simple-things2

Enjoy the Simple Things

Hello! Today I’m sharing a card that was inspired by the AECP class “Seasonal Scene Building.” This was a fun class and I especially loved building a scene using masking.

I have had this Versatile Vases stamp set for quite some time and this gave me the push I needed to create a card with 3 vases.

I first created a soft ink blended ombre background using the mountain mist ink from Altenew. Then I stamped the large round vase using a mini misti and Memento Rich Cocoa ink. After I cut a mask for that vase, I attached the mask before stamping the two smaller vases that appear like they are behind that round vase.

Then I stamped the stems of the flowers with the same mountain mist ink. I did not stamp the entire stem, as it would have been too long, so I only inked up a portion of each stem.

I stamped the Poppies with the Rose Quartz, Puffy Heart, and Purple Skies ink. This poppy stamp set was a collaboration with Ellen Hutson and it is beautiful!! The centers are stamped with Rich Cocoa ink. Then I die cut the poppies with the coordinating dies and added them to the card with 3M foam tape.

I added some Stardust Stickles glitter to the center of each flower. Then I stamped the sentiment with the Rich cocoa ink.

I’m often asked what products I used, so I have a list of supplies below using affiliate links when possible. If you purchase with these links, I may receive a small commission. This helps me keep up with blog costs and continue to bring you fun projects. Thank you very much!

Hope you enjoyed this “Simple Things” card. Enjoy the simple things.

Comments { 1 }
all-three-cards-2

Polka Dots Forever!

Hi there! Today I have a fun polka dot background created using the smallest stamp hidden amongst some gorgeous floral stamps! This stamp comes from the August 2019 Hedgehog Hollow Kit and I just knew it would make a great background.

Look at those rainbow inks!
The card created with the background

I am using some of my favorite inks today to create this rainbow of polka dots (who doesn’t love a rainbow of polka dots)?! And this card is made even better with a “Hey, Gorgeous” sentiment.

I created a short video to show you how I created a background THREE different ways that are all equally as fun! Watch it below or on YouTube:

This background is easy to make and really quick, too. Just change the direction of your stamp each time to get some variation.

Black Polka Dots!

If you look closely at the stamp set in the photo above, you can just pick out the polka dot stamps I am talking about. I put a couple of them on one side of my acrylic block, and another one on the other side; then I alternated between the two sides when I stamped it out.

I think this black polka dot card is my favorite one! I also think it would make a great background for a dog card (why do I think that)?!

Thank you. You are amazing.

The last polka dotted card is made with the beautiful embossing powders that came in last month’s kit. I alternated between 3 of them to create an ombre look for the background.

Funny story…I colored these flowers in a rainbow order because I thought it would be fun to use them for the rainbow background (first card). But sometimes my cards take on a mind of their own! So these florals ended up on the heat embossed background. I added some chunky glitter to the centers of these flowers to mimic some shine from the embossing powders. So pretty.

I’m often asked about the supplies I use on the cards I make, so I compiled a list using affiliate links when possible. If you make a purchase using these links, I may receive a small commission (at no additional cost to you). These help me to keep up with blog costs and continue to bring you fun projects. Thank you very much for your support!

I hope you are inspired to create some polka dot backgrounds! (or even create backgrounds using the smallest stamps in your stamp sets).

Which one is your favorite?
Comments { 0 }