Archive | Gift Ideas RSS feed for this section
thanks-with-cookies

Thanks Bunches card

This week has been a week of gratitude for me…and I never seem to have enough thank you cards! So today, I was inspired by the colors of Paper Smooches in their weekly challenge and I created a happy thank you card for a favorite person.

Paper Smooches logo sparks


thanks-bunches-1

I used some distress inks to create a colorful background for this very happy bunny! And see those carrots in the background? They are heat embossed with sparkly embossing powder. Here’s a better look:

thanks-bunches-2

Such a happy card. I love those Paper Smooches stamps!

thanks-with-cookies

All ready for gifting! Joining up with the Paper Smooches challenge here.
Also linking up with Simon Says Stamp Animal Antics challenge here.

Comments { 2 }
25 Days of Christmas Button

Christmas Tags (free printable)!

It’s less than a week until Christmas! Do you have all your gifts wrapped?

About this time of year I’m searching for some gift tags…and this year I MADE some to share with you! So head on over to my guest post for the 25 Days of Christmas and score some free printable tags.

free-printable-christmas-tags

  25 Days of Christmas Button

I know I still have so much to do! Here’s wishing you a stress-free, fun-filled Holiday Season!

Comments { 0 }
tied-up-with-tulle

How to sew Baby Burp Cloths

Have you heard?!? I am a grandma!! And when I found out I was going to be a grandma…the first thing I did was go shopping for FABRIC. These Designer Burp Cloths are so soft and beautiful. And every mom needs a stack of them.

stack-of-burp-cloths

I got all of these fabrics from JoAnn’s. They are thick cotten fabric on one side, and soft white chenille on the other. I whipped up a bunch of these in a single day.

Just look at how soft that chenille is.

the-soft-side-of-cloths

To make your own, just cut out the fabric into rectangles. I made mine about 14″ x 9″. Put right sides together, and sew them up, leaving about 3″ on one side to turn the fabrics right side out. Then iron, and hand stitch the hole closed.

These are just like sewing up the Baby Blanket I shared a while ago, only on a much smaller scale. They are machine washable in cold water…and you KNOW that’s important!

measure-it-out

_fanned-out-cloths

Ok, I just HAVE to share a picture of my new granddaughter:

baby-makaylah

Isn’t she adorable?!? I’m completely in love.

tied-up-with-tulle

Oh, and before I go…these make great baby shower gifts!

Comments { 2 }
baby-blanket-2

Exciting Announcement! And blanket sewing tutorial

I just can’t wait to tell you: I’m going to be a GRANDMA!! I know, I know…it’s pretty hard to believe. But, by the time this posts, I MAY already be a grandma. My daughter went into the hospital last night to be induced.

Oh. my. goodness. So I’ve never been a grandma before, but I imagine that grandmas SEW! So guess what I’ve been doing?

baby-blanket-on-stairs

Sewing! One of the first things I put together is a baby blanket…with a really SOFT minky inside. It’s a simple project to start with, so how could I resist?

Now, notice the PINK ribbon. It’s a girl! But I bought the aqua fabric before I knew 🙂 ….girls like aqua, too.
Here’s how to make one:

You will need —
1 1/4 yd. minky fabric
1 1/4 yd. cotton fabric
matching thread
sewing supplies

step-one-blanket

Put the soft fabric on your cutting mat right side up. Place the printed cotton fabric face DOWN on the minky. Trim the minky to the same size as the cotton fabric. Pin all the way around. Sew, leaving a 3 inch hole in order to turn it right side out.

pin-all-way-around

Turn it right side out by pulling the fabric through the unstitched portion:

turn-right-side-out-thru-hole

Iron the cotton side of the blanket, turning that edge under 1/4″ to match the stitched portion. Then top stitch, making sure to close up the hole.

top-stitch

Look how soft and awesome this blanket is:

finished-blanket

Don’t you think it will be perfect for newborn baby pictures?! Can’t wait!

baby-blanket-2

Comments { 2 }
the-last-chocolate-survival-kit

Chocolate Survival Kit

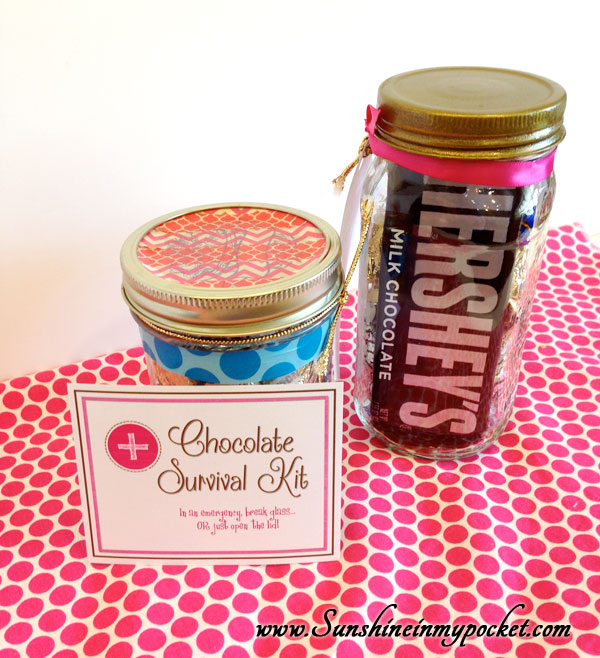
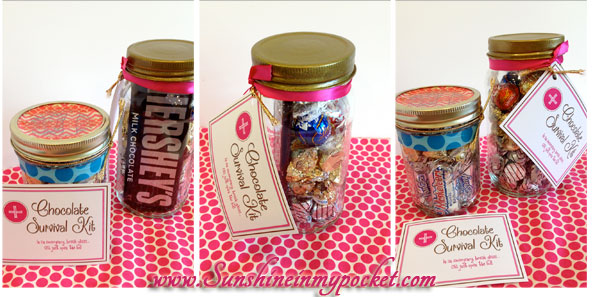
Last week I participated in a PinChat Live party about desserts in jars. It reminded me that I haven’t yet posted about one of my favorite “Survival Kits” in a jar! Here it is:

chocolate-survival-kit

This is the perfect little gift for anyone who is up against some tough trials. When I delivered one last night, my neighbor’s daughter said “EVERYONE needs one of these!” (I wish I could make one for everyone!)

I also made one for my husband, who was in a bicycle accident over the weekend. He loved it and keeps it close to his favorite chair to “help in the recuperation process.” He didn’t even mind that it was pink. 😉

I love that this is a great way to recycle those jars, too. This jar started out as a jar filled with peaches:

peaches-jar

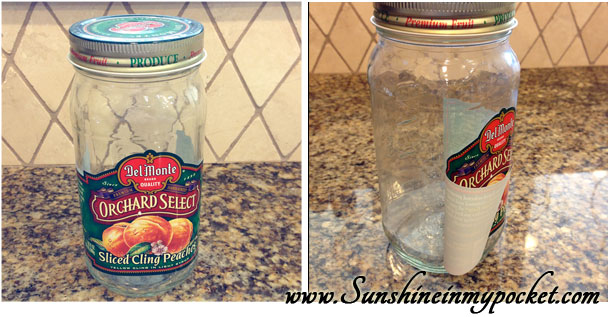
I just peeled off the label and ran it all through the dishwasher. If there is any sticky residue, a little citrus (or lemon) essential oil should take that right off.
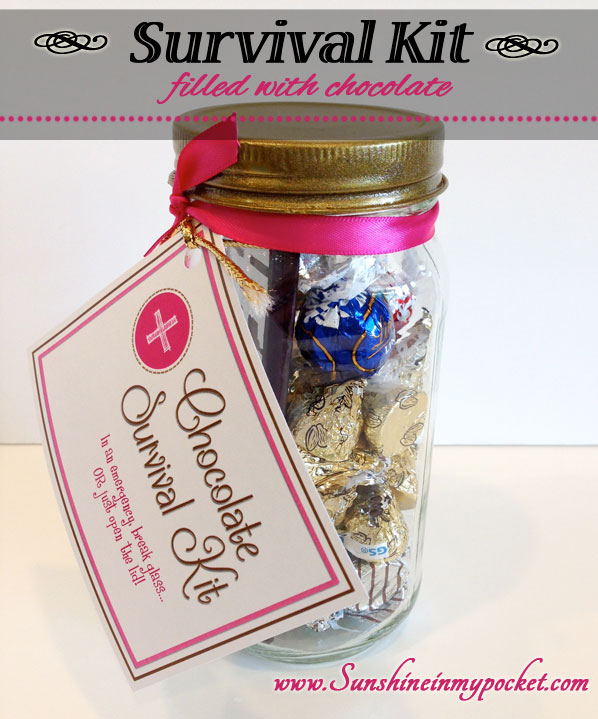
See that lid? Nothing a little gold spray paint can’t fix.

Then just fill it up with some of your favorite chocolate, tie a ribbon, attach the note and deliver. Everyone loves it.

two-survival-kits

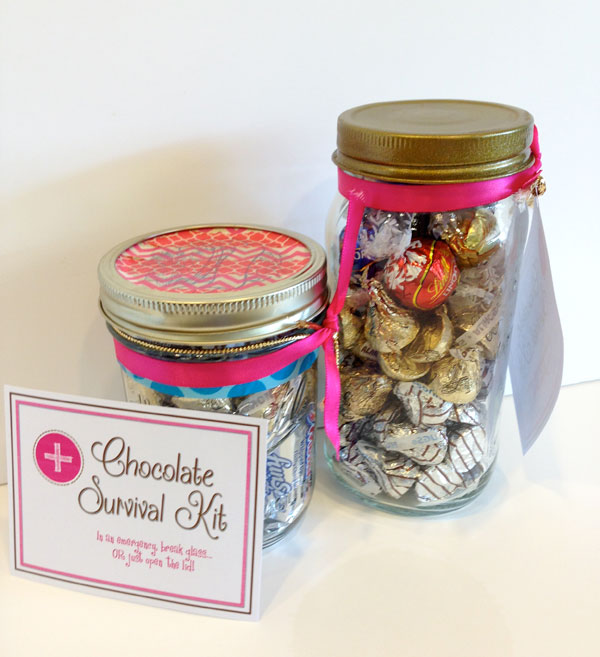
A mason jar works well, too! I like to use a little washi tape on the lid, but fabric looks great, too.

trio-of-kits

I’m thinking this little note would look good in blue, what do you think?

choose-pink-or-blue

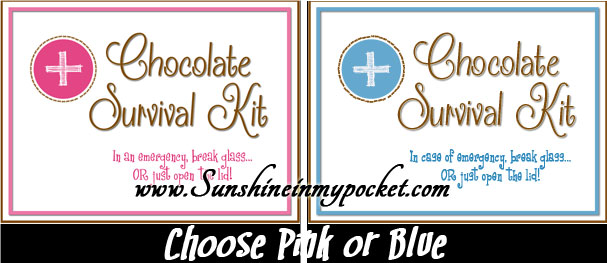
If you’d like the printable, like my page first here:

Then download the printable here:

8-13 chocolate survival kit pink

8-13 chocolate survival kit blue

Before I go, I just want to thank my neighbors the WHITINGS for bring me an entire giant container of chocolate…and they didn’t even know that it was just what I needed! 🙂 (You guys are the best!)

So you see, you never know who just might need a survival kit filled with chocolate. If you do give out a kit or two, please let me know. I’d love to hear!

the-last-chocolate-survival-kit

Comments { 0 }