About KariV

Author Archive | KariV
wish-you-were-here-card

Coloring Hedgehogs with Watercolor Pencils

Hello! Today I am showcasing some products from the Hedgehog Hollow August 2018 box…and showing you just how easy it is to use those watercolor pencils from Marvy Uchida!

I found that watercolor paper works the best for these pencils, and you must use a very light hand when applying the color. If you just put a little color on at a time, you can build up the color slowly and you won’t get those annoying pencil marks that still show when you add water! *This is important!

Affiliate links used when possible. When you purchase through these links I receive a small commission that helps pay for blog costs. Thank you for supporting my blog!

I have a video to show you the techniques and how easy they are to use, once you have a few TIPS! Watch it here or on YouTube:

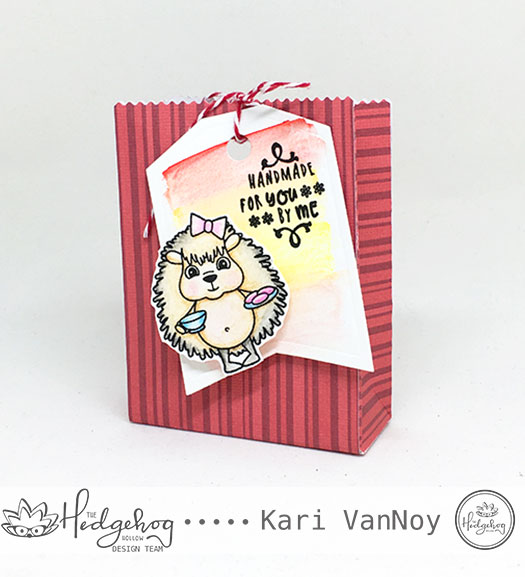
Here’s the tags I made using a wash of watercolor (from the pencils) and a hedgehog colored up with the watercolor pencils. It’s very easy to color them lightly, then keep adding color until you are happy with it. I used my favorite medium size Nuvo water brush to spread the pencil watercolor and I found it worked the best for me.

handmade-for-you-tags

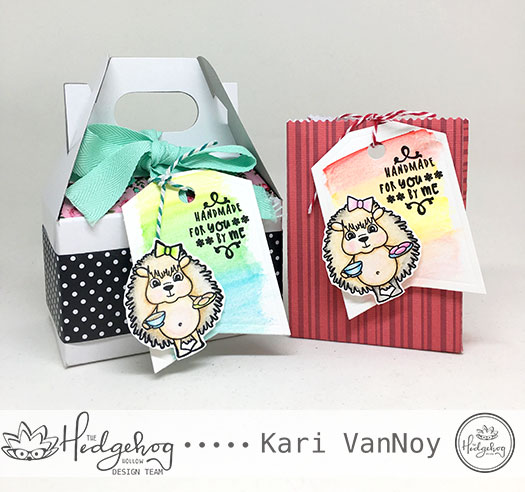
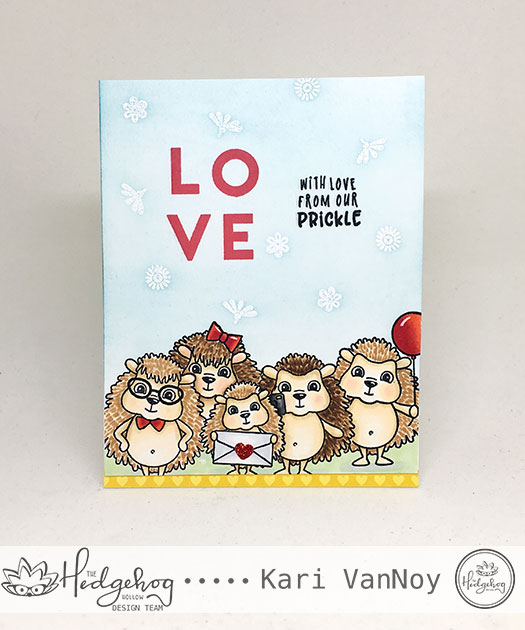
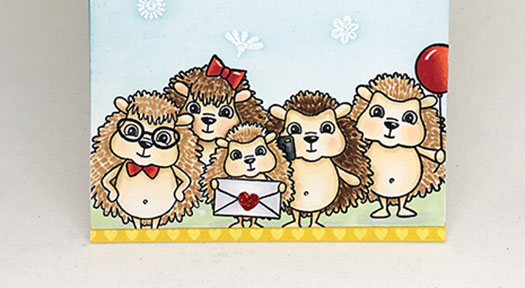
The sentiment says “Handmade for you by me.” When I looked at photos of real hedgehogs, many of them had darker quills at the end. That is why I added a layer of black around the edges of the quills on these hedgehogs. Those cute hedgehog stamps come in the August box, and they are from La La Land Crafts! This is a new company to me and I’m really enjoying their stamps!

handmade-red-bag-hedgie

blue-tag-hedgie

You can see that I colored up these hedgehogs with a light hand. After I created these tags, I decided to move onto a watercolored card using the same pencils.

Notice the darker colors on the hedgehog below…you can keep adding color once the paper is DRY. This is another important tip…wait for the paper to be completely dry or you will get dark spots on your image that are almost impossible to blend.

wish-you-were-here-card

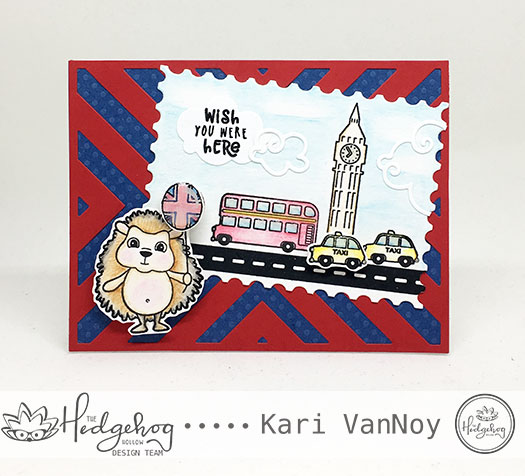
How cute is that traveling hedgehog? He’s in London! I added the British Flag to his balloon…and covered it in glossy accents. It did dry clear…here the balloon looks a little cloudy, I was too impatient to wait for it to dry fully!

I did add a bit of America to this card, too. Can you spot what it is?

Ok, I’ll tell you: the taxis in London are not normally Yellow! Nope, that’s an American coloring choice! They are normally black in London, I believe. Although I’ve never been to London. Have you?

I colored up Big Ben with a light tan and it’s not really coming across in this photo…but in real life it looks tan! I do like the watercolor painterly look of this “postcard.”

I hope you enjoyed these projects today and got inspired to try your watercolor pencils. It really is a fun and easy way to add color to your projects. Thanks for stopping by!

Comments { 2 }
yippee-fairies-with-paintbrushes

The Little Helpers

Hello! Today was back to school for many here in Arizona. Since I don’t have any littles at home anymore, I was inspired to create a card for “Back to Creating!”

Affiliate links used when possible. When you purchase something using these links I receive a small commission, which help to pay for my blog so I can keep bringing you fun projects. Thank you for your support! I truly appreciate it.

Here I use some of my very favorite recent sets to create this fun scene:

yippee-fairies-with-paintbrushes

I used distress Oxides in the background and created some big water drops. I don’t usually add those water drops, but I felt like this card called for it!

The little fairies are from The Greeting Farm, and the paintbrushes are from Waffle Flower. Aren’t they the cutest? I do not have the dies for those fairies, so I just fussy cut them.  I colored all the images with Copic markers. The Yippee sentiment can be found here.

Comments { 0 }
close-up-of-hedgehogs

With Love Hedgehogs

Hello! Today I have my first project to share using the August 2018 Hedgehog Hollow subscription box. This box is full of cute hedgehogs and a Global Love set that I know you will just love. If you haven’t seen what’s included in this box, see my unboxing video below.

But first, here is my card where I created a one-layer masked Hedgehog grouping all wanting to say hello!

with-love-from-our-prickle

Aren’t they cute!?! At first I wanted to make this card because of Alexandra, the creator of the Hedgehog Hollow boxes…she has 2 girls and they call themselves “the Prickle” (of hedgehogs). But I needed FIVE hedgehogs to make my card grouping look correct…so one of them could be gramps or grandma! Lol. (What do you say, Alexandra?!)

Just look at these cuties:

close-up-of-hedgehogs

I colored them up using Copics in E50, E31, E27 and added R20 for the rosy cheeks! They are such a happy family. I colored up the envelope using some Cool Greys and added a glittery heart. The yellow heart paper accent is from last month’s Sunny Studio box…I love those papers!

I used the small flower images in the background, heat embossed in white so as to resist the background blue Distress Ink color.

I hope you enjoyed this project today! Below is the unboxing video…take a look here or on YouTube:

And for more information about these boxes, or to order your very own, go to The Hedgehog Hollow shop and check them out! I love these boxes and always look forward to seeing what company products she has in store for us!

Comments { 0 }
sunshine-for-a-very-special-dentist-v2

August Release with Our Daily Bread Designs

Hello and welcome to a preview of some of the August new release items for Our Daily Bread Designs! This release is a beautiful assortment of get well wishes and products to show gratitude for our dentists, nurses, doctors, and such. I have a few projects to share highlighting some of the new release!

First is this unique set called King of My Heart. It is a stamp AND die set, with lots of great sentiments.

sunshine-nursing-is-a-work-of-heart

The die is that unique heartbeat…and here I cut it with black paper, and then dry embossed it multiple times over the white background. The stethoscope is a separate die, which I cut and colored with copics. If you know a nurse or doctor, this set is perfect!

Next is another great die…it’s called Bandages, and there are a variety of sizes and shapes to choose from. I am showing just one of the bandages, which I cut out of white paper and then colored with Copics in E30, E31, and E33. I added a glitter heart that I cut with the King Of My Heart die. I used the Lever Card die (from a previous release) to make a fun, interactive card for this one.

sunshine-get-well-bandage-lever-card

and here’s the inside:

sunshine-get-well-bandage-inside

The Get Well Soon sentiment is just the right size!

My last card today showcases the new Happy Smiles Stamp/Die duo set and Doctor Bag die. I am absolutely in love with these sets! Just look how cute that little smiling tooth is holding his toothbrush!!

sunshine-for-a-very-special-dentist-v2

I used the Sunburst Background die to create a stencil on the background with Distress Oxide ink in Salty Ocean. I used Copics on the tooth and to add some shadowing on the Doctor’s Bag.

For more inspiration and to see the whole release, be sure to visit the Our Daily Bread Design New Release blog post here and take a look at all the designer’s projects!

I hope you enjoyed a small look at some of these new products. I’ll have more to share next week!

Comments { 0 }
sunshine-mermaid-july

Be a Mermaid

sunshine-mermaid-july

Hello! Today I’m stopping by to share a card I created using the new Ellen Hutson Mermaid stamp set! I absolutely fell in love with the sentiments and that mermaid tail.

Here I heat embossed them with silver embossing powder on Bristol smooth paper. Then I colored them all up using Zig Clean Color Real Brush Markers. These watercolor markers are so fun to use and so easy to blend.

I used the MFT cloud stencil for the sky, and the Lawn Fawn waves dies for the ocean. That sand embossing powder is from Emerald Creek and is one of my new favorite embossing powders!! It has so much real texture. Love it.

I know I will have many, many more cards to make with this Mermaid set! Thanks so much for stopping by.

Comments { 0 }