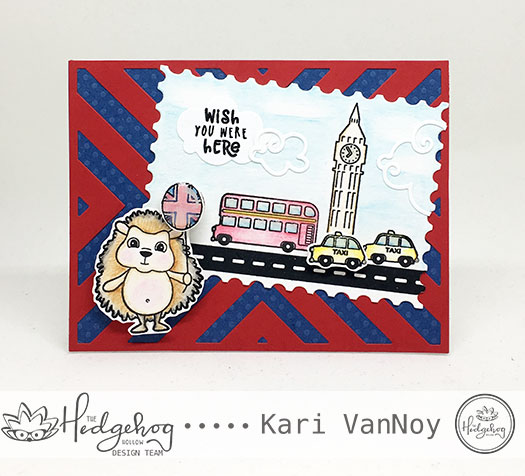
Hello! Today I have a card to share that I like to call “Balloon Over London” featuring the August Hedgehog Hollow subscription box.
I just couldn’t resist the idea of this little hedgehog floating over the London skyline at dusk. He’s on an ACTION WOBBLE (that came in the subscription box), so he moves and wobbles and it’s so cute!
I used Distress Oxides to ink up the background in the colors Fossilized Amber, Broken China, Faded Jeans, and Seedless Preserves.
I colored the images using the Marvy Watercolor pencils that came in the box, and then added detail and dots with markers and a white gel pen. Here’s a close up:
Isn’t he cute?! I love this month’s box.
If you haven’t heard…there’s a sneak peek to next month’s Hedgehog Hollow box and it’s going to be featuring Catherine Pooler!! (So exciting!) If you haven’t tried Catherine Pooler inks, you are in for a treat…because one of her NEW ink colors is going to be included in the box! We will also be seeing some beautiful floral stamps and I just can’t wait to ink those up.
That’s right. The Unicorn Card Class for you and your Little (ages 5 and up) is coming up soon! And I can’t wait…
I have so much fun in store with lots of unicorns and some fun watercolor, colored pencil, and glitter pen techniques! And now, by popular demand…this class is coming true..
HERE’S A SAMPLE OF TWO UNICORN CARDS…
…that will be fun and easy for you and your Little one to color and assemble! Unicorns are so
popular right now and your small guest will enjoy spending time with you as they design their unicorn flower wreath, watercolor up a girl with her unicorn, and add glittery touches!
That’s right…there’s two more unicorn cards and they are a SURPRISE! I’ll show you a sneak peek in a few days, but know that they are beautiful and fun and filled with RAINBOWS AND UNICORNS!
at the Red Mountain Multigenerational Center
7550 E. Adobe Road
Mesa, AZ 85207-4702
I had so many requests to hold this class on a Saturday so moms could come and bring one of their favorite girls…and leave Dad home with the rest of the kids! So that’s what I scheduled.
What will you need to bring? Just liquid adhesive. I will have everything else you need!
Here’s two of my favorite liquid adhesives for cardmaking: here and here
I will have a few of the Lawn Fawn glue tubes available for purchase at class (they are $4.50 each). If you want one, email me to reserve one now!
(P.S. I know some of you have already signed up for class…thank you! You will receive a reminder email just before the class is here.)
Hello! Today I’m showcasing a super fun new stamp set from Our Daily Bread Designs called Happy Smiles Stamp/Die duo.
This is a stamp set with the cutest teeth and the DIES to cut out those images! It’s also filled with lots of fun sentiments for Dentists, Dental Hygienists, Orthodontists, or anyone in the dental industry. I also thought these would be cute cards for kids who have lost a tooth!
Here’s my three cards I have to share today:
Aren’t these teeth so cute?! I love that they are holding toothbrushes with toothpaste on them! The rectangle dies I used on this card can be found here and here.
This next card is a BRACES card! I love these braces…I used four sets to create this card (they come in a set of two teeth with braces holding hands). I though the blue thread was reminiscent of floss! Lol.
The sentiment is perfect for this one: “Thanks for giving me so much to smile about.”
For this last one I felt compelled to color up different colors of toothbrushes! I used the Pierced Rectangles dies to create an interesting embossed background (this is one of my most used dies in my stash).
Hello! Today I am showcasing some products from the Hedgehog Hollow August 2018 box…and showing you just how easy it is to use those watercolor pencils from Marvy Uchida!
I found that watercolor paper works the best for these pencils, and you must use a very light hand when applying the color. If you just put a little color on at a time, you can build up the color slowly and you won’t get those annoying pencil marks that still show when you add water! *This is important!
Affiliate links used when possible. When you purchase through these links I receive a small commission that helps pay for blog costs. Thank you for supporting my blog!
I have a video to show you the techniques and how easy they are to use, once you have a few TIPS! Watch it here or on YouTube:
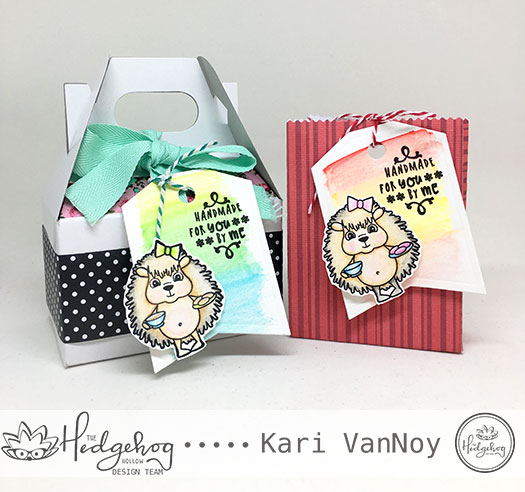
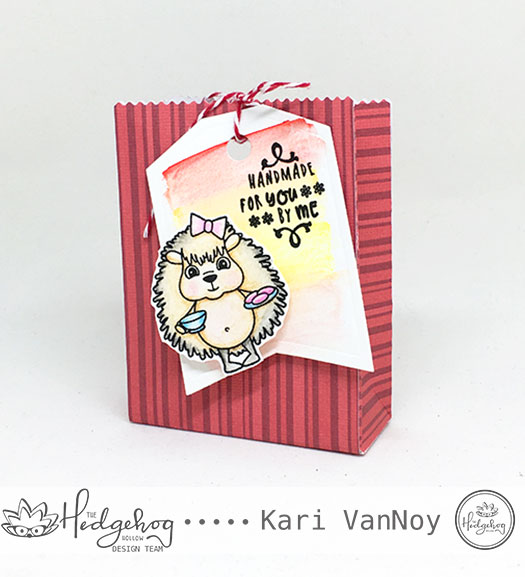
Here’s the tags I made using a wash of watercolor (from the pencils) and a hedgehog colored up with the watercolor pencils. It’s very easy to color them lightly, then keep adding color until you are happy with it. I used my favorite medium size Nuvo water brush to spread the pencil watercolor and I found it worked the best for me.
The sentiment says “Handmade for you by me.” When I looked at photos of real hedgehogs, many of them had darker quills at the end. That is why I added a layer of black around the edges of the quills on these hedgehogs. Those cute hedgehog stamps come in the August box, and they are from La La Land Crafts! This is a new company to me and I’m really enjoying their stamps!
You can see that I colored up these hedgehogs with a light hand. After I created these tags, I decided to move onto a watercolored card using the same pencils.
Notice the darker colors on the hedgehog below…you can keep adding color once the paper is DRY. This is another important tip…wait for the paper to be completely dry or you will get dark spots on your image that are almost impossible to blend.
How cute is that traveling hedgehog? He’s in London! I added the British Flag to his balloon…and covered it in glossy accents. It did dry clear…here the balloon looks a little cloudy, I was too impatient to wait for it to dry fully!
I did add a bit of America to this card, too. Can you spot what it is?
Ok, I’ll tell you: the taxis in London are not normally Yellow! Nope, that’s an American coloring choice! They are normally black in London, I believe. Although I’ve never been to London. Have you?
I colored up Big Ben with a light tan and it’s not really coming across in this photo…but in real life it looks tan! I do like the watercolor painterly look of this “postcard.”
I hope you enjoyed these projects today and got inspired to try your watercolor pencils. It really is a fun and easy way to add color to your projects. Thanks for stopping by!
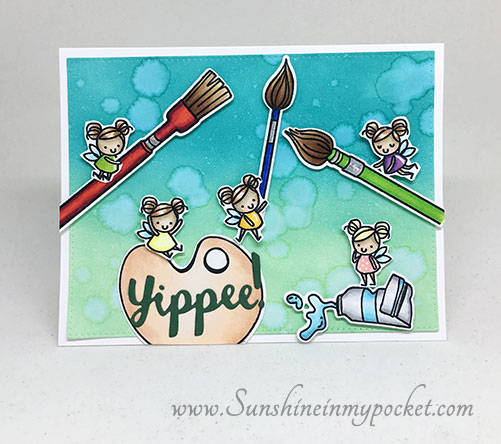
Hello! Today was back to school for many here in Arizona. Since I don’t have any littles at home anymore, I was inspired to create a card for “Back to Creating!”
Affiliate links used when possible. When you purchase something using these links I receive a small commission, which help to pay for my blog so I can keep bringing you fun projects. Thank you for your support! I truly appreciate it.
Here I use some of my very favorite recent sets to create this fun scene:
I used distress Oxides in the background and created some big water drops. I don’t usually add those water drops, but I felt like this card called for it!
The little fairies are from The Greeting Farm, and the paintbrushes are from Waffle Flower. Aren’t they the cutest? I do not have the dies for those fairies, so I just fussy cut them. I colored all the images with Copic markers. The Yippee sentiment can be found here.
Hi I'm Kari. I'm a creator, a card maker, and a day maker! I am Lucky in love to a supportive husband, blessed to raise 3 kids (all moved away now!), and happy to be watched over by 2 dogs.
I originally started this blog to remind me to be happy amid adversity, and I hope it inspires you, too!