Tag Archives | The Hedgehog Hollow stamps
SUNSHINE-snowglobe-card-1

Do You Want to Build a Snow Globe?

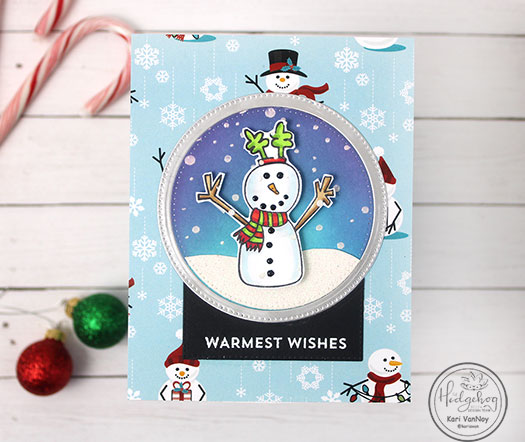
Hello! Today I have a Snow Globe card to share, created with basic shape dies. This cute snowman stamp is from the Hedgehog Hollow November Kit and it’s perfect for this holiday card!

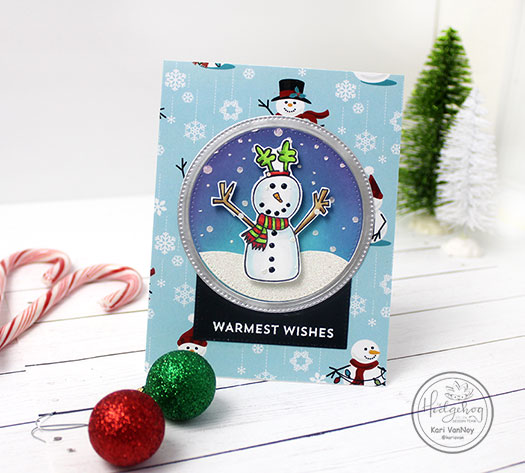
I used nesting Circle dies for the Snow Globe frame, and a rectangle die to create the Snow Globe and base. The background of the Snow Globe is cut with a circle die to fit right inside.

I show you just how to create this Snow Globe and put the entire card together below, or watch it on YouTube:

I added the “snow” with Metallix White Pearl gel. Then for finishing touches, I added Black Nuvo drops to his eyes, mouth, and coal buttons. A little glitter pen on his scarf and antlers give a little extra sparkle!

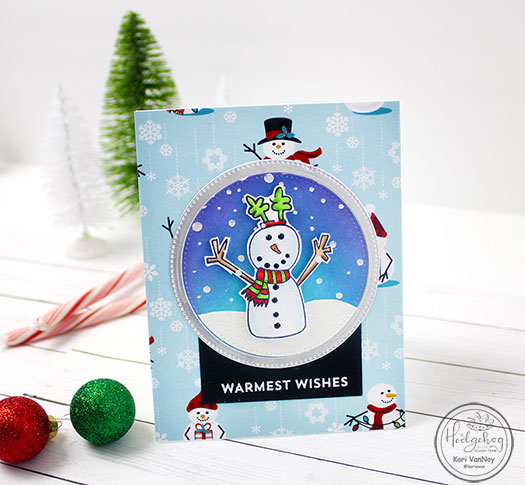
The background paper is some I had in my Christmas stash, and I thought it was perfect for this snowman card. You can use any holiday paper you have, or create your own inked background.

I’m often asked what supplies I use to make my cards and projects, so I’ve put together a list using affiliate links when possible. If you make a purchase with these links I may receive a small commission. These help me to keep up with blog costs and continue bringing you fun projects. Thank you so much for your support!

Thanks for stopping by today! I hope you enjoyed this Snow Globe project today. See you next time!

Comments { 0 }
dad-man-of-the-hour

For the Men in our Lives

Hello again! I’m here to share some fun cards for Dad and Grandpa! These are made with the June 2018 Hedgehog Hollow box (which I believe are now sold out!)

Affiliate links are used, when possible, at no additional cost to you. When you purchase items using these links I get a small commission that helps me to pay for my blog costs, thank you!

I couldn’t resist using the tissue paper from the box….yes: the tissue paper that all the goodies were wrapped up in! It was the cutest mustache tissue wrap and I just knew it needed to be the card panel background for my grandfather. So, I turned it into this card:

grandfather-mustasche-card-1

I used Stick It to adhere to the tissue paper and then I smoothed it out with my Teflon bone folder and was able to get all the wrinkles out! That made it so easy to attach to my 110# card base.

My grandfather would really get a kick out of this. But let me explain that mustache in the bottom corner…it is on an ACTION WOBBLE so it moves!! He would laugh and laugh because he really liked the “Groucho Marx” look and I can just see him wobbling that mustache for hours. This is for you, Grandpa!

My second card features the awesome background stamp that looks like a metal tool box…I thought it would look stunning on a kraft background heat embossed with silver.

dad-man-of-the-hour

The silver embossing is just the thing to make it shine! I cut the large “dad” die cut out of blue glitter paper (blue is, in fact, my Dad’s favorite color!) I know that Father’s Day has already passed, but this could make a fun Birthday card or Congratulations card. And the black adds just another masculine touch.

I have really enjoyed making some cards for the men in my life. I hope you have enjoyed these projects, too. And I’m super excited to share the next ideas I have for this box…that’s coming up next week! Until then, I hope you get some crafty time in. šŸ˜‰

To see what boxes are still available, visit the Hedgehog Hollow page.

Comments { 1 }
cherry-tall-card-with-mouse-close-up

Creating a “Disappearing Die” Background

Hello! Today I have fun technique to share with you, using a small stamp to create a background for a “disappearing die” card! I used the May 2018 Hedgehog Hollow subscription box products, which include some great stamps & a beautiful “Sweet” die! I love this box and I cannot stop creating with these products. (You can see everything included and more information about this box here)

Affiliate links used in this post where possible, at no additional cost to you. Thank you for your support of my blog!

This is theĀ FIRST card I made with this technique:

cherry-sweet-original

See how that die sort of disappears? But in real life you can read that it says “SWEET!” Here’s a close up:

cherry-sweet-original-close-up

Today I haveĀ  a video to share with you, making a variation of this card. I wanted to see if I could fit that sweet die on a vertical card…and YES! You can!

cherry-tall-card-with-mouse

I have a video on just how to make this card here, including a short clip on how I colored those sweet cherries! Watch it below or on YouTube:

I love how you can create this card using a small stamp!

I stamped those cherries first, as close together as I could without using a mask. Then I colored them up using copic markers in R89, R27, and R14. For the leaves I used YG17 and YG05. I added some blue ink around the edges using “Daydreaming” ink from Waffle Flower Crafts using a round ink blender. I added the sentiment from the “Sweet Sentiments” set from The Hedgehog Hollow using my Misti and my favorite black ink for sentiments. Then I cut out the Sweet die from the card panel and added it back in over black craft foam. I added all the inside pieces as well…that’s what creates the “Disappearing die” effect! I popped up that cute mouse from this Waffle Flower set using Scotch 3M Foam Tape.

cherry-tall-card-with-mouse-close-up

I hope you enjoyed this project today! For more information about the subscription boxes, visit The Hedgehog Hollow website here. (I am really enjoying these boxes!) And, if you didn’t know, Alexandra is the face behind the Hedgehog Hollow and she designed this “Sweet” die and “Sweet Sentiments” set as her VERY FIRST ones! So exciting! I am glad to have them and also to know that you can create a card either vertically or horizontally and that die will fit! Love it.

Comments { 0 }
mice-cloudy-2

Chocolate Covered Everything!

Hello and good day to you! Today I have a delicious chocolatey post for you…well, it’s a CARD so please don’t try to eat this one. Lol.

I’m using supplies from the May Hedgehog Hollow kit, which included these beautiful Waffle Flower images and a die designed from the Hedgehog Hollow creator herself! This is a card that has been in my head ever since I was out of town and as soon as I got home, I created it right away.

[Affiliate links are used where possible at no additional cost to you, thank you for your love for my site!]

I added a “Chocolate” drizzle to all the sweets and I just love how it turned out:

chocolate-covered-sweet-cream

That “chocolate drizzle” is so fun and shiny that it was difficult to capture it in a photo! But look at that shine! I even added the “chocolate” to the Sweet die cut! (see below for what I used to “make” that chocolate). The cute striped paper is from the March HH subscription box, which is sold out.

Now if you brought me all these treats I might just declare “Well, aren’t you a sweet thing?!” That’s the reason I decided to use this sentiment.

If you haven’t seen the contents of this box, click here to view my unboxing! It’s a fantastic subscription box and I love each of them I’ve received so far!! And here’s the first card I made with the supplies in the box, too!

Another card that has been waiting for creation is this shaker card:

mice-cloudy-with-a-chance-of-sprinkles

This entire card is a shaker! I embossed some clouds in the background then colored up those cute mice that are included in the box, and added those Pretty Pink Posh sequins from the box! This shaker card really has a fun sound when you shake it!

The sentiment is also included in the box, it’s the new sentiment set also designed by Alexandra! I just love all the options she gives for sentiments! I stamped the first portion in black ink, then the “sprinkles” I stamped using Distress Oxide raspberry ink. The background for the little mice was inked using Distress Oxide ink as well in Twisted Citron and Lucky Clover.

mice-cloudy-2

Such fun! I hope your day is full of sprinkles, too. See you next time!

For more information about the Hedgehog Hollow subscription boxes, visit the website here. I love that you can buy just one box if you want, or sign up for the subscription so you don’t miss a thing.

Oh, and if you were looking for how I made the “chocolate drizzle”….I used this pen:


Comments { 0 }