Tag Archives | paper crafting
sunshine-brick-neighborhood-diorama

A Look back at the October Release with Our Daily Bread Designs

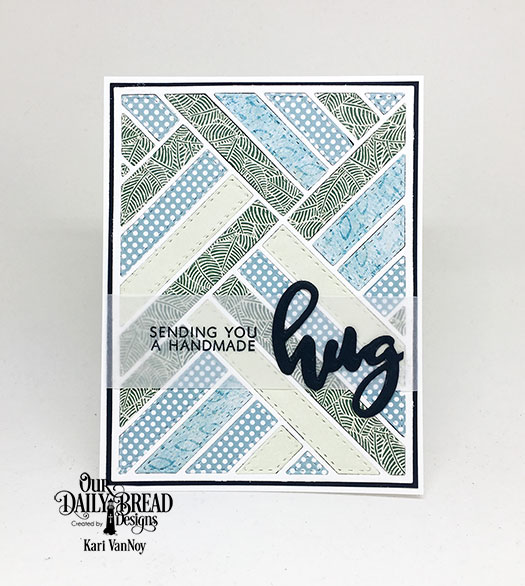
Hello! I hope you’ve had a chance to see the entire October Release from Our Daily Bread Designs, because it is fabulous! Today I’m sharing two cards using some of the products.

First I had to create a card front using the beautiful Bethlehem dies set.

sunshine-bethlehem-A2-card

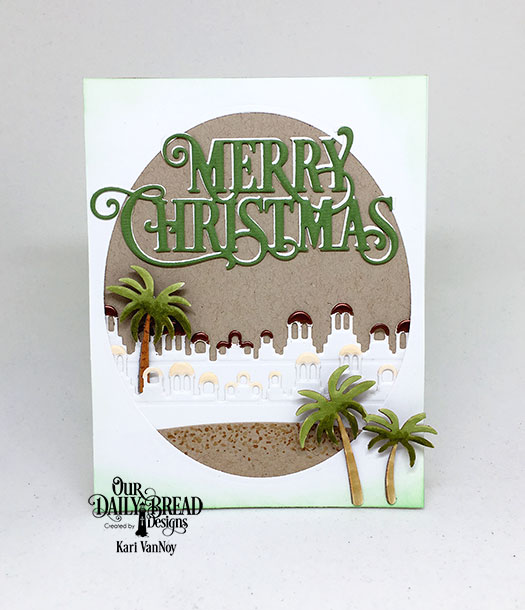
I used the Pierced Ovals dies to create the frame and inked it up slightly with Cracked Pistachio Distress Oxide ink. I heat embossed the back layer of the building tops with copper embossing powder before adding them to the kraft background. The trees are colored with copics. Isn’t this a beautiful scene?

To finish it all off, I added the Merry Christmas Caps die at the top.

Here’s a look at the inside of the card, where I stamped a sentiment from the Christmas Card Scriptures Stamp set:

sunshine-bethlehem-A2-inside

This sentiment is such a beautiful way to say Merry Christmas!

My next project features the Diorama with Layers set. This is another new favorite of mine and this time I’ve paired the Brick Gate Border with the Neighborhood Border die.

sunshine-brick-neighborhood-diorama

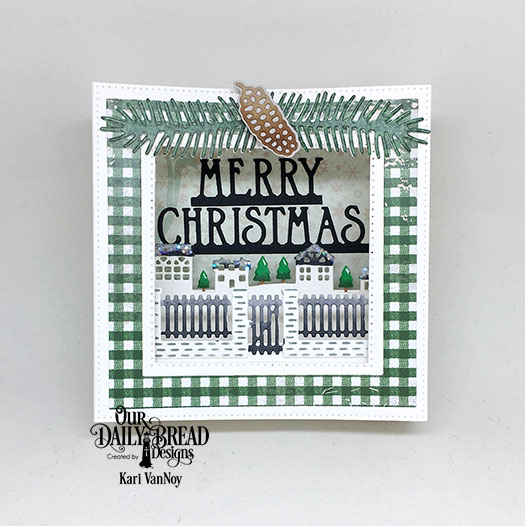
Look at that sweet little neighborhood! I’ve added some chunky glitter to the rooftops to add a snowy feeling. The paper is from this set. The Pinecones Dies and Pine Branches Dies are must-haves, in my opinion!

The Brick Gate Border offers a way to ink up those bricks through the die when you leave it on the die cut piece! (That’s how I got all those individual grey bricks).

I hope you enjoyed these projects today and got inspired.

For more inspiration using the October Release and to see the other designers projects, be sure to visit the ODBD Blog here.

Comments { 0 }
sunshine-faith-in-god-quilting-squares-bw

Quilting on cards

Hello! Today I’m sharing the new July release from Our Daily Bread Designs….and it’s all about quilting! Are you a quilter? Well, you CAN be a “card quilter” with these new designs!

The first new product I’m sharing is the Quilted Background Die. It is a coverplate die, so it will fill the entire card (size A2). Let me show you a few quilts I designed:

sunshine-sending-you-a-handmade-hug

On this one I also used the new Hugs Stamp & Die Duo. The die is actually the plural word “hugs,” but you can cut off the “s” and create the singular word to go with this sentiment. I really like the idea of sending a handmade hug! (It reminded me of a quilt…that’s like a hug in itself!) By the way, one more thing I LOVE about the new release stamp/die duos: they are CLEAR STAMPS!! Yay! That makes them so easy to line up and use with your stamp positioner, in my humble opinion.

For the next one I used Distress Inks to create a Color Block quilt. The new Walk by Faith Stamp/Die Duo set is also a beautiful set, and I used that for the sentiment.

sunshine-color-block-faith-makes-all-things-possible

Isn’t the needle and thread so cute?! It’s from the new Sewing Set Dies and I love them! They work so well with this theme of quilting.

Now, for the last one I have to share with you, I first have to show you the dies I was working with…because you might NOT BELIEVE that they can create such amazingness! Here’s the dies, called Quilted Window Squares:

quilted-window-squares-image

It looks like an unassuming circle die (with some score lines) and a square die. But if you put them together just right, you can create a beautiful quilt like this:

sunshine-faith-in-god-quilting-squares-bw

Isn’t that awesome!?! Such little dies can create such a beautiful quilt. I used the pierced rectangles dies to emboss over the top of the quilt (to look like quilting!)

I hope you enjoyed a look at the new products for July and some fun quilted cards! For more information and inspiration for this month, visit the Our Daily Bread Designs website here.


Comments { 0 }
7-14-lincoln-and-carter-cards

Zoo and Pirates!

My dear nephews (my brother’s boys) both have birthdays in July! So I had some fun with making their cards this year.

Lincoln turned 3, and I just knew my Paper Smooches zoo stamps (and a few others) would make a perfect card for him!

7-14-lincoln-zoo-card

His (current) favorite color is green, so I added green chevron paper behind his die-cut name. This is such a happy card!

His brother, Carter, turned 5 and so I put together a fun pirate card for him!

7-14-carter-pirate-card

I just love those fish jumping over the pirate ship into the glittery water! So fun!

7-14-lincoln-and-carter-cards

I am entering this into the Paper Smooches anything goes challenge.

anything-goes !papersmooches-banner

I hope you enjoyed these cards as much as my nephews did! ๐Ÿ™‚

Supplies Used
Stamps: Paper Smooches Zoo Crew, Paper Smooches Forest Whimsy, Paper Smooches Surf & Turf; My Favorite Things It’s A Pirates Life
Dies: Lawn Fawn Cole’s ABCs, Pretty Pink Posh Stitched Borders 1
Color: Distress Markersย 
Comments { 0 }
dude-2

Dude, it’s your birthday card

My brother’s birthday required me to veer away from all girly-ness and focus on a making a more masculine card. This is good practice for me! I pulled out my Paper Smooches stamps and found just the right pup from a Christmas stamp set!

dude-1

I love this little dog and bird and I thought it would be fun to create a distress background on just a small portion of the card. So here’s the sequence: Stamp, mask, tape, distress, remove, color, emboss, adhere, VOILA!

I used inktense pencils on the little characters and a Kelly Purkey stamp set for the “Dude!”

inside

I am going to enter this into the Paper Smooches Anything Goes contest.

!papersmooches-banner

dude-2

So what do you think…more masculine card? I hope so. My brother liked it (right, Jon?!) Ha!

Well, I’m off to make a few more cards! See you next time.

Supplies Used:
Stamps: Paper Smooches “Santa Paws”; Kelly Purkey “Dude”; Simon Says Stamp “Happy”
Distress Inks: Peacock Feathers, Forest Moss, Mowed Lawn
Colored Pencils: Derwent Inktense Pencils
Paper: Neenah Solar White
Embossing Powder: White, Snow
Comments { 3 }
laffy-taffy-one-side-wet-wipes-other-side

Double-Sided Paper Pocket (tutorial)

I am excited to (finally) bring this post to you. Girls Camp started this week, which means it is safe to start posting some of my projects and handouts I’ve been working on for the girls! ๐Ÿ™‚ So get ready for a week of girly crafts and projects…here we go!

The colors for camp this year are pink and grey, with chevrons. When I was asked to help make some cute handouts and favors, I jumped at the chance (this is right up my alley)!

The first handout I thought of were these double-sided paper pockets. I found the PERFECT paper that had pink chevrons on one side, and polka dots on the other side.

double-sided-paper-pockets

You might recognize these little darlings, I used them for my Backyard Picnic here! See, if you just change up the colors, you have an entirely different feel. They are the perfect size for Ghirardelli chocolates, but use your imagination for other items that can slip inside the pockets.

picnic-paper-pockets

laffy-taffy-one-side-wet-wipes-other-side

At my backyard picnic, I put Laffy Taffy candy on one side, and Wet Wipes (for the BBQ!!) on the other side. Perfect.

Wouldn’t these be adorable as a little “Thank You” for someone? For these little pockets, you need a 6×6″ sheet of paper, adhesive, and some ribbon. (For a larger sized pocket, I’ve seen them made with a full 12×12″ sheet of paper.)

Here’s a semi-quick (just under 4 minutes) video How-To:

Since it is July in Arizona, we decided to use Laffy Taffy for the Girls Camp pockets, instead of chocolate. I’m pretty sure that was a smart move. I hope the girls are enjoying camp…and laughing it up! Can’t wait to hear how they loved Girls Camp.

Leave me a comment and let me know if you have any other creative ideas for using these pockets. ๐Ÿ™‚

Comments { 0 }