Tag Archives | Distress Ink
floral-card-2

The Fastest Floral Card! [VIDEO]

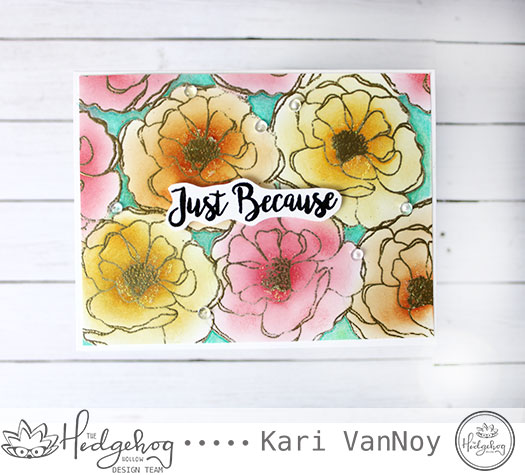
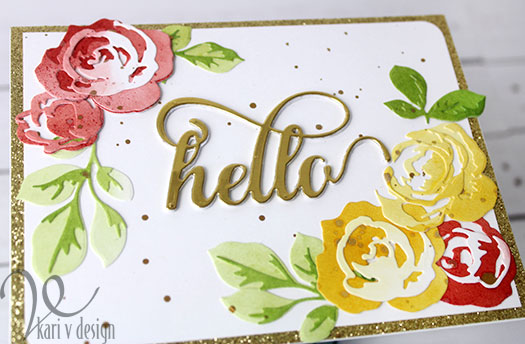
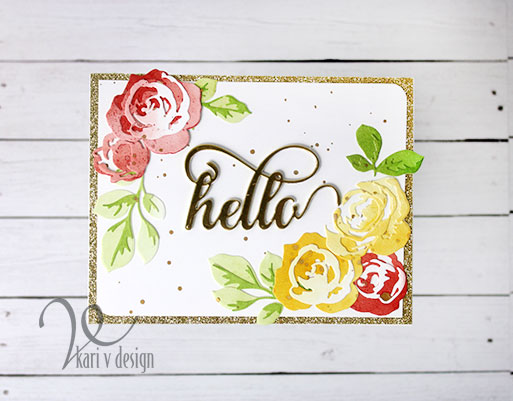
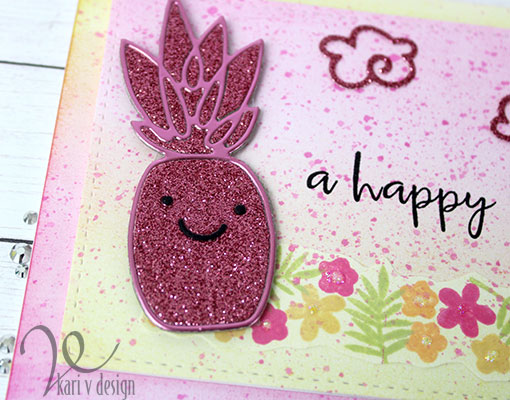
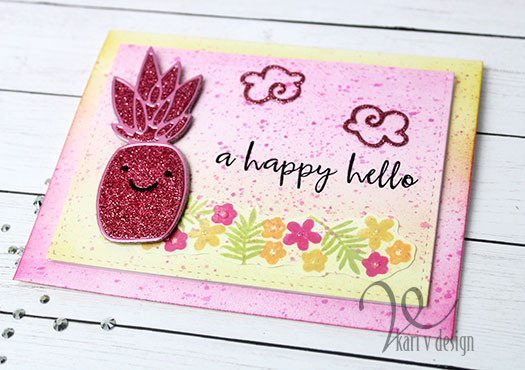
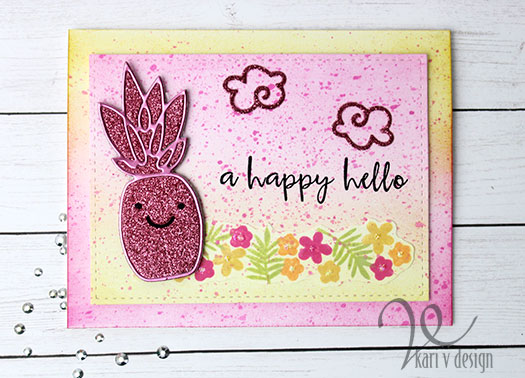
Hello! Today I have a card that is so fast, you might not believe me! I’m using a technique that I’ve used for years with great results.

Let’s be honest: as cardmakers sometimes we need a FAST card and we don’t want to create any masks. Well, if that sounds like you, you are going to love this technique!

Fill a card front FAST (no masking)

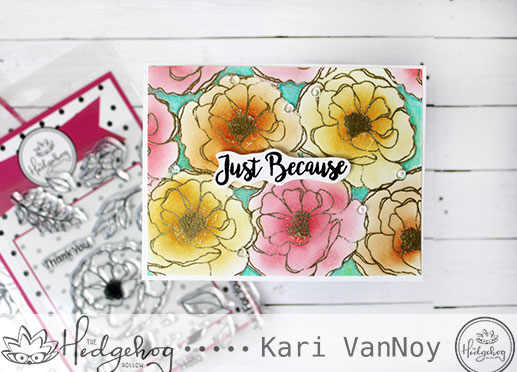
I took one flower stamp and filled the card front without any masking. It’s easy and I made a quick video to show you just how it’s done. Watch it below or on YouTube:

This card took me under 20 minutes to make (and for me that is FAST!) I love that you can change this floral card up with colors and sentiments.

Just Because

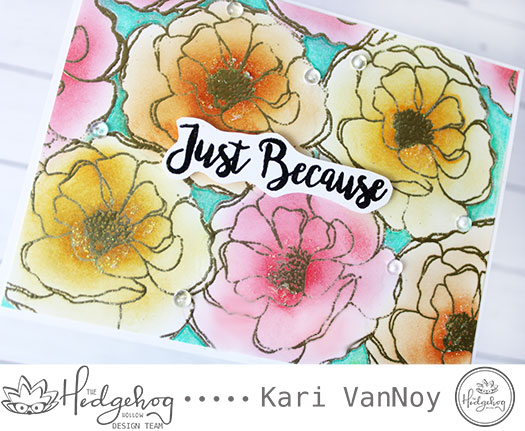
Keep this technique in your arsenal for when you need a quick card. To color up these florals I used inks and a finger dauber, making them darker in the center. I used only 1 colored pencil for the background. So easy.

I’m often asked what supplies I use on my projects, so I have a list below using affiliate links when possible. When you purchase with one of these links I may receive a small commission (at no additional cost to you). This helps me keep up with blog costs and continue bringing you fun projects. Thank you!

I hope you enjoyed this fast technique today. I’ll be back with more inspiration later!

Comments { 0 }
both-cards-2

Life Looks Beautiful on You

Hello! Today I have another card share for my Altenew Educators Certification Program. This time, I was inspired by Jennifer Rzasa in the Clean & Simple Boutique Cards class.

Clean & Simple definitely does not come easy for me, but Jennifer suggested adding a little something extra like foil or embossing powder. This gives the card a bit more flair and still remains clean & simple.

Here’s my take, (it is difficult to capture the shine of the gold in photos, so please keep scrolling for more pictures):

I just love the look of this stamp set (Build-A-Flower: Anemone)! I used a variety of purple inks to get this look. Since I don’t have my Altenew inks yet, I combined both Distress Ink and Distress Oxides to get this look.

The idea was to add a gold embossed stem to the Anemone, but this stamp set doesn’t have any stems, so I drew one on using a Versamarker!

Gold embossing powder adds a pop of shine

I have a video below to show you the process, or watch on YouTube:

Just imagine all the different color combinations you can try on this flower. I love the big change in colors I got here, but for a more subtle effect you could simply use one or two colors and double, even triple stamp in that color.

I hope you enjoyed this project today. I often get asked what products I’ve used, so I have a list below. I use affiliate links, when available, at no extra cost to you. When you purchase using these links, I may receive a small commission. This helps me to keep up with blog costs and continue to bring you projects like this! Thanks for your support.

Love this Anemone set! Thanks so much for stopping by.

Dramatic Anemone
Comments { 4 }
roses-with-gold-hello-12

A Golden Hello

Hi there! I’m on Day 4 at the Altenew 3D Floral Focus class with a fun card share today! The topic was to use less layers of the die cuts to create a modern vibe.

Believe it or not, I was going for a modern look here, but it absolutely turned into FANCY! Lol. That happens sometimes.

Before I die cut the flowers, I ink blended some Distress Inks in ombre fashion onto some 80# cardstock, then I splattered some of the same color of paint and gold watercolor paint onto the panel. I then die cut some flowers, reserving the darker portion of the panel for the furthest back florals.

I layered them up, but I didn’t use a complete floral layer for each of them..only 2 or three layers each. After I found an arrangement I liked, I adhered them down with liquid adhesive and splattered the entire panel with gold watercolor paint.

A golden hello

I die cut the hello sentiment out of gold foil paper and adhered it to the center of the card. Only two corners got the corner-rounded treatment before I added the entire panel to a gold glitter 4 1/4″ x 5 1/2 panel. Then the whole thing was added to a 110# card base.

I absolutely love how it turned out, but it really took on a life of it’s own!

For the colors of this card, I was inspired by the photo below, so I’m also entering the June Altenew Challenge with this card.

I’ve linked the supplies below, as I get asked often about what products I used. Affiliate links are used when possible, so if you make a purchase through these links, I may receive a small commission. These help me to keep up my blog and bring you more fun projects like this one. Thanks for your support!


I hope you enjoyed my modern/fancy floral card! lol.

Thanks for stopping by!

Comments { 3 }
pink-pineapple-card-2

Glittery Pink Pineapple? Why not?

Hello there! Today I have a fun tropical card share. Yesterday I made a beachy card, and today I thought I’d take it one step further: to Hawaii Tropics!

This card uses my favorite background inking technique that is SO FAST!! In fact, I feel like it’s one of the most overlooked tools in the craft room right now. But today, I’m bringing it back!

This was a fun and easy card to put together and I have a VIDEO for you to watch below or on YouTube:

Did you watch the video yet? No? Well, I’m still going to tell you my secret: clarity brushes! (aka Stencil brushes). I love them for a fast and easy way to put ink onto paper. Sometimes I find the blender tool takes too long and is painful for me. The makeup brushes are great, but when I have a LARGE area to blend, I reach for these clarity brushes.

A Happy Pineapple!

I made him a glittery pink to play in the Paper Smooches contest going on this month: here.

This was my inspiration photo:

What do you think? Fun, right?

I’m often asked what supplies I’ve used on a project, so I’ve made a list for you here using affiliate links when possible (at no extra cost to you). When you purchase an item using these links, I may receive a small commission. This helps me with blog upkeep and to bring you more fun projects like this one! Thank you for your support.


I hope you enjoyed this project today! Thanks for stopping by!

Comments { 0 }
close-up-2

Bee Happy Rainbow card with the HH February Kit

Hello! Today I have a cheerful card for you using products from the Hedgehog Hollow February kit. It starts with a rainbow of colors of Distress Ink so you know it’s going to be cheery! I used Picked Raspberry, Worn Lipstick, Orange Marmalade, Mustard Seed, Evergreen Bough, Peacock Feathers, Denim Jeans, Shaded Lilac, and Wilted Violet. With all those colors, you are sure to smile! (at least they made me smile)

bee-happy-rainbow-3

I used some die cut hexagons that would normally just be thrown out! But they were perfect for my project today. To adhere these in perfect alignment, I put all the colored hexagons into the die cut, then picked it all up with some Glad Press N Seal. Then I turned it over and added some glue ONLY to the rainbow pieces. I attached it all to the card panel, let it dry for a minute, then removed the die cut to reveal the perfect placement of all those beautiful hexagons!

close-up-2

I used the bees, bee trails and BEE happy sentiment from the stamp set that came in the February Kit, and as an outline for the bottom layer I used the small hexagon stamp repeatedly for the border.

bee-close-up

I popped up those bees with some Scotch 3M foam tape (the mega roll!) to give more dimension. I put some craft foam between the top layer and the bottom layer for even more dimension!

bee-happy-rainbow-3

I hope you enjoyed this cheery project today! Check out how you can get the Hedgehog Hollow Kit here. And she is taking pre-orders for the April Kit (which I hear has some Art Impressions!!)

See you next time!

Comments { 0 }