Tag Archives | card
close-up-2

Bee Happy Rainbow card with the HH February Kit

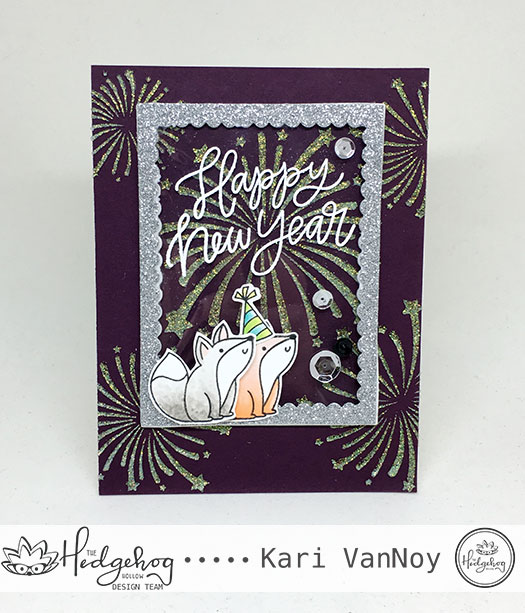
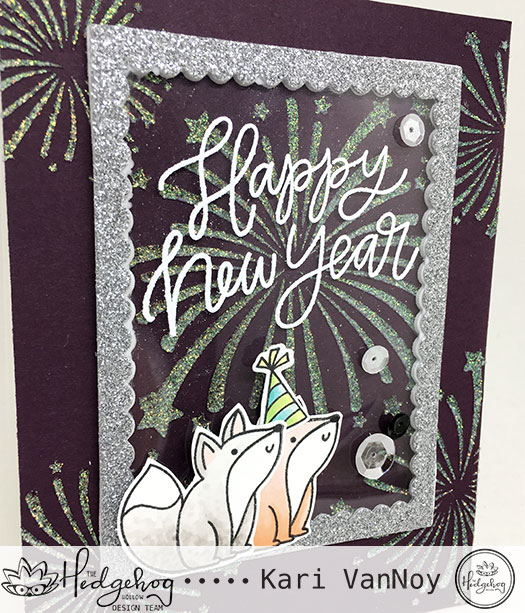
Hello! Today I have a cheerful card for you using products from the Hedgehog Hollow February kit. It starts with a rainbow of colors of Distress Ink so you know it’s going to be cheery! I used Picked Raspberry, Worn Lipstick, Orange Marmalade, Mustard Seed, Evergreen Bough, Peacock Feathers, Denim Jeans, Shaded Lilac, and Wilted Violet. With all those colors, you are sure to smile! (at least they made me smile)

bee-happy-rainbow-3

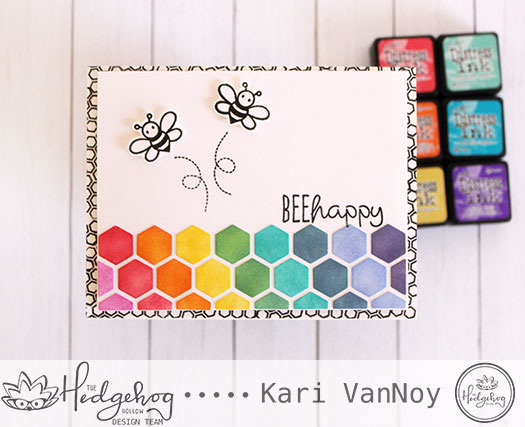
I used some die cut hexagons that would normally just be thrown out! But they were perfect for my project today. To adhere these in perfect alignment, I put all the colored hexagons into the die cut, then picked it all up with some Glad Press N Seal. Then I turned it over and added some glue ONLY to the rainbow pieces. I attached it all to the card panel, let it dry for a minute, then removed the die cut to reveal the perfect placement of all those beautiful hexagons!

close-up-2

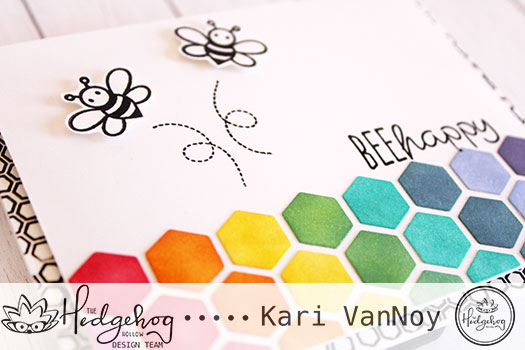
I used the bees, bee trails and BEE happy sentiment from the stamp set that came in the February Kit, and as an outline for the bottom layer I used the small hexagon stamp repeatedly for the border.

bee-close-up

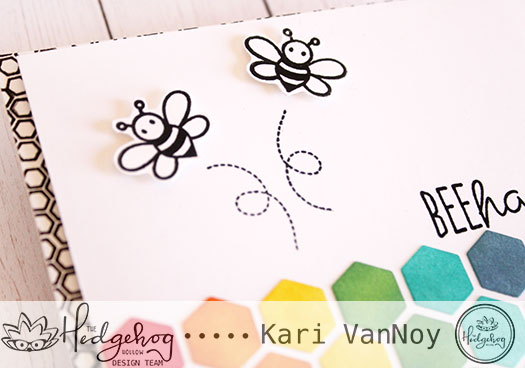
I popped up those bees with some Scotch 3M foam tape (the mega roll!) to give more dimension. I put some craft foam between the top layer and the bottom layer for even more dimension!

bee-happy-rainbow-3

I hope you enjoyed this cheery project today! Check out how you can get the Hedgehog Hollow Kit here. And she is taking pre-orders for the April Kit (which I hear has some Art Impressions!!)

See you next time!

Comments { 0 }
wolf-side-view

Watercolored Owl and Wolf

Hello everyone! I shared the new January Hedgehog Hollow kit with the geometric goodies, and today I have some cards using the OWL and WOLF to share.

owl-and-wolf-card

I watercolored these up using Zig Clean Color Real brush markers using my favorite trick! Embossing powder! Yep…it keeps the colors in the lines!

Watch my video below or on YouTube:


I’m loving these geometric animals. There’s also a butterfly, a lion, and a unicorn. Oh just wait to see what else I have planned for cards coming soon!

I created the backgrounds of each of these cards using the geometric designs from the same kit.

owl-with-geometric-bckgrnd

This square geometric design is probably my favorite. I just stamped it repeatedly to create that background using Distress Oxide Ink!

wolf-card

For the wolf card background, I used another geometric shape and white heat embossed it onto grey cardstock. I think it looks cool with this wolf!

wolf-side-view

To finish off these cards, I popped the images up using double layer of foam tape. These turned out so cool, don’t you think? And they look a bit masculine…which is not easy for me to create!

Love them and I hope this inspired you to try some geometric watercoloring yourself.

Thanks for stopping by!

Comments { 0 }
foxy-faux-shaker

Happy New Year, Foxy!

Hello again! I hope you had a wonderful Christmas! Now that Christmas is over, it’s time to focus on a few more New Years cards for me…how about you?

Today I’m over on the Hedgehog Hollow blog sharing this fun Faux Shaker card! I used products from the Hedgehog Hollow December box, and added a couple foxes from the Pretty Pink Posh Woodland Critters set.

foxy-faux-shaker

I used embossable plastic for the sentiment because I wanted to see through to the beautiful iridescent fireworks!

faux-shaker-close-up

For all the details on how to make this card, head on over to my Hedgehog Hollow post here.

Thanks for stopping by! Happy New Year!

Comments { 0 }
sunshine-brick-neighborhood-diorama

A Look back at the October Release with Our Daily Bread Designs

Hello! I hope you’ve had a chance to see the entire October Release from Our Daily Bread Designs, because it is fabulous! Today I’m sharing two cards using some of the products.

First I had to create a card front using the beautiful Bethlehem dies set.

sunshine-bethlehem-A2-card

I used the Pierced Ovals dies to create the frame and inked it up slightly with Cracked Pistachio Distress Oxide ink. I heat embossed the back layer of the building tops with copper embossing powder before adding them to the kraft background. The trees are colored with copics. Isn’t this a beautiful scene?

To finish it all off, I added the Merry Christmas Caps die at the top.

Here’s a look at the inside of the card, where I stamped a sentiment from the Christmas Card Scriptures Stamp set:

sunshine-bethlehem-A2-inside

This sentiment is such a beautiful way to say Merry Christmas!

My next project features the Diorama with Layers set. This is another new favorite of mine and this time I’ve paired the Brick Gate Border with the Neighborhood Border die.

sunshine-brick-neighborhood-diorama

Look at that sweet little neighborhood! I’ve added some chunky glitter to the rooftops to add a snowy feeling. The paper is from this set. The Pinecones Dies and Pine Branches Dies are must-haves, in my opinion!

The Brick Gate Border offers a way to ink up those bricks through the die when you leave it on the die cut piece! (That’s how I got all those individual grey bricks).

I hope you enjoyed these projects today and got inspired.

For more inspiration using the October Release and to see the other designers projects, be sure to visit the ODBD Blog here.

Comments { 0 }
sunshine-city-scape-A2-card

Cityscape Cards Two Ways

Hello! Today I am excited to share with you some Cityscape Christmas cards…One is a diorama 3D card and one is an A2 size folding card. Here’s the Diorama card:

sunshine-noel-cityscape-diorama

This is a 3D card that will fold flat to fit into an A6 envelope for mailing!

How festive do those skyscrapers look all lit up in green and red?! I love that. I used glitter paper to place behind the die to get that sparkly holiday lights look.

This new Diorama Die is a new favorite of mine. It is so easy to use and to layer with Christmas paper. I added some Alphabet Flags (from a previous release) to spell “Noel” and used that same sparkle paper behind those letters. To finish off this card, I added some glitter to the Pine Branches and topped it with a big, red bow (from this set)!

I love that you can also use these same dies to make an A2 size card:

sunshine-city-scape-A2-card

Here I used the same City Skyline dies over an ink blended background. That beautiful sentiment is from the Christmas Card Verses stamp set. I created a frame with the Pierced Rectangles dies, and finished it all off with sparkly Pine Branches and a Pinecone from this set.

If you haven’t already seen the entire October release, head over to Our Daily Bread Designs to take a look. It’s a fantastic release and I love how versatile the dies are to use for a Diorama Card OR for a folded card.

Thanks for stopping by!

Comments { 0 }