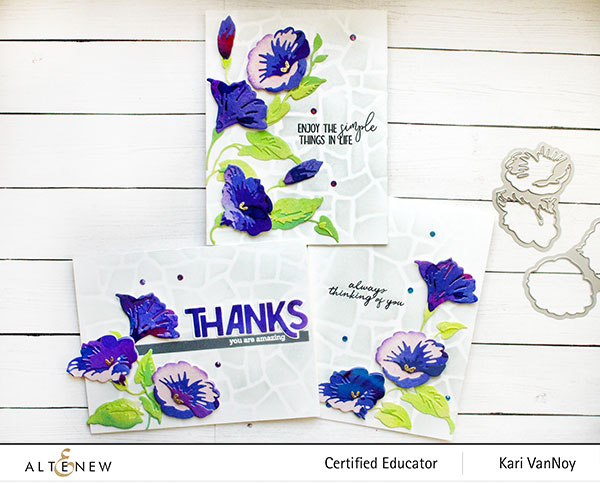
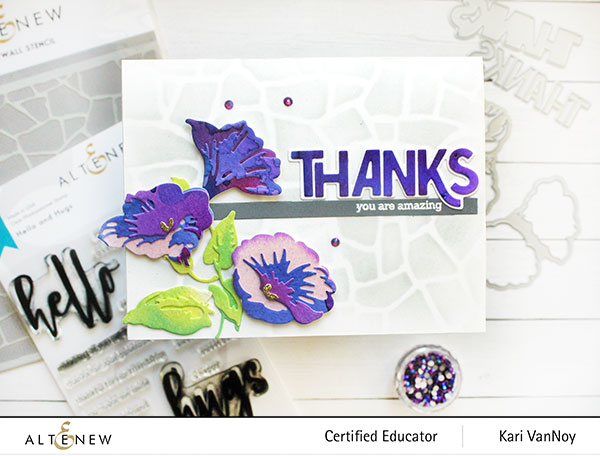
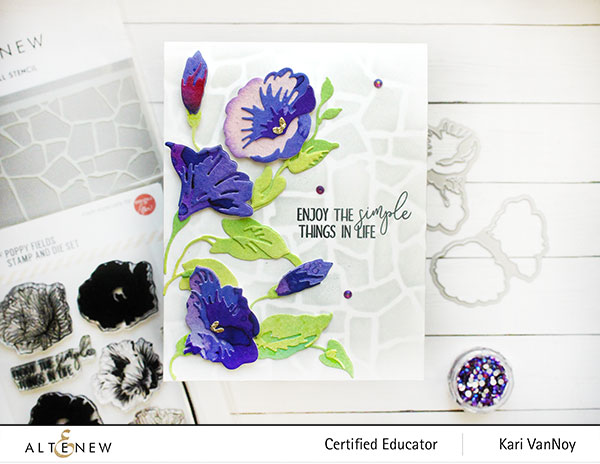
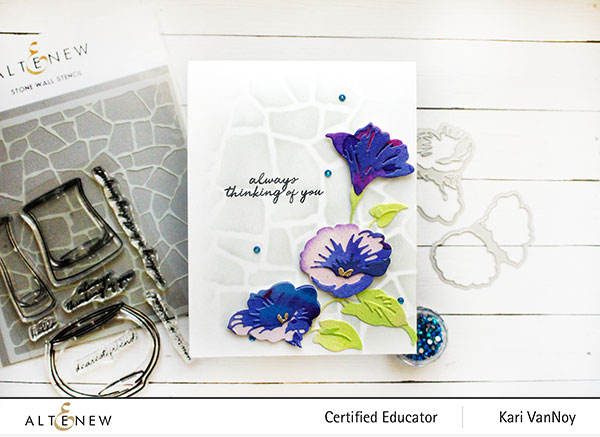
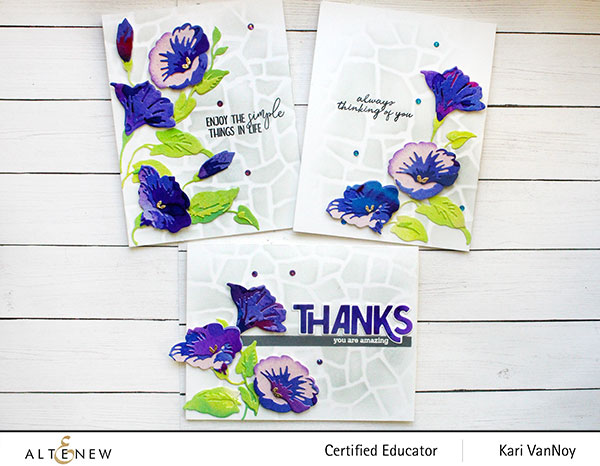
Hello! Thanks for stopping by the Altenew Educators’ Favorite Altenew Stamp Blog Hop. Today I am sharing some of my favorite stamps (and Morning Glory Dies!) and creating THREE cards.
Altenew has some wonderful stamps and dies to create some stunning cards. Today I want to share an easy way to create the Craft-A-Flower Morning Glory dies and combine them with favorite stamps!
I have a video showing all the details, watch it below or in HD on YouTube:
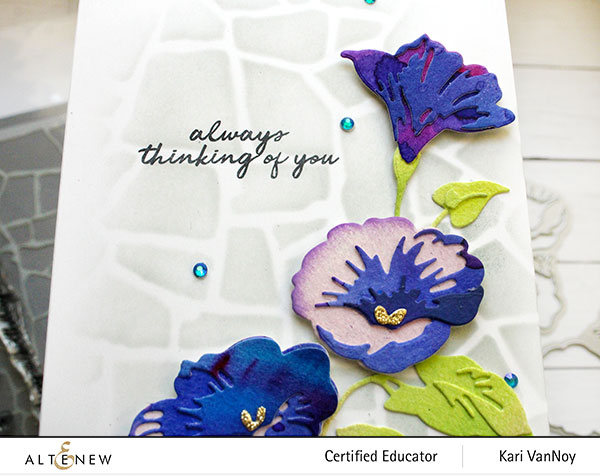
Take a look at some of the ways you can easily put together cards using these dies and stamps. I used the Stone Wall Stencil as a background…I thought those morning glories would be great “Climbing” up the wall. I added some gems in different colors to finish off the look.
Aren’t these flowers just gorgeous?
I’m often asked what supplies I use to make my cards and projects, so I’ve put together a list using affiliate links when possible. If you make a purchase with these links I may receive a small commission. These help me to keep up with blog costs and continue bringing you fun projects. Thank you so much for your support!
Prizes:
Altenew is giving away a $20 gift certificate to 5 lucky winners! Please leave a comment on the Altenew Card Blogby 4/4/2021 for a chance to win.
We’ll also draw a winner to receive a $15 Altenew gift certificate from the comments left on each designer’s blog on the blog hop list below. All winners will be announced on theAltenew Winners Page on 4/6/2021.
There’s MORE! What’s a hop without YOU?! We have included an Inlinkz at the Altenew blog for you to enter your gorgeous Altenew “Old/New Favorite Altenew Stamp” creations. We will pick 2 of our favorite handmade creations from those who joined the linky party and they will each receive a $15 Altenew gift certificate!
Hello! I’m delighted to be a part of the Altenew Educators Floral with Geometric Elements Blog Hop today. There’s also a giveaway and a Linky Party for another chance to win by participating!
If you have arrived here from Nanette Madero’s blog, you’re on the right track! I have a full list of the blog hop links listed near the end of this post.
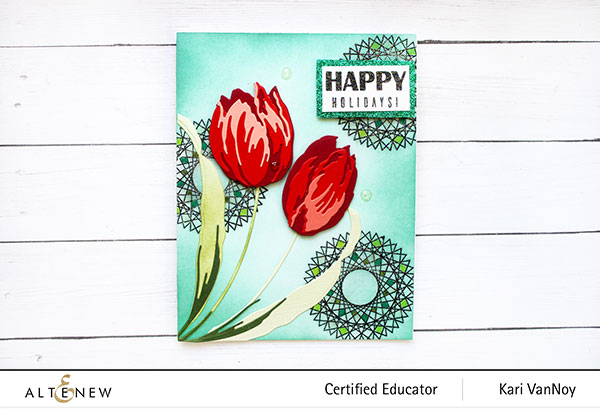
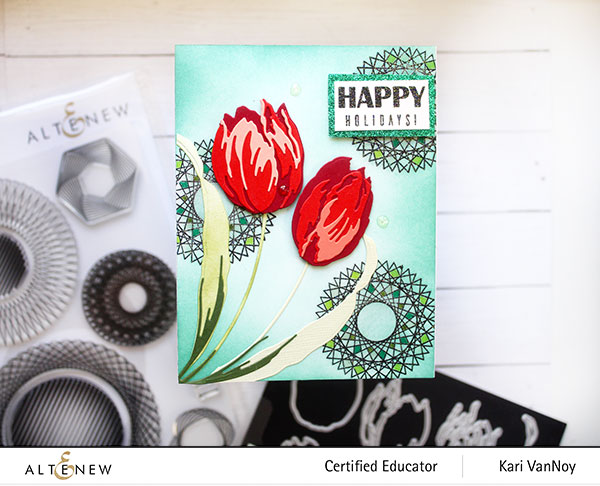
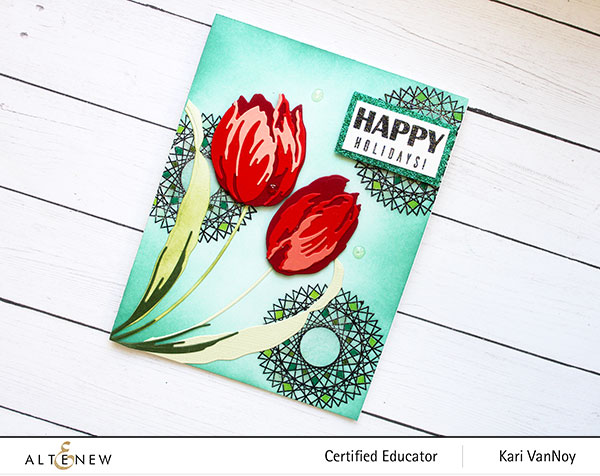
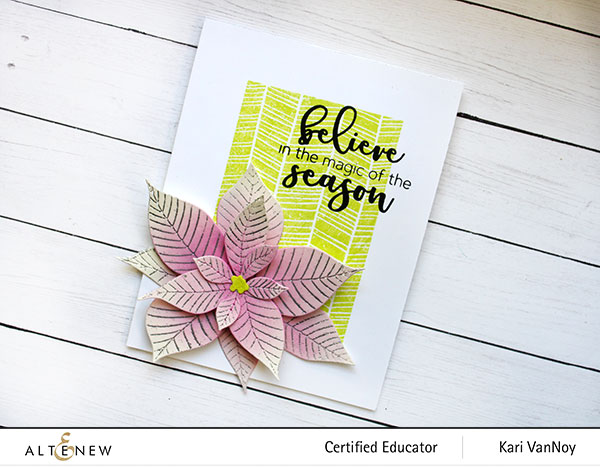
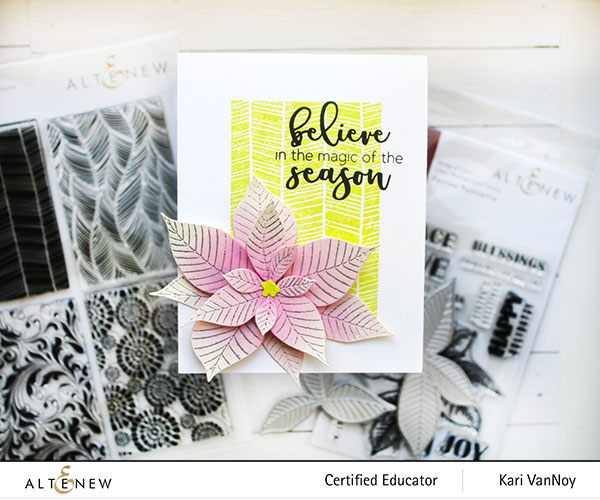
Today I’m sharing TWO cards. I started out with the stamped geometric background (shown below) and had my poinsettia already die cut, but this background really needed some red tulips for that Christmas vibe I was going for.
This card uses a favorite of mine: Spheres and Spirals stamp set. I stamped these in black and added some glitter embossing powder for extra sparkle. I used Evergreen Bough to ink up the background and then colored in a few spots of the spirals with various green shades of marker. Then I added some red tulips from another favorite of mine: Craft A Flower Tulip!
Then I just HAD to use my poinsettia for another card, so I made a different background using another beautiful stamp set.
That poinsettia is die cut with a very fun technique (adding versamark ink) so I could silver heat emboss those veins in the petals! For a video on how to do this, watch below or in HD on YouTube:
I’m often asked what supplies I use to make my cards and projects, so I’ve put together a list using affiliate links when possible. If you make a purchase with these links I may receive a small commission. These help me to keep up with blog costs and continue bringing you fun projects. Thank you so much for your support!
Prizes:
Altenew is giving away a $30 gift certificate to 1 lucky winner! Please leave a comment on the Altenew Card Blog by 12/21/2020 for a chance to win.
We’ll also draw a winner to receive a $15 Altenew gift certificate from the comments left on each designer’s blog on the blog hop list below. All winners will be announced on theAltenew Winners Page on 12/23/2020.
There’s MORE! What’s a hop without YOU?! We have included an Inlinkz at the Altenew blog for you to enter your gorgeous Altenew “Floral with Geometric Elements” creations. We will pick 2 of our favorite handmade creations from those who joined the linky party and they will each receive a $15 Altenew gift certificate!
Hello! Today I am excited to share with you that I have completed all the requirements for my AECP certification! Last night I held my card class and it went so well. I had 5 participants in the class. Virginia, the supervisor representing Altenew, also attended via Zoom.
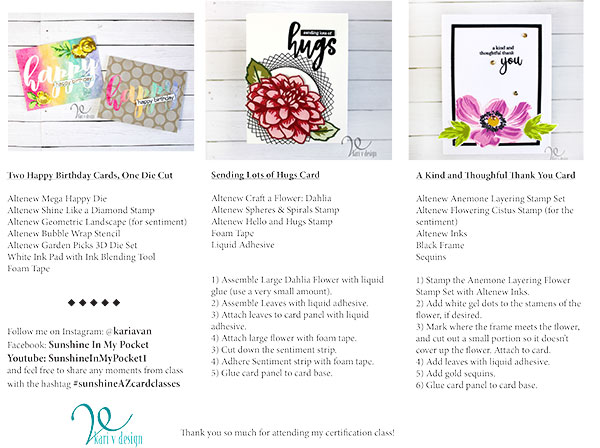
To prepare for this class, I first had to consider all the techniques I learned over the course of the past year in all my Altenew Academy classes. I chose a few of my favorites and set out to create some card samples that class participants would make. The techniques I chose were:
Watercolor wash with Altenew Watercolor Brush Markers Making 2 cards out of one Mega Die (Mega Happy) Putting Together Layering Die sets Stamping Layering Flower Anemone Set Stenciling with white ink and more…
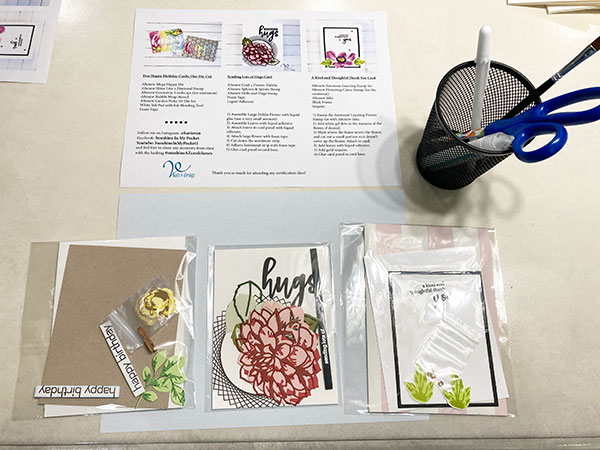
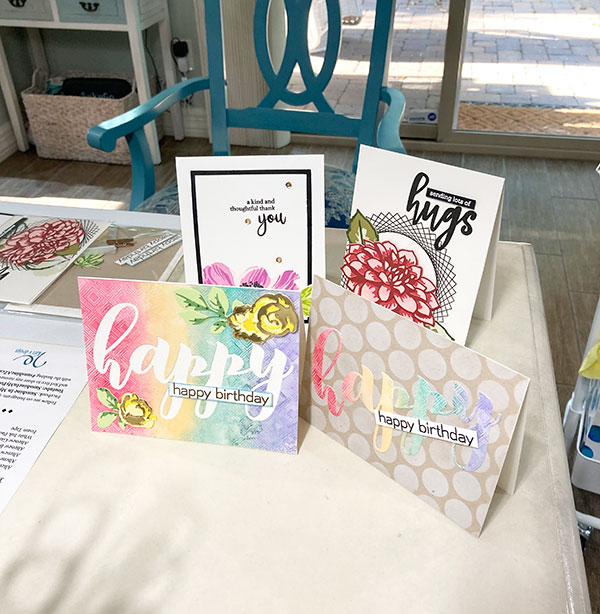
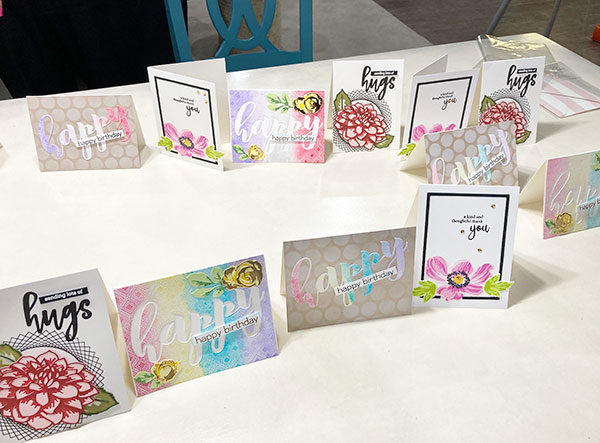
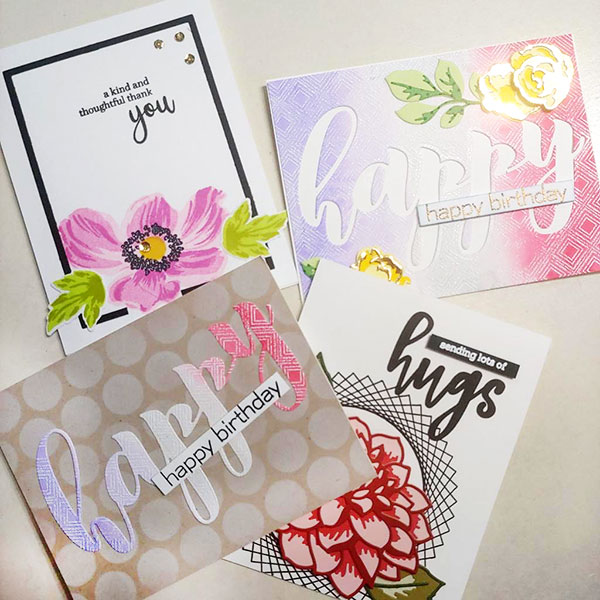
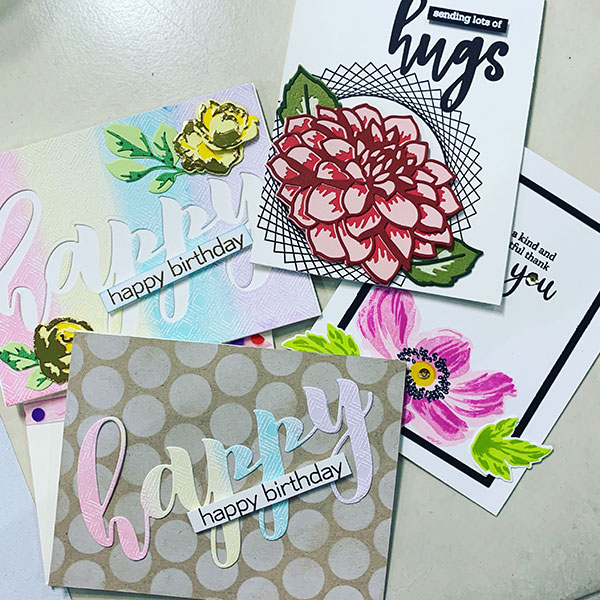
Here’s the cards I created for samples:
Watercolor wash, 2 cards 1 happy die cut, stenciling with white ink Layered Dahlia Layered stamping with the Layering Anemone set
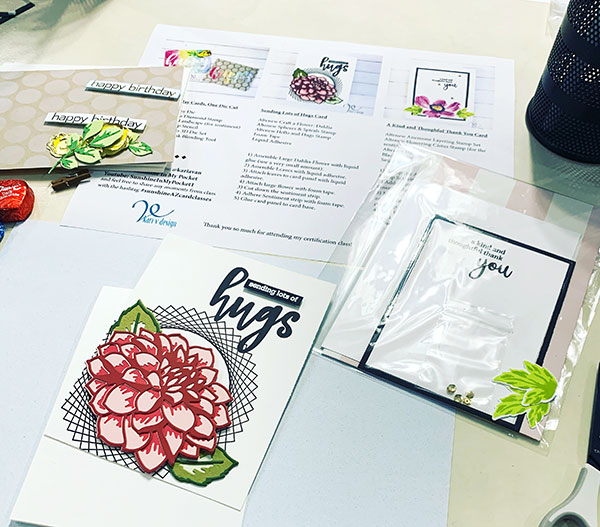
Once the cards were made, I created my worksheet for class. I like to have a handout for my classes to show the participants what supplies we are using, and have a small instruction on how the cards are put together. I also include hashtags they can use to post their cards to social media. (my class hashtag is #sunshineAZcardclasses)
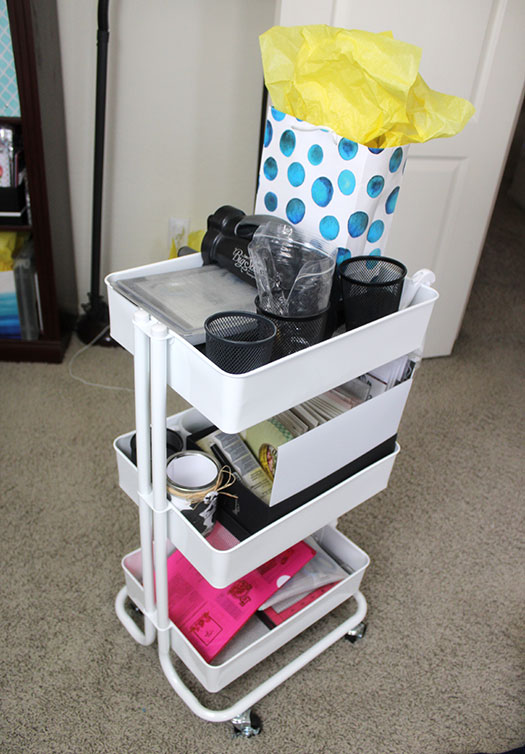
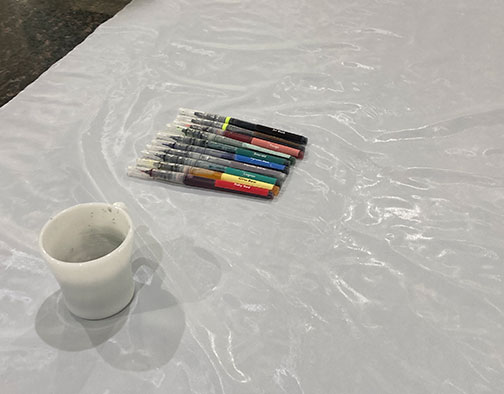
I began preparing all the class kits and setting up a time, date, and place for the workshop. I packed up my rolling cart with all the necessities for class! On the top shelf is the die cutting machine, and in the bag is my Essential Tools for Cardmakers (pre-ordered by one of my students). I also have those mesh pencil cups to set up each participant station.
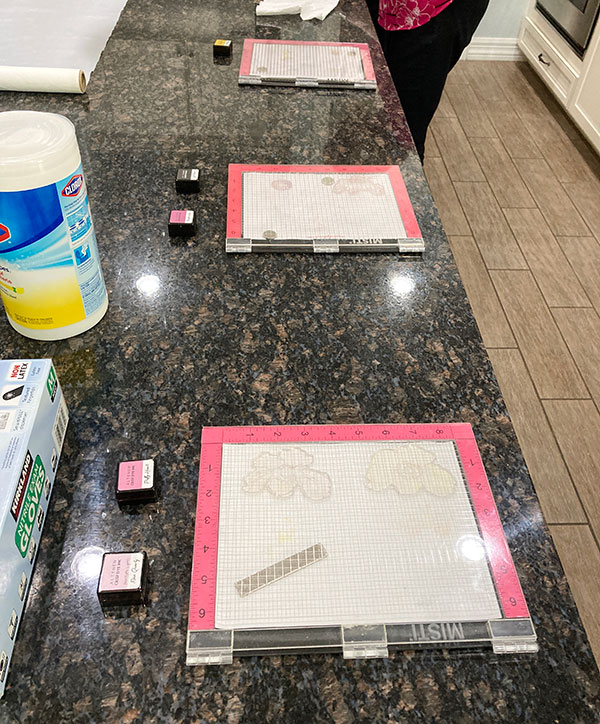
On the second shelf are all the card kits and extra supplies. And in the bottom shelf are the handouts, 3 MISTIs, and tools in a mesh pouch. I’m all ready for class!!
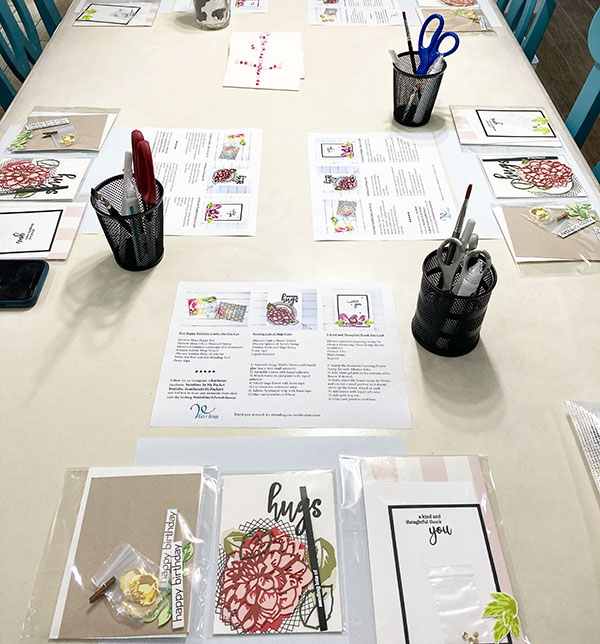
On the night of class, I started set up at about 5 o’clock. Each participant got their own tools to use (no need to share with other students), and we have different stations for the watercoloring, layering stamping, and ink blending.
Setting up the table All the kits are ready! The MISTI station, complete with gloves and disinfectant wipes!Watercolor station using Altenew Watercolor Brush MarkersCard Samples and my Rolling Cart is just to the right
Since we are still dealing with COVID issues, I had gloves to use for the MISTI station and other tools we had to all share. I also had disinfecting wipes readily available and of course, a hand-washing station.
Class went pretty smoothly. I had a complete lesson plan detailing the schedule of the evening: we started watercoloring our panels since those took the longest to dry. Two participants started at that station, and two participants started at the ink blending station and then switched. One participant began putting together their layering roses from the Garden Picks 3D die set.
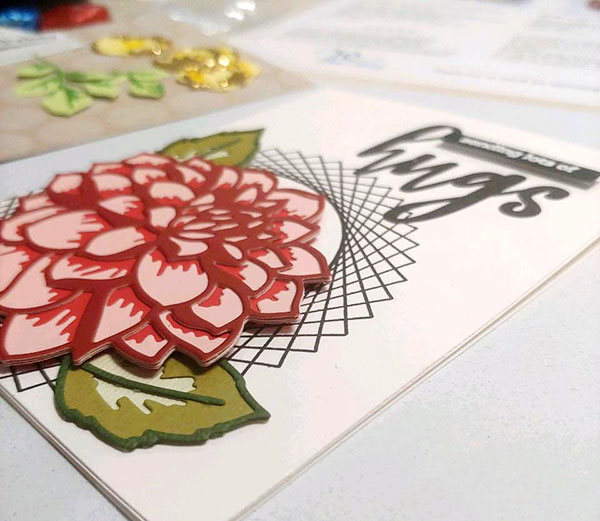
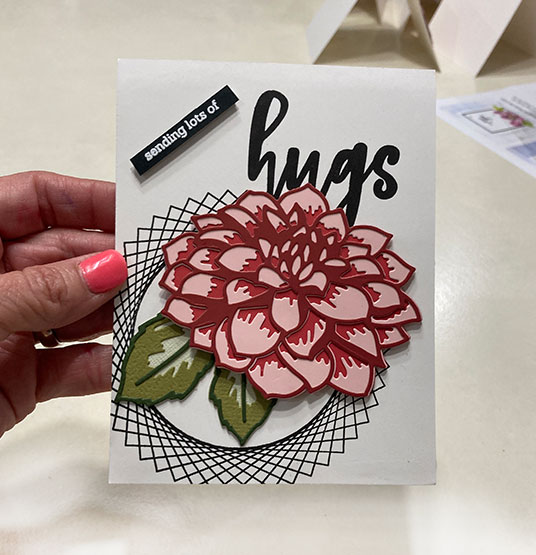
While those were drying, we went on to make and complete the Layering Dahlia die card.
Jill’s Dahlia card
Everyone LOVED this large bloom and putting it together was easier than they thought. They also loved the “spirograph” stamp from the Spheres & Spirals Stamp set. “It brings back such happy memories,” one class participant said.
Juli’s Dahlia card
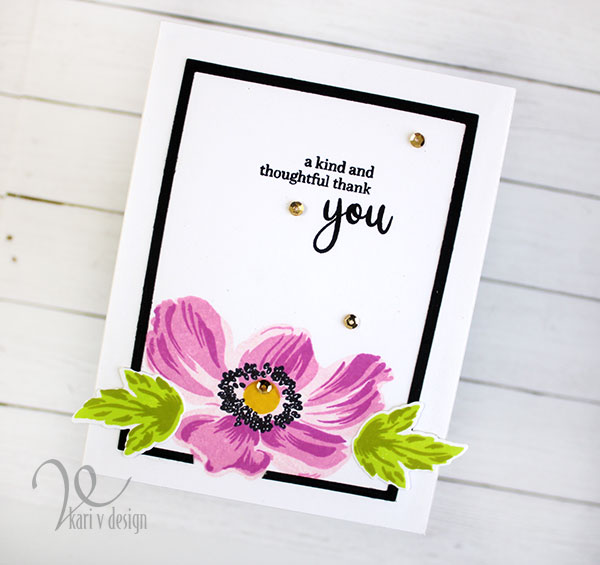
After we completed that card, we went on to make the Layered Stamp card using the Build-A-Flower: Anemone stamp set. Most of the participants had used a MISTI before, but NONE of them had ever used a layering stamp set!
There were so many OOOhs and AAAHs as the flower began to take shape with each layer added. It was so magical to see how excited they were to stamp and create this card. (That’s part of the reward of teaching!! I love to see the happy reactions!)
I taught them how to cut the black frame just a touch, so that it didn’t cover the lower petal on the flower. A great trick!
Layering Stamped Anemone Card on the right, with the black frame
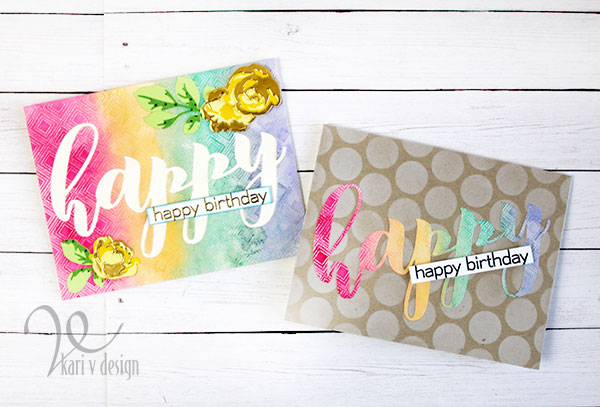
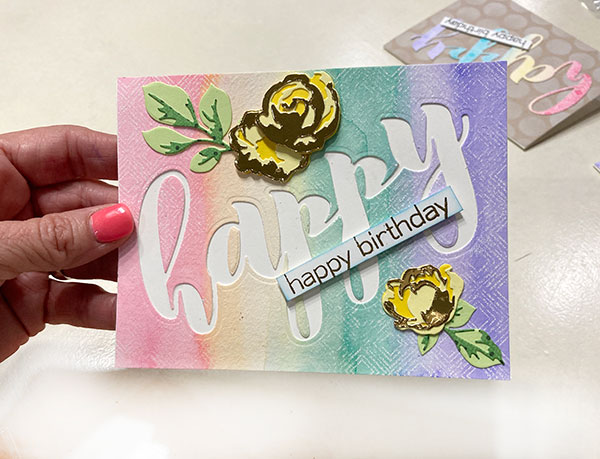
The last cards to finish now were the 2 Happy Birthday cards. The watercolor panels were now dry, so each participant cut their panels down to an A2 card size (4 1/4″ x 5 1/2″). I like to make the panels larger so if there are any weird edges from the watercoloring, we can just cut them right off!
Then they die cut the MEGA HAPPY die right out of the center of their watercolor panel. We turned the resulting panel and die cut into TWO cards.
Some participants did not like their watercolor panel at first, but after they assembled the card, it became a FAVORITE!
Kerri’s Happy card…she made her die cut diagonal and put the flowers in a different arrangement! I love the creativity that everyone had!
I like to encourage creativity in my card classes, and each participants cards were just a little different! It’s so fun to see that.
We finished the workshop in just over an hour and a half and created a whopping FOUR cards!! I was so excited that all participants loved their final cards and it was difficult for them to pick a favorite card.
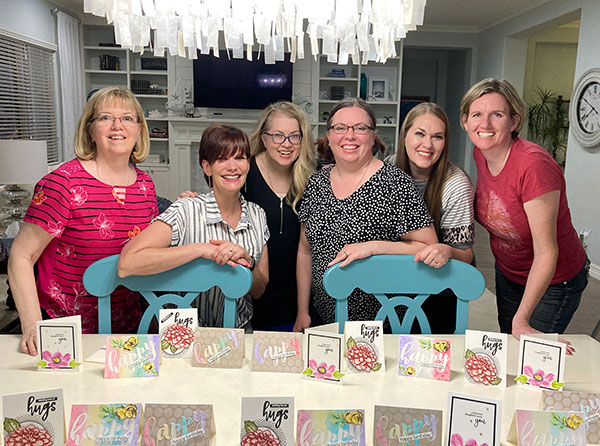
We had to take a quick group photo with all the cards!
Jill created a patriotic look to her Happy cards!Juli’s Happy cards were more pastel colors and so beautiful!
At the start of class I asked how many of them were familiar with or had worked with Altenew products and NONE of them had heard of Altenew before.
The workshop was a complete success and went pretty smoothly. I do believe we now have FIVE NEW Altenew fans!! Lol.
I am so grateful for the Altenew Educator Certification Program. I learned quite a lot and grew so much in cardmaking over the course of all Levels (there are 3 levels total). I highly recommend the AECP to anyone who wants to improve their cardmaking skills, grow as a creator, and learn even more about Altenew and their beautiful layering dies and stamps.
A BIG THANK YOU to Virginia and Erum for all their support and encouragement along my journey. And for helping me to make this final card class a success!
And, if you are still reading this until the end…thank you! I will list the supplies below if you are interested in any of them.
I’m often asked what supplies I use to make my cards and projects, so I’ve put together a list using affiliate links when possible. If you make a purchase with these links I may receive a small commission. These help me to keep up with blog costs and continue bringing you fun projects. Thank you so much for your support!
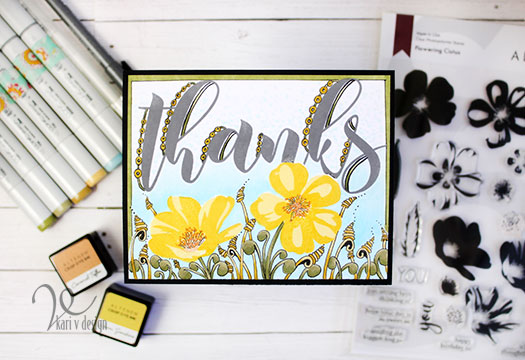
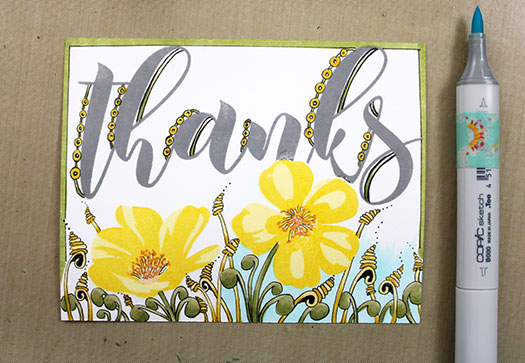
Hello! Today I’m excited to share with you my very first Zentangle project on a card. I have to admit I was a little intimidated by this….but I persevered until I got just the look I was going for!
This was inspired by a class I took at Altenew Academy by Amber Rain Davis. It’s a great class, and I recommend it if you like to doodle or love to add details to your cards!
While practicing my tangles, I learned quite a few things: first of all, I wish I had a broader tip pen. Here I used my .05 Copic Multiliner, and while the details turned out great, I wished that my tangles were a little BIGGER and BOLDER with the lines.
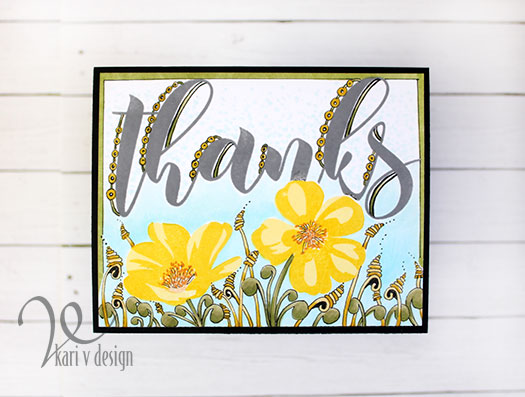
I used four different Zentangles on this card: Mooka, Zinger, Springkle, and Caviar. These turned out with my own flair and in my own style, as most tangles will take on the style of the illustrator.
I will show you my progress on how this card came about:
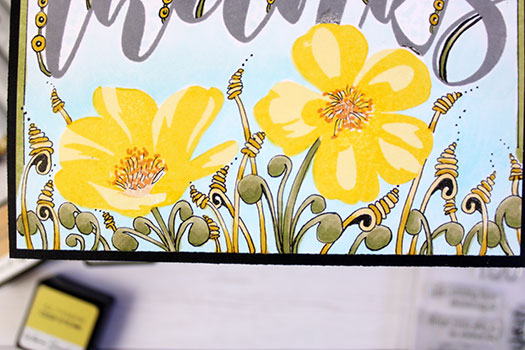
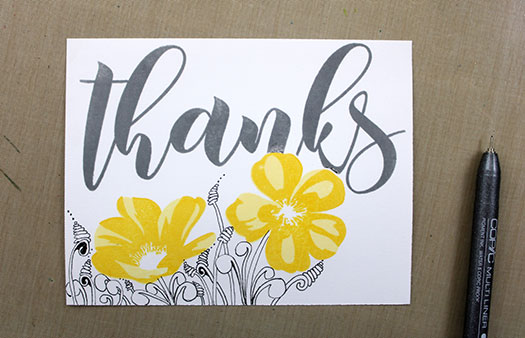
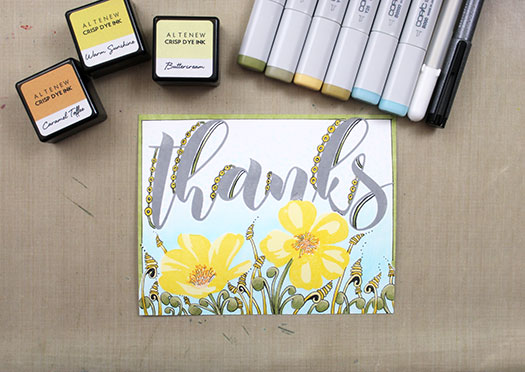
First, I stamped the flowers with two shades of yellow ink. I masked them off before stamping the large Thanks sentiment in gray ink. Then I started in with the Zentangles, adding some “Mooka” to act as the leaves and stems of the flowers.
The beginning of something great…
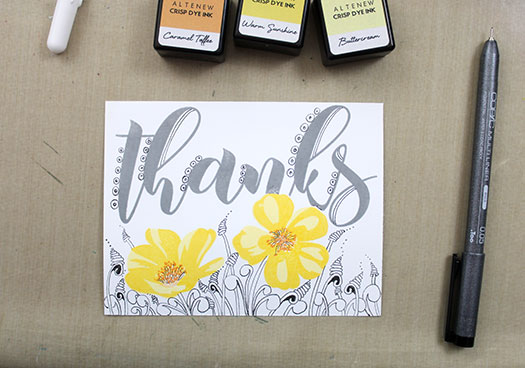
I continued adding the tangles with some Zingers and Springkles, and I stamped the centers of the flowers with an orange ink. I end up adding some lines and auras to the centers, too.
Then, I drew in some “Caviar” tangles on the left of each of the letters of the sentiment. I felt like the sentiment was getting left out and needed something, so caviar it was! I attached the caviar together with some small connecting lines. I added some lines on the inside of some of the letters, too.
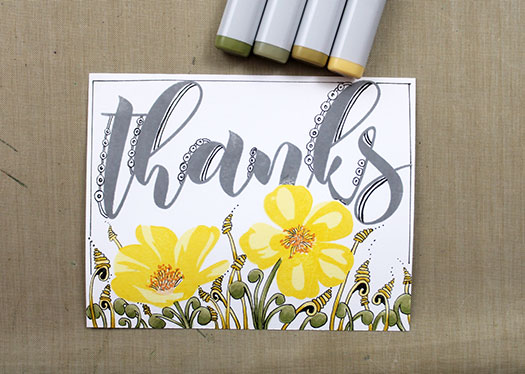
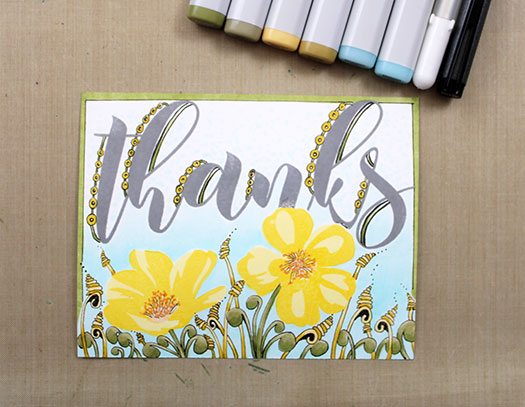
Then I outlined the entire card with a thin, black border (for this I used a ruler). Now it’s time to color! I used only a few colors of Copic markers for this: Y32, Y26, YG93, YG91.
After the leaves and tangles were colored, I outlined the entire frame in YG93 green and began adding some blue shades at the bottom of the card. I started off with B00 and lightened it up at the top with B000. Finally, I added blue dots at the top of the card fading off into white. I thought that gave this card a kind of dreamy look!
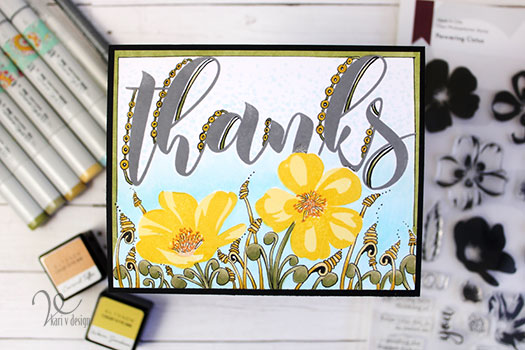
After all the coloring, the card finally started looking all put together! I matted it with some black cardstock to finish it all off.
I loved making this card after I got over the intimidation of it all. Lol. The drawing was relaxing, and I feel like the final result has a dreamy and whimsical feel to it. You might not be able to see the light blue dots at the top of the card, but that also adds to the dreamy feeling.
I hope you enjoyed this card today! I’ve linked the class below if you are interested in getting started with some Zentangles of your own.
I’m often asked what supplies I use to make my cards and projects, so I’ve put together a list using affiliate links when possible. If you make a purchase with these links I may receive a small commission. These help me to keep up with blog costs and continue bringing you fun projects. Thank you so much for your support!
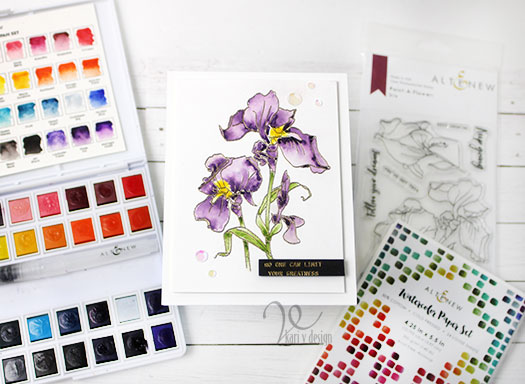
Hello! Today I’m talking about the most important two things to do when you get a new watercolor set (or any new medium)! I was inspired by Jen Rzasa at Altenew for this post, as a part of my Altenew Educator’s Certification Program.
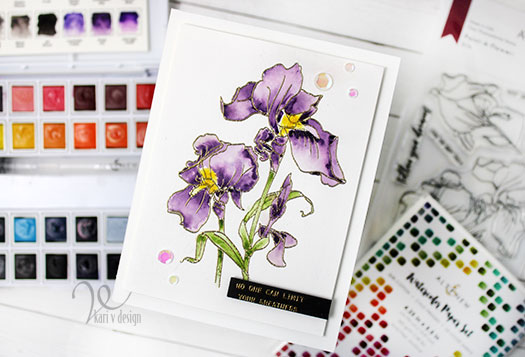
I recently purchased the 36-pan watercolor set from Altenew and I was SO EXCITED to use them! So the first thing I did was swatch them out to get to know the colors a little better.
Did you know that Altenew has a beautiful swatch page already created for you? You can watercolor your own, or print one already done. (check it out here).
Since my printer will not print on heavy watercolor paper, I printed out the blank version on regular copy paper…(I did size it down a bit so I could make it fit into my watercolor case). Then, I took it to a copy center and copied it onto watercolor paper. Then I could swatch my colors!
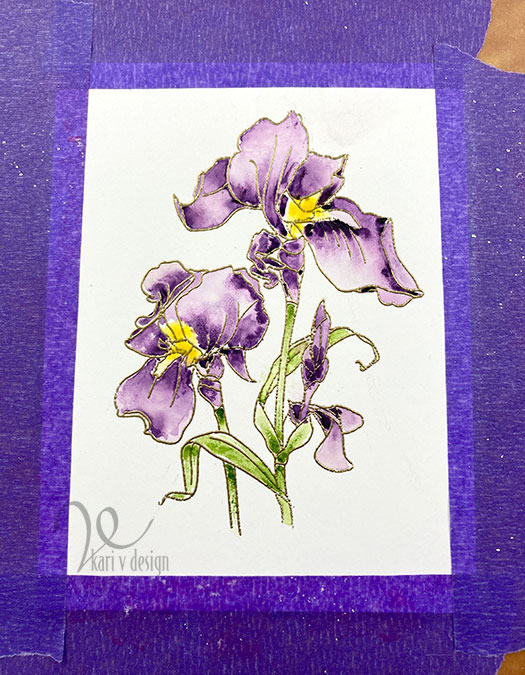
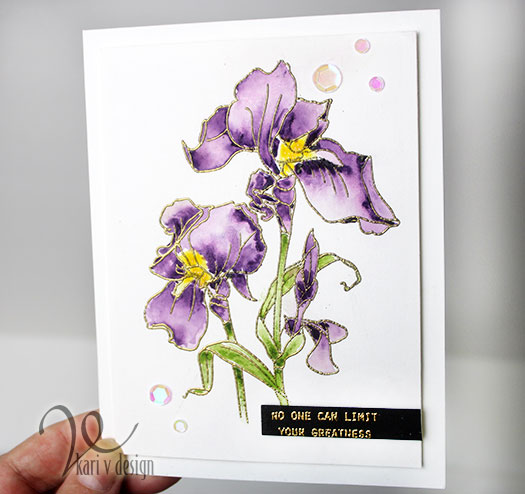
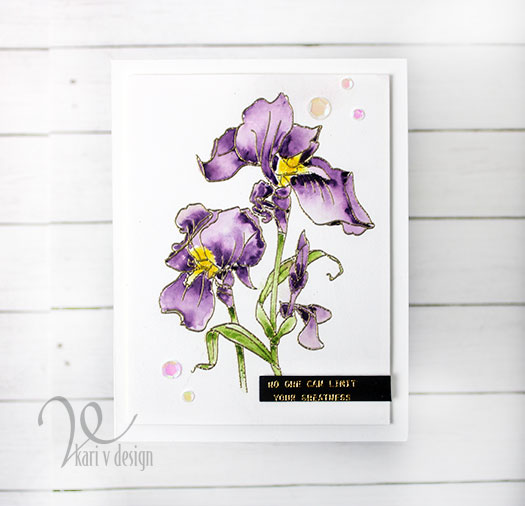
After I swatched out the colors, using a gradient technique, I painted my very first card! I chose the Iris Paint-a-Flower from Altenew as my first victim, er, I mean…first masterpiece!!
I created a short video to show you the gradient technique, and secrets for watercoloring! Watch it below or in HD on YouTube:
I stamped the image and heat embossed it in gold on Altenew watercolor paper. I love this watercolor paper…it’s already A2 card sized and it’s nice and white!
Before I began watercoloring, I taped down my watercolor panel with purple tape. This helps to keep the panel from warping. I taped it to a cutting board so I could move it around as needed.
I used Jen’s technique of using clean, clear water first on one small part. Then I dropped in some color. I started with the green stems and leaves, then added a yellow center to the flowers. Then I worked on the purple irises.
Did you know there’s a watercolor color called “Deep Iris” in this set?! How perfect! That’s the color I chose for this image (surprise). Lol.
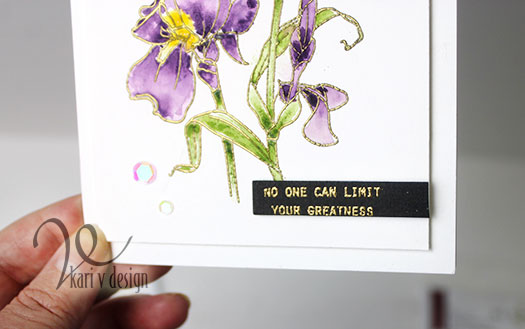
No one can limit your greatness!
For the sentiment, I chose to gold heat emboss on black cardstock. It’s a little difficult to read in the photos, it says: “No one can limit your greatness.”
I cut down the card panel to 3.75″ x 5″. Then I finished it all off with some iridescent sequins and attached it to the card base with foam tape.
I’m often asked what supplies I use to make my cards and projects, so I’ve put together a list using affiliate links when possible. If you make a purchase with these links I may receive a small commission. These help me to keep up with blog costs and continue bringing you fun projects. Thank you so much for your support!
I hope you enjoyed this and got inspired to try a little simple watercoloring! Thanks for stopping by.
Hi I'm Kari. I'm a creator, a card maker, and a day maker! I am Lucky in love to a supportive husband, blessed to raise 3 kids (all moved away now!), and happy to be watched over by 2 dogs.
I originally started this blog to remind me to be happy amid adversity, and I hope it inspires you, too!