birthday-greetings

Studio Katia Turns 2!!

Studio-Katia-turns-two-header

Hello all! I want to say a big Happy Birthday to Studio Katia! Today I’m a part of a blog hop for Studio Katia to celebrate and to share some of the NEW, beautiful products!

It’s no secret that I’m a big fan of all things Studio Katia….the products are all so fabulous, and have you seen the sequins, shaker bits, and shiny mixes?! Wow!

Today, I wanted to make a birthday card (or two…LOL) for Katia! Here’s my first one:

turquoise-flower-on-black

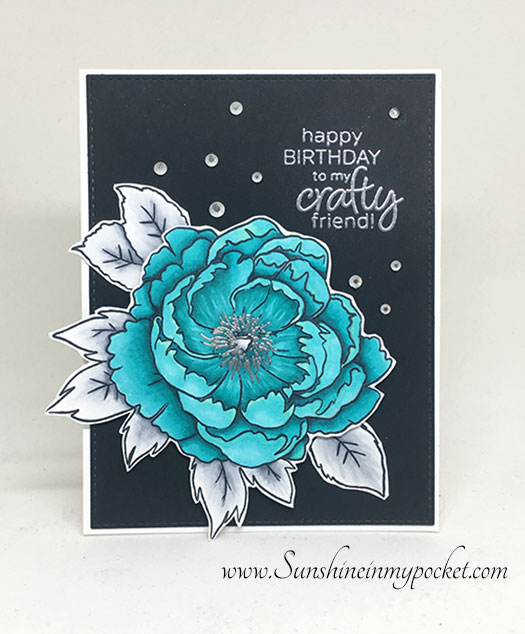
This is a bit dramatic, with the black card panel! But I wanted to show off those GORGEOUS Silver Crystals…aren’t they fun?! And so elegant. They are even more impressive in real life! I Copic colored this Japanese Peony in my current color obsession (BG45, BG49, BG09, N5)! Then I put the flower BACK INTO the MISTI and stamped over just the middle portion with some Versamark ink so I could add that SILVER embossing powder in the center.

The sentiment is from Birthday Greetings…and there are all kinds of awesome sentiments in this set! I really love that she included sentiments for CRAFTY FRIENDS!!

My next card is another birthday card, and this time it’s Pretty in Pink:

pink-stripes-happy-birthday

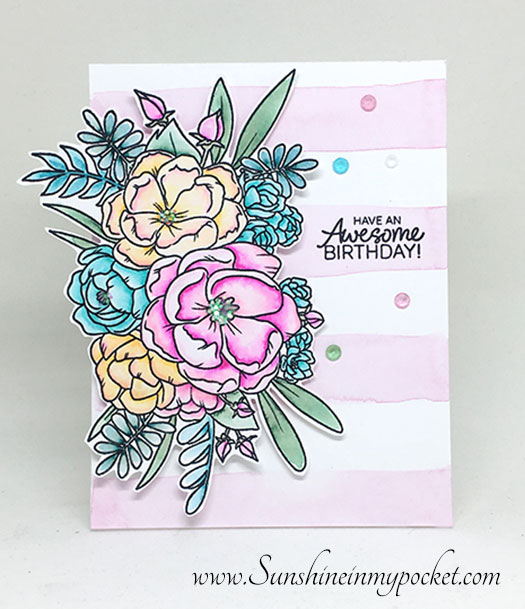
This features the new beautiful Lovely Blooms stamp set. Isn’t it fabulous?!? Oh my gosh….I’m in love with this set. I watercolored using my Zig Clean Color Real Brush Markers. For the background, I simply painted the pink stripes and let them dry before popping up the Lovely Blooms on top with foam tape. Those gems are from the Spring Gems collection.

For my last card today, I used the Lovely Blooms set again, but this time heat embossed it in Gold and watercolored with Daniel Smith Watercolors. I also used the Scallop Window Shaker Die on this one for a fun Peek-A-Boo surprise!

peek-a-boo-shaker-card-1

peek-a-boo-shaker-2

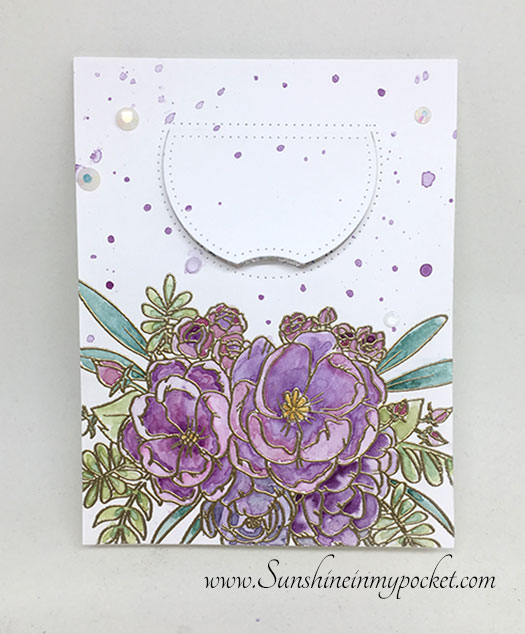
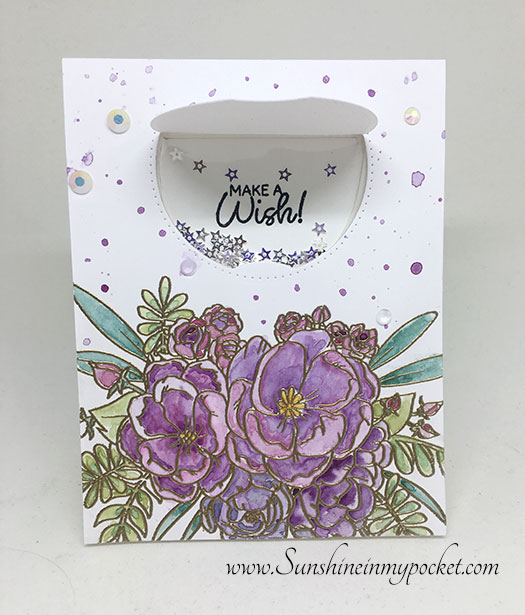
The stars are the beautiful Crystal Stars, and the jewels on the outside are the gorgeous April Crystals. I’m still on the fence about the paint splatters. You know how you think of an idea and it turns out not quite what you wanted? Well, just maybe that happened here. Lol.

But those flowers are so fun to use…and so many different ways to show them off! The Make A Wish sentiment is from the Birthday Greetings set.

I hope you enjoyed these projects…don’t forget to enter for the giveaway! Here’s how you have a chance to win:


GIVEAWAY!!

To celebrate Studio Katia is giving away TWO $100 CAD Gift Certificates every day of the Blog Hop! That’s FOUR chances to win. The winners will be chosen randomly from comments left on ALL blogs of our Blog Hop.

To enter:
– Leave a comment on this blog post and on every stop of the Blog Hop
– Follow us on Instagram
– Like us on Facebook
– Make sure to leave all the comments by Saturday, June 2nd, 2018 11:59 PM EST.
All winners will be announced on Sunday, June 3rd, 2018 on the Studio Katia Blog.


Ready to get hopping? Here’s the complete Blog Hop List:

Saturday, May 26th
I hope you enjoyed these projects! Do you love the new floral stamps as much as I do?! Good luck and enjoy the hop!
Comments { 91 }
scone-and-tea-tote

Two Totes, Two Turtles, and a Beach

Hello! How do you like my title for today? I just had to share a few more projects featuring my FAVORITE products from Our Daily Bread Designs for the month of May.

With the Royal Wedding last week, I just had to make some scones and Tea Totes/Purses. Yes!! I really did make scones (see below). The “Tea Totes,” as I like to call them, work so well with the Mini Cups & Mugs dies I used on the tags:

sunshine-tea-purse

That sentiment is from the Hug In A Mug Stamp Set…it’s so perfect! The paper I used is from this paper pack, and I think it’s perfectly girly with that Small Bow Die!

This purse was a bit lonely on it’s own, so of course I had to make another…this time using a fancy whipped cream-topped drink for the tag.

sunshine-two-tea-purses

scone-and-two-totes

scone-and-tea-tote

Add a few scones…and some tea bags…and you’ve got a perfect little Tea Tote to give to a friend. Or, if you’re like me, eat all the scones and then replace them with a store bought treat to put inside the tote. Lol.

I have my recipe here to share, if you would like to make them yourself!!

Now for my turtles! I LOVE this set from ODBD and I can’t stop creating with it. I was searching online for some photos of real turtles and I kept seeing some that had golden lines on them…which caused me to think of GOLD embossing on my turtles!

sunshine-gold-turtles

I made a video for you on how to create this background and I share my favorite TRICK for adding just a touch of embossing powder on any image! Watch it here or on YouTube:

And then of course I needed to try it out in silver! Oh…I love the little holes in the embossing on these “coral”…it makes it look so real. When I use only one layer of embossing powder I can get this fantastic result!

sunshine-silver-turtles

I was not only inspired by photos online for these turtle cards, but also by a little turtle we picked up in Newport Beach…here he is:

sunshine-turtle-inspiration

He’s cute, right? I’ve been playing around with other variations of this turtle and it has been so fun to make cards, tags, you name it!

And my last card today is this beautiful beach scene. I cannot tell you how much I love this set with ALL of it’s sentiments.

sunshine-breath-beach-chairs

Breathe. Just Breathe.

Don’t you love those wispy clouds? I used Distress Oxide Inks and then a barely damp chamois to lift off some of the color, leaving these beautiful clouds. For the sand, I inked on some Distress Oxides and then used my favorite SAND TECHNIQUE using the Distress Spritzer. I have a video here if you’d like to see just how I did this.

So there you have it. Weddings. Scones. Totes. Turtles. And Beach Chairs.
A lovely combination, don’t you think?

Check out the entire May release here at Our Daily Bread Designs.

Comments { 0 }
mice-cloudy-2

Chocolate Covered Everything!

Hello and good day to you! Today I have a delicious chocolatey post for you…well, it’s a CARD so please don’t try to eat this one. Lol.

I’m using supplies from the May Hedgehog Hollow kit, which included these beautiful Waffle Flower images and a die designed from the Hedgehog Hollow creator herself! This is a card that has been in my head ever since I was out of town and as soon as I got home, I created it right away.

[Affiliate links are used where possible at no additional cost to you, thank you for your love for my site!]

I added a “Chocolate” drizzle to all the sweets and I just love how it turned out:

chocolate-covered-sweet-cream

That “chocolate drizzle” is so fun and shiny that it was difficult to capture it in a photo! But look at that shine! I even added the “chocolate” to the Sweet die cut! (see below for what I used to “make” that chocolate). The cute striped paper is from the March HH subscription box, which is sold out.

Now if you brought me all these treats I might just declare “Well, aren’t you a sweet thing?!” That’s the reason I decided to use this sentiment.

If you haven’t seen the contents of this box, click here to view my unboxing! It’s a fantastic subscription box and I love each of them I’ve received so far!! And here’s the first card I made with the supplies in the box, too!

Another card that has been waiting for creation is this shaker card:

mice-cloudy-with-a-chance-of-sprinkles

This entire card is a shaker! I embossed some clouds in the background then colored up those cute mice that are included in the box, and added those Pretty Pink Posh sequins from the box! This shaker card really has a fun sound when you shake it!

The sentiment is also included in the box, it’s the new sentiment set also designed by Alexandra! I just love all the options she gives for sentiments! I stamped the first portion in black ink, then the “sprinkles” I stamped using Distress Oxide raspberry ink. The background for the little mice was inked using Distress Oxide ink as well in Twisted Citron and Lucky Clover.

mice-cloudy-2

Such fun! I hope your day is full of sprinkles, too. See you next time!

For more information about the Hedgehog Hollow subscription boxes, visit the website here. I love that you can buy just one box if you want, or sign up for the subscription so you don’t miss a thing.

Oh, and if you were looking for how I made the “chocolate drizzle”….I used this pen:


Comments { 0 }
sunshine-wish-you-were-here-tropical-drinks

Take Each Day One Cup at a Time

I’m back with some more fun projects using dies! I love these Cups & Mugs Dies from Our Daily Bread Designs! Here’s my first card:

sunshine-tea-cup-perks-you-up-2

I die cut those tea cups using this die and this paper. I love the sentiment “I Hope this perks you up!” (It’s from this set here). Those tea cups look like they are precariously perched!! Lol.

That spoon is cut from silver foil paper and it looks JUST like a stainless steel spoon. *Wink*

I added some distress ink to the lower portion of this card, as well as to the cups and around the edge of the card. It might be hard to tell in this photo, but there are also some vertical score lines in the background to add some more texture to the card. It looks so cool in real life!

My next card is another pick-me-up:

sunshine-one-cup-at-a-time

That mug is just so fun and filled with hot cocoa (lol…hot cocoa for me!) Believe it or not, I used the Boho Egg die to make the steam coming out of that hot cup of cocoa!! Isn’t is just perfect for steam? I popped a couple of the steam flags up using craft foam for more dimension. Lots of ink blending on this one, and for a bit of sunshine in the background I used this die as a stencil!

For my last card I went more tropical, I just couldn’t resist turning those mini dies into tropical drinks!

sunshine-wish-you-were-here-tropical-drinks

All those colorful drinks are just delightful! I’m thinking lemonade, watermelon juice, limeaid, and orange fizz! So fun. And if I were drinking one of these on a beach somewhere I really would “Wish you were here!”

I used this paper pad for the background paper, this die for the leaves, and this set for the sentiment.

That’s all for me today…check out the ODBD website for more information about these sweet new dies. I am loving them!

For more inspiration using the May Release and to see the other designers projects, be sure to visit the ODBD Blog.
Comments { 0 }
sunshine-love-you-a-latte-lever-card-inside-2

Grateful Heart

Hi again! I hope you are having a great day! Today I have some fun cards to share using the May release from Our Daily Bread Designs.

These cards feature the Hug in a Mug Stamp/Die Duo. I love these duo sets…you get the stamps AND the dies to cut out the images. They also have wonderful sentiments to choose from!

Now, I don’t drink coffee, but I DO love to make coffee cards still (like for the coffee lovers blog hop and such…). Just look at how cute these stamps are:

sunshine-grateful-heart-coffee-cups

I used the Cups & Mugs dies to cut a heart into the middle of each of the coffee cups, and I put some of the new Latte Love patterned paper behind each one. Doesn’t that just look like the steaming coffee?! (Well, that was the idea behind it anyway! Lol.)

I watercolored each cup using Zig Clean Color Real Brush Markers (still loving my Zigs!) and popped them up using multiple die cuts of the cup. That sentiment is a favorite of mine: Start each day with a grateful heart!!

You know what would be in my cup? A green drink from Nekter, or a cup of ICE. Ha!

Next, I made a card using more of that paper and a different coffee cup image. I couldn’t resist turning this into a Lever Card!! Did you see my turtle lever card? Check it out here.

Back to my coffee cards…Here’s the front of my Love You a Latte Lever card:

sunshine-love-you-a-latte-lever-front

Isn’t that paper cool?! I stamped the image a second time on kraft paper and cut out only the coffee cup sleeve. Then I popped it up using foam tape. I colored the top of the cup with Copics.

Here’s the inside of the card:

sunshine-love-you-a-latte-lever-card-inside-2

I used the stamp to make a watermark on the inside panels. The sentiment “You’re the Cream in my coffee” was perfect for the inside! These lever cards are so fun. I love having the Lever Card Layers Dies to easily make the inside panels. This Lever Card is such a great design!

See you next time!

Comments { 0 }