dad-card-with-supplies-in-bkgnd

A Card for Dad

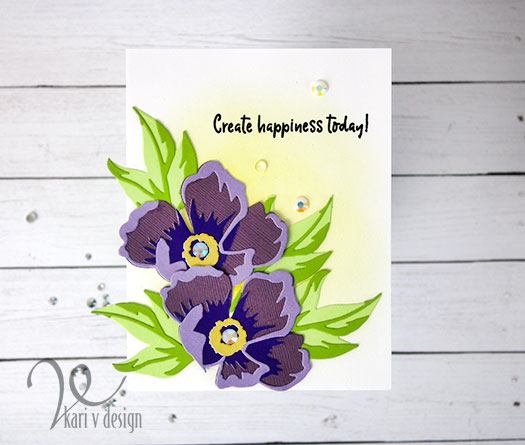
Hello! Today I have a fun card using a floral set to make a masculine card. Yep, you heard that right. You can use florals on your cards for men, too!

Dad, You’re in a league of your own

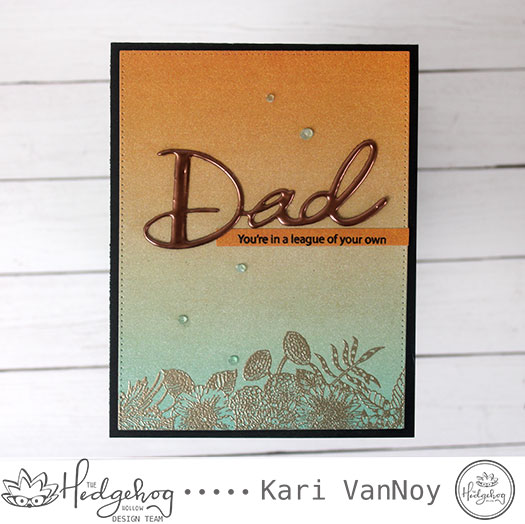
I used the Flowers from the May 2019 Hedgehog Hollow Kit (sold out) and paired it with a sentiment and a Dad die from the June 2018 Hedgehog Hollow Kit. This kit was a favorite of mine, packed with dies and stamps for masculine cards…including a “jeans pocket” stamp & die. There are currently only THREE left (at the time of writing this post). Check it out here.

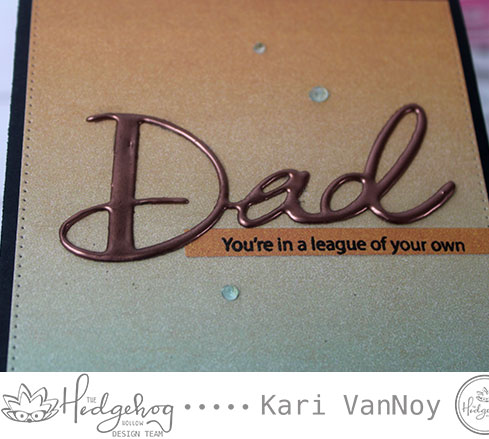
I used the Dad die cut to cut some chipboard and then I heat embossed it three times with Nuvo Copper Blush embossing powder. This is a beautiful coppery metallic color!

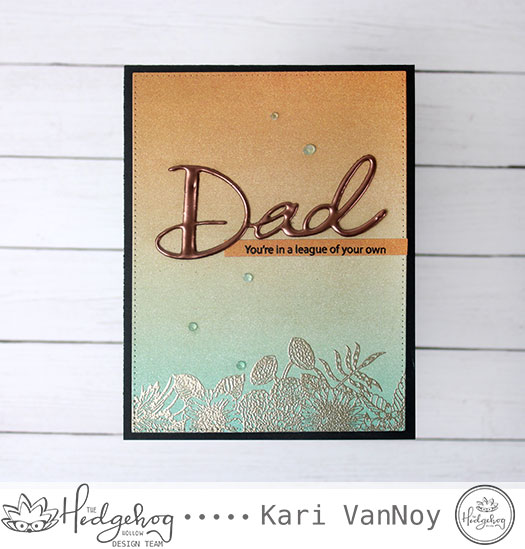
I chose a paper from my stash that had both teal and copper and looked a little bit like watercolor. You could also achieve this look yourself with a watercolor wash, but sometimes patterned paper is such an easy way to go!

Then I heat embossed the floral stripe on the bottom of the card using a softer embossing powder in Ranger metallic.

I finished it off with some Nuvo Jewel drops. Such a great card and I think it still looks masculine. Anyway, my Dad DOES like flowers! Lol.

Thanks for stopping by!

Comments { 0 }
polka-dot-background

Inlaid Die Cut Peony

Hi there! Today, as a part of my 3D Floral Focus class, I am trying a new technique called Inlaid Die Cutting. I have to admit, inlaid die cutting hurts my head! I rarely include inlaid die cutting on my cards…because it takes too much brain power…Lol!

But today I braved it, and here is my card:

Everything but the center pieces are INLAID!

This card took me about 800 hours to complete. Well, maybe not quite that long, but a really long time! Most of it was thinking about how to cut those pieces to fit into each other.

Now, it is not perfect. And I can’t believe I’m showing you this close up, but in full disclosure I thought you should know that everything didn’t line up PERFECTLY. In retrospect, I wish I listened better to Therese Calvird when she suggested having a colored background that would disguise that. I could’ve done a blue background and you wouldn’t even have noticed! (maybe?! Lol)

I’m not going to even point out all the other things that went wrong with this card. We are our own worst critics, right?

I used a polka dot embossing folder to add some fun to the background, but all in all I kept this card a bit simple. No sequins, No gems, No Nuvo drops. (crazy, right?)

Just a simple heat embossed sentiment on a popped up flag.

Here’s a list of the supplies I used on this one. For the peony, I only used the largest of the flowers this time. I really like that peony.


Thanks for joining me in this fun flowery journey!

And now, for the grand finale photo…I added some fun with a polka dot backdrop! Lol.

Do you like the polka dot backdrop?

Ok, I’m having way too much fun with this class. 🙂 See you next time.

Comments { 6 }
colorful-neutral-card-2

Neutral Monochromatic Hibiscus Card

Hi there! I’m back with my second card for the Altenew 3D Floral Focus card class. This class is fantastic, but I have to admit that I struggled with this monochromatic card.

I suppose I could have chosen one color in varying shades, but I decided to REALLY test my skills by doing a neutral card!! (WHAT?!) I know, I know, it’s not like me at all!

Neutrals/Monochromatic card

I do think that it turned out rather striking. But I had to add some pizzazz somehow! So I cut the main portion of the hibiscus in PEARL paper (it has quite a beautiful pearl sheen in the light)! And I added some silver glitter leaves. There! That’s more like it.

Silver glitter paper adds some extra drama!

When I had this arrangement of flowers and leaves all laid out on my black cardstock, I used the Glad Press ‘n Seal trick to pick them ALL UP and put glue on the back. Then I took the entire arrangement that was still attached with the Press ‘n Seal, and glued it right onto the card. I let the glue dry for a minute, then pulled off that Press ‘n Seal to reveal my grouping of flowers & leaves. It works like a charm!

Can you see that pearl shine?

I’m often asked what supplies I’ve used, so I’ve compiled a list here. I have to say…it’s quite a NEUTRAL list of supplies today (except that Press ‘n Seal…Lol)! I’ve used affiliate links when possible, at no extra cost to you. When you purchase through these links I may get a small commission, which helps me keep up with blog costs and bring you more and more fun projects! Thank you.


Check out the Floral 3D class if you are interested in learning more about these 3D flower dies. I’m having a blast!

Thanks for stopping by. 🙂

Comments { 14 }
create-happiness-2

Create Happiness | Altenew 3D Peony Dreams

Hello! The Altenew 3D Floral class just started yesterday and I’m already loving it! This is my very first time using any 3D flower dies and I’ve learned lots so far.

For my first card with the Peony Dreams 3D flower die, I found some random cardstock lying around by my paper cutter. Please tell me I’m not the only one to save all the little pieces of leftover cardstock? Anyway, I found three purples in different shades to cut out the flower; and two shades of green for the leaves.

I love that with this die, you can create smaller flowers OR layer them up with the larger dies to create a much larger flower! For this card, I just used the smaller flowers. But I know there’s a lot more I can do with this die set.

You might be able to see the texture on that flower…for the base I used a textured cardstock and I love the extra that it adds!

Textures with gemstones…beautiful match!

I ink blended a simple background using Distress Ink, and added some gems to finish off the card.

Here’s the supplies I used, affiliate links used when possible (at no extra cost to you!)


I hope you enjoyed this card today! I’ll tell you…these dies are a lot of fun.

Comments { 4 }
pink-pineapple-card-2

Glittery Pink Pineapple? Why not?

Hello there! Today I have a fun tropical card share. Yesterday I made a beachy card, and today I thought I’d take it one step further: to Hawaii Tropics!

This card uses my favorite background inking technique that is SO FAST!! In fact, I feel like it’s one of the most overlooked tools in the craft room right now. But today, I’m bringing it back!

This was a fun and easy card to put together and I have a VIDEO for you to watch below or on YouTube:

Did you watch the video yet? No? Well, I’m still going to tell you my secret: clarity brushes! (aka Stencil brushes). I love them for a fast and easy way to put ink onto paper. Sometimes I find the blender tool takes too long and is painful for me. The makeup brushes are great, but when I have a LARGE area to blend, I reach for these clarity brushes.

A Happy Pineapple!

I made him a glittery pink to play in the Paper Smooches contest going on this month: here.

This was my inspiration photo:

What do you think? Fun, right?

I’m often asked what supplies I’ve used on a project, so I’ve made a list for you here using affiliate links when possible (at no extra cost to you). When you purchase an item using these links, I may receive a small commission. This helps me with blog upkeep and to bring you more fun projects like this one! Thank you for your support.


I hope you enjoyed this project today! Thanks for stopping by!

Comments { 0 }