Archive | Paper Crafting RSS feed for this section
SUNSHINE-Mug-Full-of-Fun-card-3-Kari-V

The Happiest Gingerbread Man

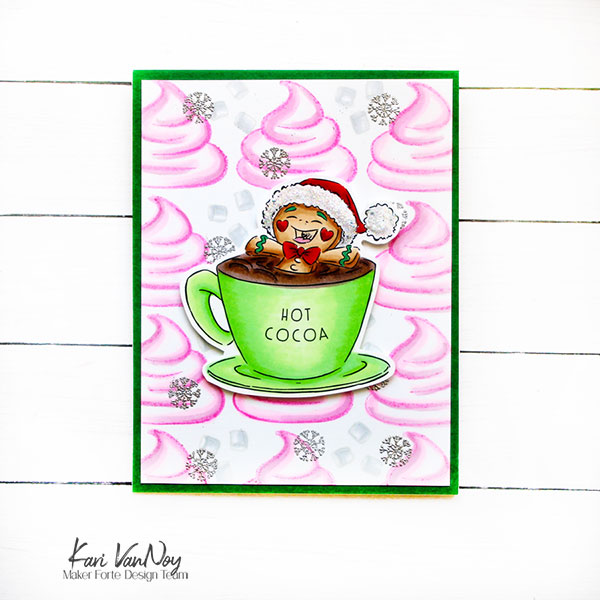
Hello! Today I have the cutest, happiest Gingerbread Man card to share with you! I am using a new stamp set from Maker Forte for this one, and it is one that is so versatile. You can make cute cards (like this one) or even more elegant cards depending on the images you choose. I just love sets like that.

I have a video for you on how this card came together, watch it below or in HD on YouTube:

This card was such a delight to make, I might have been smiling the entire time!

I used the whipped cream from the set as my background, stamped in PINK! I think this could be peppermint whipped cream. YUM!

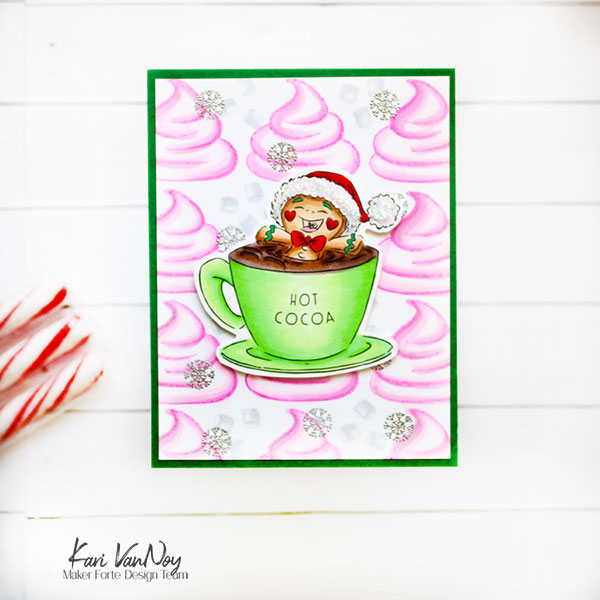
I also stamped some mini marshmallows in the background and some silver heat embossed snowflakes.

For the focal point, I stamped the mug with one of the sentiments (of course I had to choose “Hot Cocoa!”) Then I stamped that happy gingerbread man. I colored this up with Copic markers and popped it up with foam tape on the whipped cream panel.
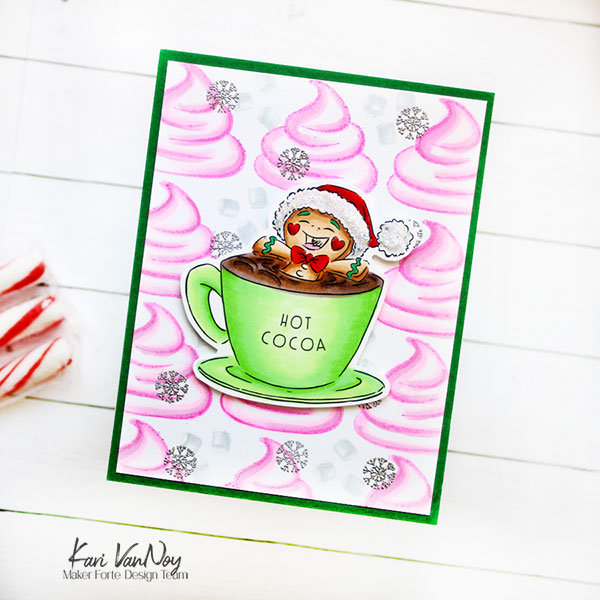
Isn’t he so happy?!

I’m often asked what supplies I use to make my cards and projects, so I’ve put together a list using affiliate links when possible. If you make a purchase with these links I may receive a small commission. These help me to keep up with blog costs and continue bringing you fun projects. Thank you so much for your support!


Thanks for stopping by today! If you haven’t already checked out the entire Christmas in July release, check it out HERE. So many great sets released!

Happy Crafting!

Comments { 0 }
SUNSHINE-Gidde-Up-Cowboy-card-1-with-paper-Kari-V

Reward: Time to Celebrate You

Hello! Today I have the easiest card that’s oh-so-cute! I am using the new set from Maker Forte called Giddy Up Cowboy. Here’s the best part: I used some pre-printed paper for the background! That’s right: the background was done for me!!

I love a great background, especially when it’s already done! And just look how cute it is. I cut the panel down so I would have a white frame around the background.

For this card, I stamped and colored a few of the images from the stamp set. I colored them up very simply with Copic markers (in keeping with the quick theme).

For the sentiment, I picked one from a simple sayings set and die cut it with the Simply Stated dies! Then I popped the sentiment and the images up with foam tape. VOILA! A completed card that was so so simple.

I’m often asked what supplies I use to make my cards and projects, so I’ve put together a list using affiliate links when possible. If you make a purchase with these links I may receive a small commission. These help me to keep up with blog costs and continue bringing you fun projects. Thank you so much for your support!


I hope you enjoyed this project today! Thanks for stopping by!

Comments { 0 }
SUNSHINE-hippo-birdie-to-you-card-3

Masking Stencils to create a Wavy Background

Hello! Today I have some Wavy Background stencils to share, and I create a watery scene. I love the new stencils, and I paired them with a sweet hippopotamus from Miss Ink Stamps.

Watch the video below or in HD on YouTube:

To create the “splashes” I used the Fancy Shells stencil with embossing powder and glitter. I love the texture and the shine this adds!

I’m often asked what supplies I use to make my cards and projects, so I’ve put together a list using affiliate links when possible. If you make a purchase with these links I may receive a small commission. These help me to keep up with blog costs and continue bringing you fun projects. Thank you so much for your support!


Thanks for stopping by!

Comments { 0 }
SUNSHINE-both-cards-2

Dragonfly & Hummingbird

Hello! Today I have the new July Hedgehog Hollow kit to share along with 2 cards. I loved the large stencils included in the kit: one is a dragonfly and one is a Hummingbird. I paired them with the wildflower background stamp for some beautiful cards.

I created a process video for you, watch it below or in HD on YouTube:

I used the foilable ephemera in the kit on both of these cards. I love this concept because they include both the positive and negative ephemera to use up all your foil! This is difficult to explain, so watch the video to find out how to really use this!

I’m often asked what supplies I use to make my cards and projects, so I’ve put together a list using affiliate links when possible. If you make a purchase with these links I may receive a small commission. These help me to keep up with blog costs and continue bringing you fun projects. Thank you so much for your support!


Thanks for stopping by today!

Comments { 0 }
SUNSHINE-stars-flip-flops-card-2

Patriotic Flip Flops

Hello and Happy 4th of July! Today I have some patriotic flip flops to share…inspired by a pair of flip flops I actually own.

I die cut the flip flops from white cardstock and then inked up the blue one with Vegas Strip ink. I used a stripe stencil from my stash to ink on the red stripes with Telephone Box ink. I used these same colors to ink up the straps.

Then I used a mini star stencil from my stash to add embossing paste on the blue flip flop. I set this aside to fully dry.

To assemble the card, I used a background paper from Honeybee stamps. I layered 3 sets of straps per flip flop and attached them with liquid adhesive.

Of course I had to add a gemstone! Then I stamped the sentiment with the same blue ink and die cut with matching dies.

I’m often asked what supplies I use to make my cards and projects, so I’ve put together a list using affiliate links when possible. If you make a purchase with these links I may receive a small commission. These help me to keep up with blog costs and continue bringing you fun projects. Thank you so much for your support!


Thanks for stopping by today! Happy 4th of July!

Comments { 0 }