Archive | Paper Crafting RSS feed for this section
alice-and-her-flamingo-card-6-in-hand

Alice Plays Croquet

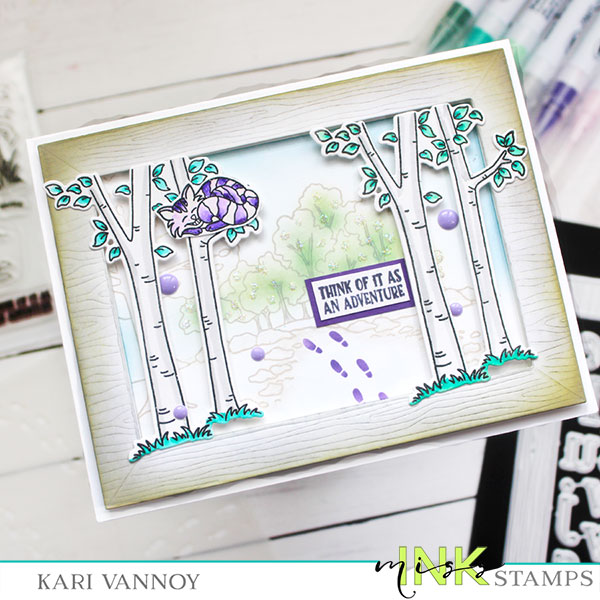
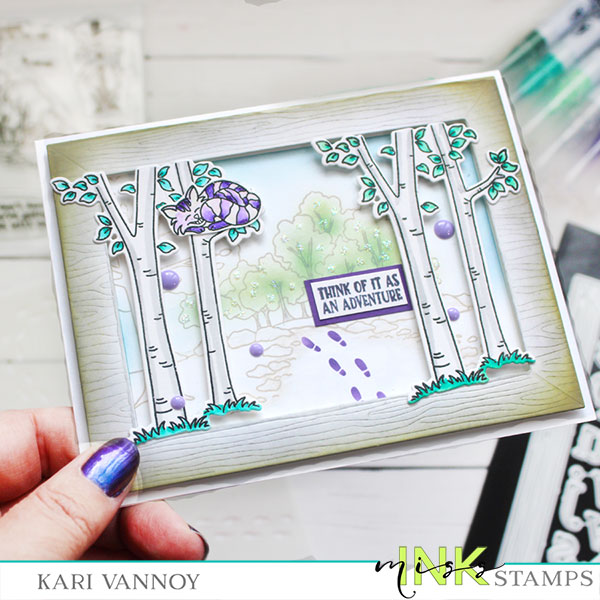
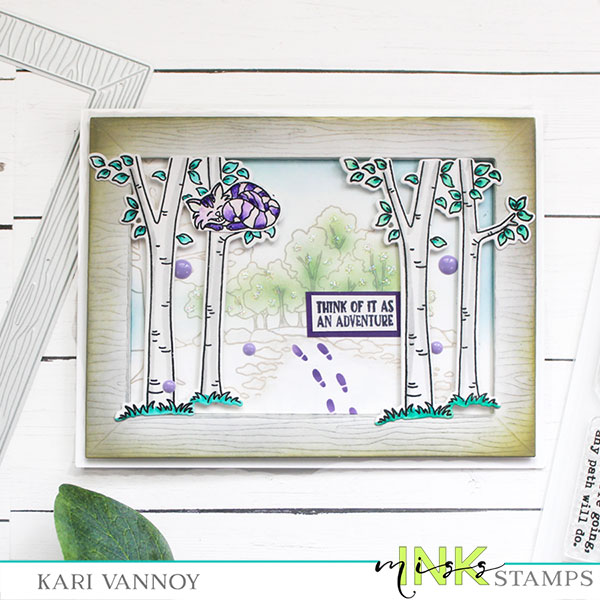
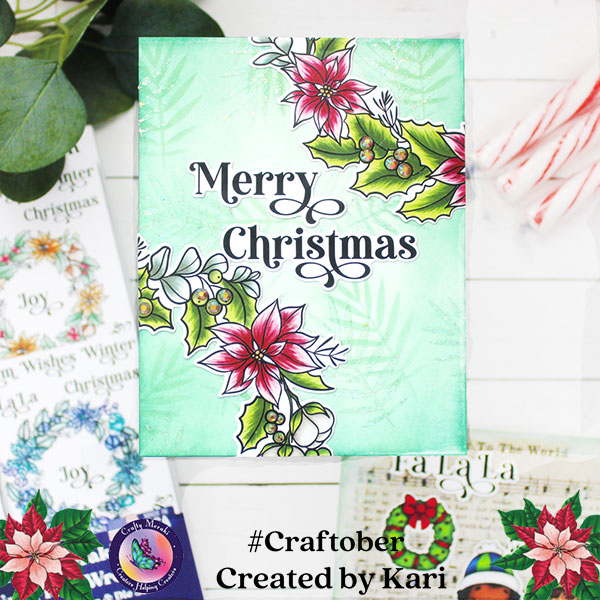
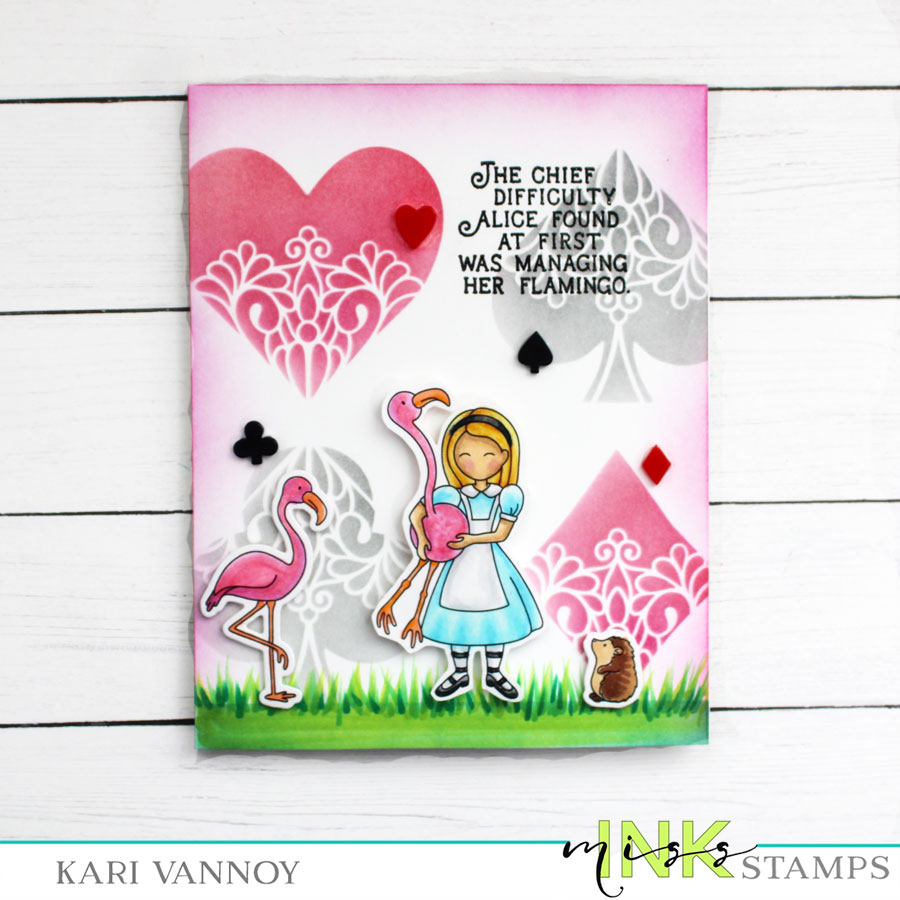
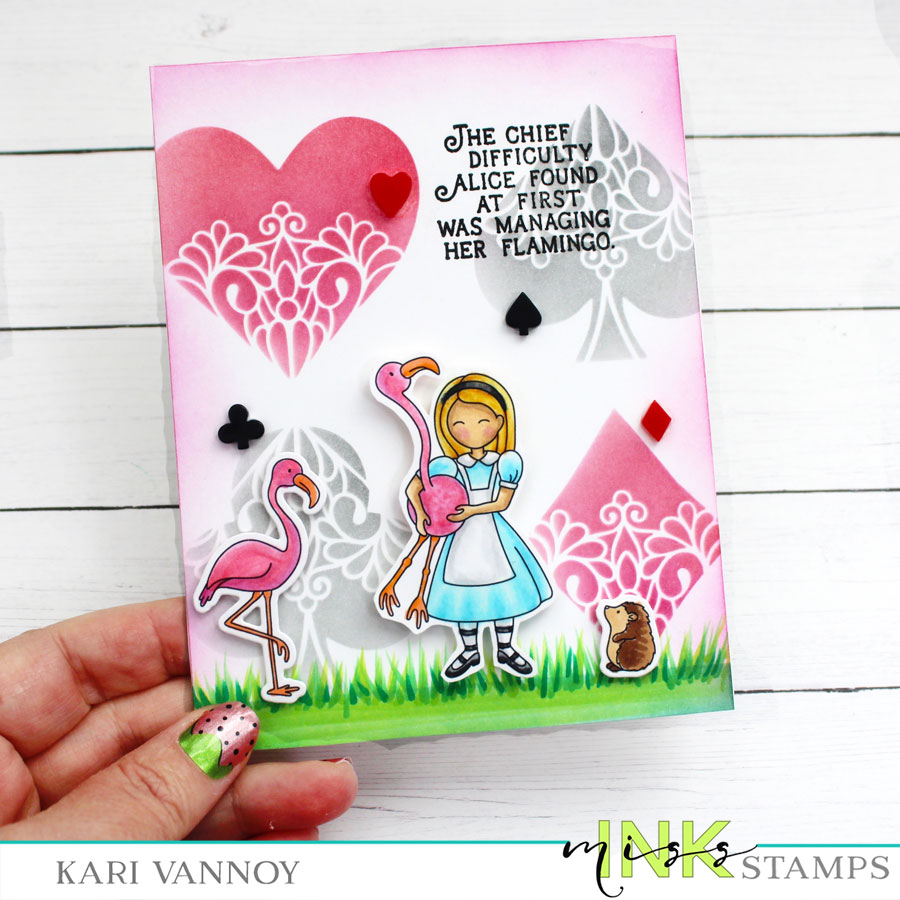
Hello! Today I have a new card video for you: Alice Plays Croquet. I’m using some new products from Miss Ink Stamps that I really love: the new Filigree Card Suit Stencil and the new Croquet stamp set from the Alice collection.

Watch the video below or in HD on YouTube:

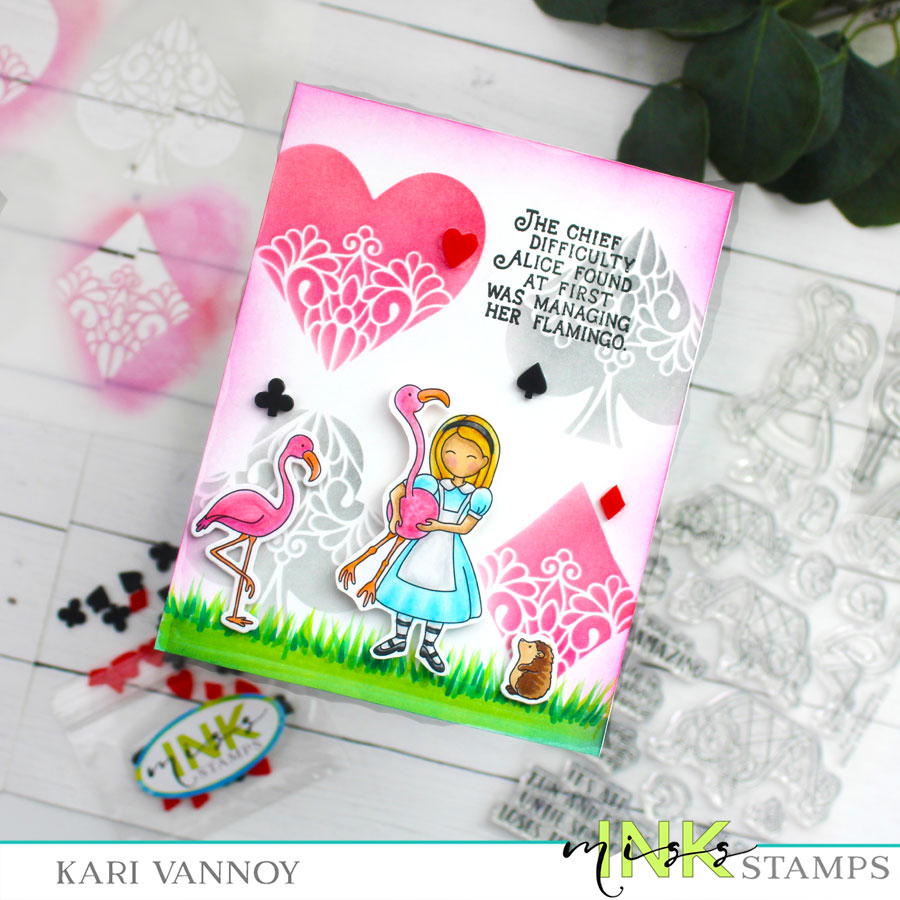
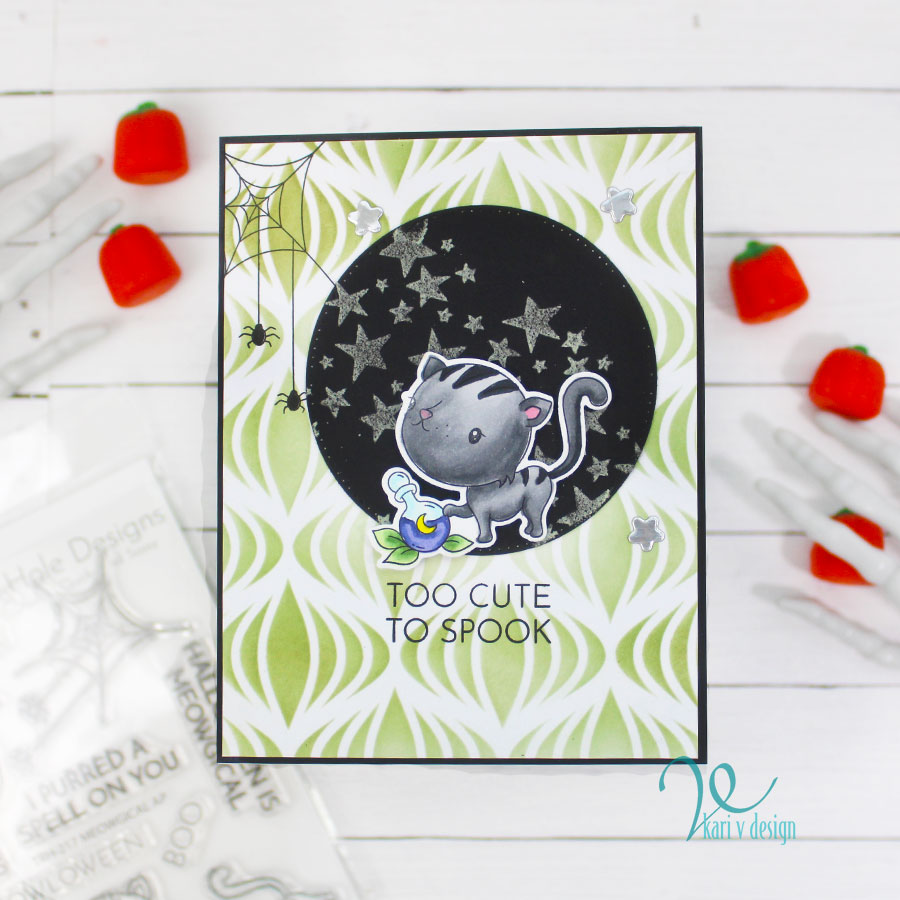
Look how beautiful that stencil set is in the background! I hope you will watch the video to see how this card came together.

I’m often asked what supplies I use to make my cards and projects, so I’ve put together a list using affiliate links when possible. If you make a purchase with these links I may receive a small commission. These help me to keep up with blog costs and continue bringing you fun projects. Thank you so much for your support!


I hope you enjoyed this project today. I’ll be back real soon with more cards to share.

Comments { 0 }
SUNSHINE-cheshire-cat-in-forest-card-5

Frame into Wonderland

Hello! Today I have a Frame into Wonderland card with the Cheshire Cat. This is a fun card to make, and it does look a little dreamy!

Watch it below or in HD on YouTube:

See that frame…it’s the new Woodgrain Frame die from Miss Ink Stamps! It cuts a frame and embosses a wood grain design into the cardstock at the same time. I love this frame and I thought it would make the perfect picture frame into Wonderland!

I started watercoloring the aspen trees and die cut them out. Then I stamped the background in a soft grey ink. I colored the trees and sky with a soft Oxide ink treatment. Those footprints are from a new stencil by the same name. I love a purple footprint to mimic the colors on the Cheshire cat. (I love seeing him smiling up in the tree!)

I’m often asked what supplies I use to make my cards and projects, so I’ve put together a list using affiliate links when possible. If you make a purchase with these links I may receive a small commission. These help me to keep up with blog costs and continue bringing you fun projects. Thank you so much for your support!


I hope you enjoyed this project today! I’ll be back with more cards to share soon.

Comments { 0 }
all-4-cards

Glow in the Dark Cards

Hello! Today I have some Glow in the Dark Cards as a part of my Halloween card series. What’s even better: they have black kitty cats on them!

Watch the video below or in HD on YouTube:

These cards were so fun and easy to make, and the addition of GLOW PASTE really makes them pop. I have brought in my black light to take pictures of them to show you the glowing backdrops for those kitties.

Aren’t they fun?! To make these cards I started off with the stenciled backgrounds in a few different colors. Then I made the glow paste circles on black cardstock.

I colored all those cute kitties up with Copic markers and used foam tape to attach them to the (dried) black circles.

I stamped the sentiments and the spiderwebs with black ink onto the card panels and put them all onto black cardstock mats.

I really love how these turned out (even if I DID have other card ideas in my head). Sometimes these take on a mind of their own!

A COUPON FOR YOU!

Use the code KARI10 to save on your order at The Rabbit Hole Designs! (A big thank you for the coupon code!)

I’m often asked what supplies I use to make my cards and projects, so I’ve put together a list using affiliate links when possible. If you make a purchase with these links I may receive a small commission. These help me to keep up with blog costs and continue bringing you fun projects. Thank you so much for your support!


Comments { 0 }
Kari-V-slimline-double-oven-die-and-baking-die-set-card-4

Double Oven Slimline Shaker Card

Hello! Today I have a Double Oven Slimline Shaker Card to share and Oh is it awesome! This new die from Whimsy Stamps is one of my new favorites…and I don’t think it’s hard to see why. Just take a look at the video and photos below!

I’ve share all the details and how-to in the video so it’s easy! I love the little oven mitt and potholder. I also used the NEW Baking die set to add in the pie and the turkey (how cute are they)?!?

I do think this slimline oven is the cutest as a shaker card, but you certainly don’t have to make it into a shaker. I added some peppermint embellishments to my shaker (they just remind me of the holidays)!

I just had to make a mint green shaker oven…inspired by my new mini fridge at my office! It’s so cute and retro!

I’m often asked what supplies I use to make my cards and projects, so I’ve put together a list using affiliate links when possible. If you make a purchase with these links I may receive a small commission. These help me to keep up with blog costs and continue bringing you fun projects. Thank you so much for your support!


I hope you enjoyed this project today. I sure had a great time making it. I’d love to hear your favorite holiday baking recipes! Leave me a comment below or on the video and tell me…do you make pies?!

Comments { 0 }
SUNSHINE-Fa-la-la-card-2

Quick Holiday Cards!

Hello! Today I have some Quick Holiday cards to share in my latest video. This is a part of a video hop with prizes, so be sure to check out the video description for how to enter to win!

Watch the video below or in HD on YouTube:

These cards are so easy to put together with these new Effortless Artistry Papers and Coordinating Dies.


Card 1. Fa La La

For the first card I started out with some music paper for the background and added some White Gesso around the edges. Once that was dry I edged the entire panel with Rustic Wilderness ink and added some Stickles Moon Dust glitter through the Shape Shifters Stencil.

See the glitter?

Then I added the images and sentiment cut from the Effortless Artistry Paper! Voila! A very quick holiday card!

Card 2. Merry Christmas with Wreath

For the second card, I inked the background with Evergreen Bough Distress ink, and the same color with the leaves stencil. I then shifted the stencil and added some Stickles Glitter Moon Dust through the leaves stencil.

I added portions of the wreath to the upper right and lower left corner of the panel and then added the sentiment! For extra sparkle, I added some Gold Illusion Meraki Sparkle (gems) to the berries. So pretty!

I’m often asked what supplies I use to make my cards and projects, so I’ve put together a list using affiliate links when possible. If you make a purchase with these links I may receive a small commission. These help me to keep up with blog costs and continue bringing you fun projects. Thank you so much for your support!


I hope you enjoyed these projects today! Don’t forget to check out the video and YouTube video description for details on how to enter to win a prize! See you soon with more cards to share.

Comments { 0 }