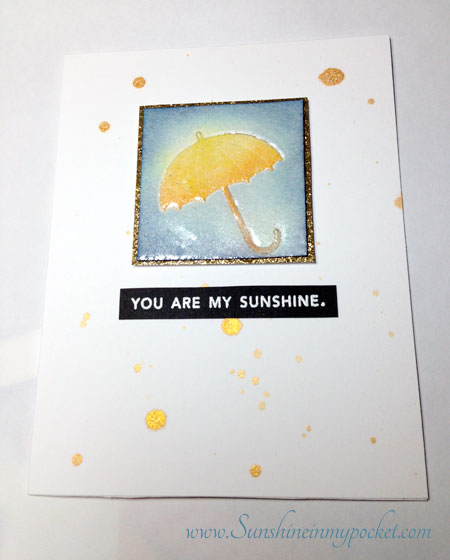
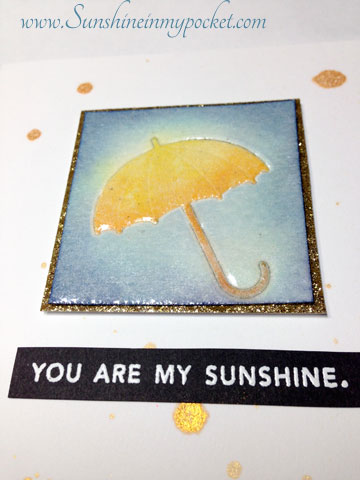
Archive | Paper Crafting RSS feed for this section
nail-polish

A Little Bit o’ Luck FIVE ways

little-luck-logos

I had fun designing this printable for St. Patrick’s Day! It is such a versatile little gem that I’ve featured it in FIVE ways. With just a few different cutting techniques or punches, you can make it look completely different. I am sure there are plenty more ways to use this printable…so use your imagination and have fun! Little-luck-5-ways-sm

Let’s take a closer look at these ideas. I first put together these colorful cards. I can just imagine my nephews helping me to paint a water-color rainbow for this card…they would love it! I simply folded a card out of white cardstock, painted the rainbow, added a “snowflake” stamp to the upper left corner, and cut out a pot-o-gold with black sparkly paper. It was super easy to put together and I love that it turned out so bright. I used the word  bubble “Luck Logo” and just cut it out with scissors.

cards

The other card was made with a green cardstock base, a green square cut to fit, and a “plank” of tan paper embossed with a wood embossing folder. I cut the Luck Logo with an EK Success punch and used a green stamp pad to color the edges a bit. I cut out a shamrock that I drew free-hand and glued on some green glitter. Who wouldn’t love to get one of these colorful cards offering a “Little Bit o’ Luck?”

SECOND, is the adorable cupcake flag! I cut these with an EK Success punch and attached them to a lollipop stick.

cupcake-toppers

Can you imagine a row of these all lined up on your dessert table? I added a little glitter glue to the shamrock cupcake topper on the right…I think it adds just a little more pizzazz. So cute!

THIRD, a simple napkin ring made from paper. Having a St. Patrick’s Day breakfast, brunch or dinner? Add some extra luck to the table settings. I cut the “Luck logo” into a rectangle and added a little excitement to the edges with a scallop cut. It’s actually the same punch as the cupcake topper on the left, but just a part of it. (can you tell by looking at the picture above?)

napkin-ring

FOURTH, this adorable glassine bag, embellished with some green! My creative and crafty Aunt Marilyn donated these little bags to my crafting stash and, boy, have I been having a ball decorating them up! (Thanks, Marilyn, I love them!)

glassine-bag

I added a bit of green glitter tape (love this stuff!) and green washi tape. {A quick shout-out to my dear friend Shellie, who graciously gave me the green washi tape when I saw it in her bag! She had “extra” and kindly gave me 2 rolls!! Shellie, you are awesome!} To the top I added the bubble Luck logo. You could use this at your table setting as a gift bag…I filled mine with butterscotch candies. I think it would be just as cute with rolos or skittles!

FIFTH, a small gift, represented here by green glitter nail polish.

nail-polish

This green glitter nail polish would be welcome by any gal wanting to avoid any pinching on that 17th day of March! I am going to give this to my amazing Mother (shhh…don’t tell) whose birthday is on St. Patrick’s Day! I secretly hope she will share it with me!

To add a little dimension and shine to the shamrock, try using Diamond Glaze…be sure to let it completely dry before you try to attach it to your gift. (ahem, not that this happened to me….!)

I hope you enjoy spreading a little bit o’luck with these printables this year! Enjoy!

2-13-a-little-bit-of-luck-8-up

To download the printables, please like my page here:

Then download the printable here:  Little Luck Logo

Comments { 0 }
you-rock-valentine-printable-pdf

Valentine Candy Pockets & Free Printable

you-rock-valentine3

Here’s an easy Valentine idea for boys or girls. I have more nephews than nieces and so I created these more “masculine” valentine pockets and included some Pop Rocks candy!

They are super easy and fast to put together. Here’s what you need:

you-rock-items-needed

Scoring Board, washi tape, brown ink, adhesive, printable tag, large circle punch (not shown), corner rounder punch (not shown), valentine paper, and pop rocks.

I have put together a little video on how to put together these pockets, and here’s some written instruction: (the video will help!)

1. Cut your valentine paper to 4 1/4″ by 6 1/2″

2. Score your paper at 1/2″ and 3 1/2″

3. Turn paper and score at 1/4″

4. Fold on score lines, trim corners

5. Cut a notch in the top front of the pocket with circle punch

6. Adhere tabs and fold pocket together

7. Round the corners on your printable, ink the edges, adhere to front of pocket

8. Wrap washi tape around bottom of pocket

9. Insert Pop Rocks into your new pocket! Deliver…and you’re done!

I hope my two nephews in Utah don’t see this post…I just dropped some of these sweet Valentines in the mail for them! I know this little pocket filled with Pop Rocks will inspire some smiles.

Happy Valentine’s Day! Enjoy these free printables to make your own and please leave a comment if you enjoyed this post.

you rock valentine printable pdf

you-rock-valentine-printable-pdf


Comments { 0 }