Archive | Paper Crafting RSS feed for this section
joy-with-greenery

Mistletoe Greenery

Hello! Today I have a beautiful stamp to share with you…it’s called Mistletoe from Altenew and it is so fun to play with! It is a multi-layer stamp set, so you can use a variety of ink colors to make a beautiful image (no coloring required).

I have discovered my favorite green inks so far: the lighter green is Chirp Chirp from Waffle Flower, and the darker green ink is Fern from Simon Says Stamp. I am sure I will be using this combination many times this holiday season!

joy-with-greenery

I added the red berries using Distress Oxide ink and added some shading with Prismacolor Pencil. Then I used the JOY die cut from My Favorite Things to cut out a red glitter paper sentiment. I love how this came together.

I love the holiday season and I hope to get a lot of cards made this year. Do you send out holiday cards?

Comments { 0 }
halloween-bear-with-gravestones

Big Bear Halloween Version, 4 ways

Hello! I have some fun Halloween cards for you using the “Boo” set from Waffle Flower, featuring one of my favorite characters: Big Bear! I use mostly Distress Oxide Inks to create these backgrounds and I really had a lot of fun!

This first one is the simplest to make: just stamp some black stripes for the background, color up your bear and pop him up using Scotch 3M foam tape! (This is my favorite and I buy it in a big roll!) I used the Plaid Play set to stamp these stripes in VersaFine Onyx Black ink.

halloween-bear-with-stripes

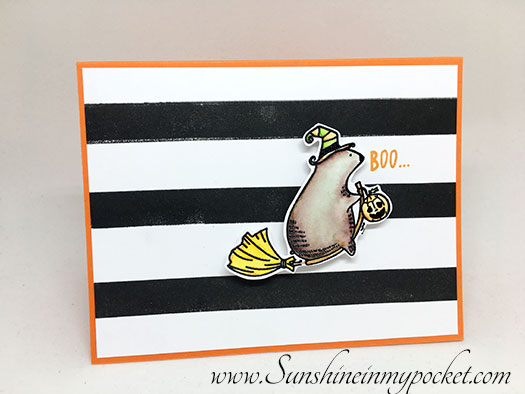
[Here I used Zig Clean Color Real Brush Markers to color the bear.] Then, I added the card panel to an orange card base, stamped the “Boo” sentiment in orange marmalade Distress Oxide ink and Voila! A cute Halloween card that didn’t take very long at all!

For the second card, I used the same stamp set, but got a very different look!

halloween-bear-with-cape

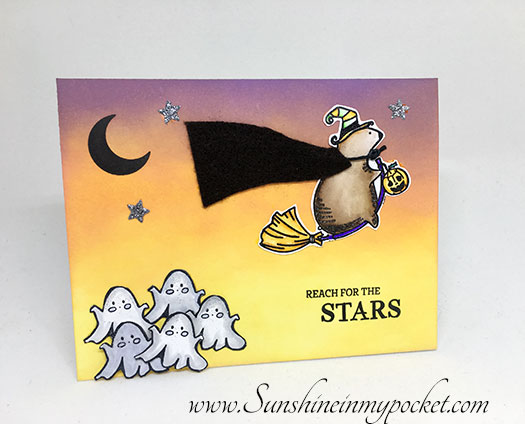
Oh, Big Bear, you look very cute with a cape! I just cut a small piece of felt in a “cape-like” shape and attached it to the car front using my favorite glue: Tombow Mono Multi glue. A little black twine tied in a knot makes it look like an official cape. Lol.

For the background, I used Distress Oxide Ink in Fossilized Amber, Spiced Marmalade, and Wilted Violet. (These are from the January 2017 Distress Oxide colors).  I added some die cut stars in silver glitter paper, and a moon shape and sentiment from the Waffle Flower “Reach for the Stars” set.

I love those ghosts in the corner!

My third card uses Distress Oxide ink in Spiced Marmalade to make a puff of smoke behind Big Bear. I cut my own mask in a smoke shape using Post-It Full Adhesive sheets, then inked on the orange color. Add some sparkly Stickles and White dots to create a magical look.

halloween-bear-with-orange

The background is made with Distress Oxides in Broken China and Faded Jeans colors and splashed with water droplets. I masked the bear first before this ink went on…it’s an *almost* one layer card! The Boo sentiment is heat embossed in white on a black strip of cardstock and adhered to the upper left of the card. I like the black card base for this one.

And my last card is one of my favorites…Big Bear flying over a graveyard!! (This grave stamp set is from My Favorite Things)

halloween-bear-with-gravestones

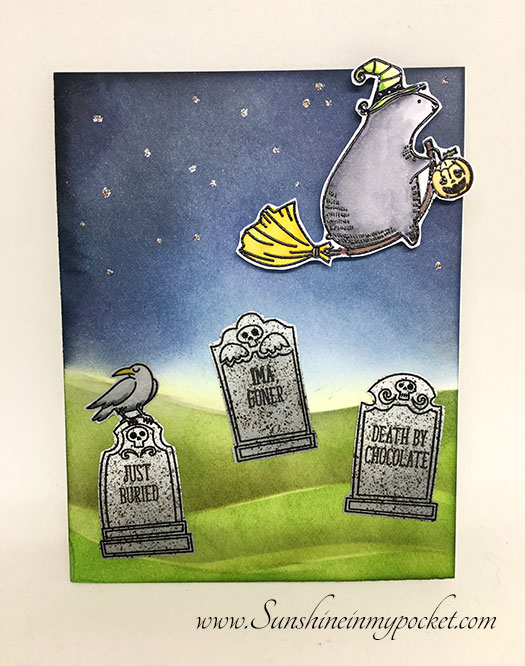
The Distress Oxides are wonderful for creating a background like this! I also inked on the gravestones using the Iced Spruce color. To get the granite-like texture on the gravestones, the Distress Spritzer is key! I used a few grey Distress Markers in the spritzer on the gravestones BEFORE I cut them out. Don’t they look cool?

For the stars in the sky, I used one of my favorite colors of Stickles: here. It creates a silvery/gold star in the sky! Just add some dots and they dry to a glittery perfection.

I hope you enjoyed these projects! I’d love to hear if you send out Halloween Cards. I have to say, that I don’t normally send Halloween cards, but when you have stamps as cute as these…now I love to make and send them!

Happy Halloween!

Affiliate links used when possible at no additional cost to you. Thank you for your support!


Comments { 0 }
think-pink-october-card

Fight Like A Girl (Breast Cancer Awareness) Cards

I just have to give a shout out to Amuse Studio Stamps for offering a beautiful Breast Cancer Awareness stamp set called “Fight Like a Girl.” I received these stamps last week and purchased the die to go with them. Right now they are still offering this stamp set for free (you just have to pay shipping & handling). (The die is already sold out when I checked tonight.)

Here’s the cards I made to honor my friends and family for October Breast Cancer Awareness month:

hope-october-card

I used the Hope stamp and the Pink Ribbon stamp (and die) on this card. [The flowers are from a Waffle Flower set called Wild & Free.] Of course, I had to add some diamond Stickles to the ribbon…I love a little sparkle! To add some pink highlights around the edges, I inked on some Distress Ink in “Spun Sugar.”

think-pink-october-card

This card has some irridescent pink sequins. They look purple in this picture, but in real life they are beautiful and pink! I love this “Think Pink” sentiment! I used the negative of the ribbon die to make this card…I love it when you can make two cards with the same die!

Here is a link to the stamp set by Amuse Studio if you are interested: Fight Like A Girl.

I love these stamps and I hope you enjoyed my projects!

*Affiliate links used when possible, at no extra cost to you. Thank you for your support!
Comments { 0 }
day-5-watercoloring

Merry Making Class Day 5

Today I was inspired to try my hand at a holiday watercolor card. Debby Hughes is the master at watercoloring a scene, and she made a glorious card to show us her technique. Here, I used Zig Clean Color Real Brush Markers to watercolor my scene.

day-5-watercoloring

I adore this Stamping Bella image…so cute! That carrot is just waiting to be put on the snowman as a nose! Well, that wraps up the class projects this time around. I will take more time to finish up a few more projects I really wanted to try…soon!  I really enjoyed this class and can recommend any of these classes they offer. Enjoy!

merry-making-badge

Comments { 1 }
day-4-die-cutting-card

Merry Making Class Day 4

I’m back with a great card using all die cuts, inspired by Nichol Spohr! Ok, ok, there is ONE stamp on this card: the greeting! But other than that, this is mostly die cuts colored up with some Distress Inks. I love how it turned out! These are some new stamps and dies from Right At Home Stamps and I love the car and that sentiment!

day-4-die-cutting-card

See you again for the last day of class projects tomorrow!

merry-making-badge

Comments { 0 }