Archive | Paper Crafting RSS feed for this section
sunshine-wish-you-were-here-tropical-drinks

Take Each Day One Cup at a Time

I’m back with some more fun projects using dies! I love these Cups & Mugs Dies from Our Daily Bread Designs! Here’s my first card:

sunshine-tea-cup-perks-you-up-2

I die cut those tea cups using this die and this paper. I love the sentiment “I Hope this perks you up!” (It’s from this set here). Those tea cups look like they are precariously perched!! Lol.

That spoon is cut from silver foil paper and it looks JUST like a stainless steel spoon. *Wink*

I added some distress ink to the lower portion of this card, as well as to the cups and around the edge of the card. It might be hard to tell in this photo, but there are also some vertical score lines in the background to add some more texture to the card. It looks so cool in real life!

My next card is another pick-me-up:

sunshine-one-cup-at-a-time

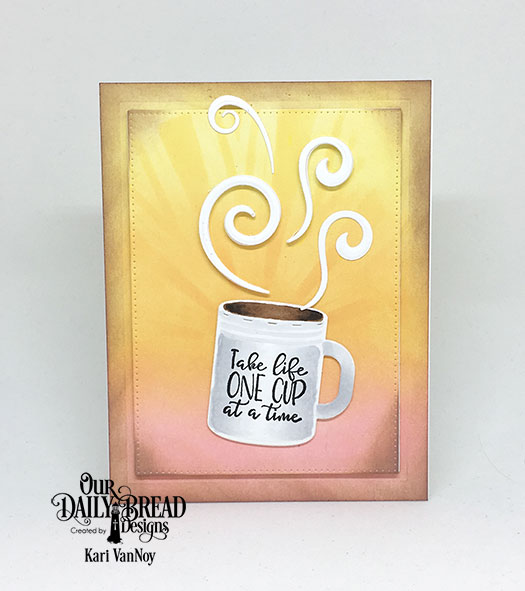
That mug is just so fun and filled with hot cocoa (lol…hot cocoa for me!) Believe it or not, I used the Boho Egg die to make the steam coming out of that hot cup of cocoa!! Isn’t is just perfect for steam? I popped a couple of the steam flags up using craft foam for more dimension. Lots of ink blending on this one, and for a bit of sunshine in the background I used this die as a stencil!

For my last card I went more tropical, I just couldn’t resist turning those mini dies into tropical drinks!

sunshine-wish-you-were-here-tropical-drinks

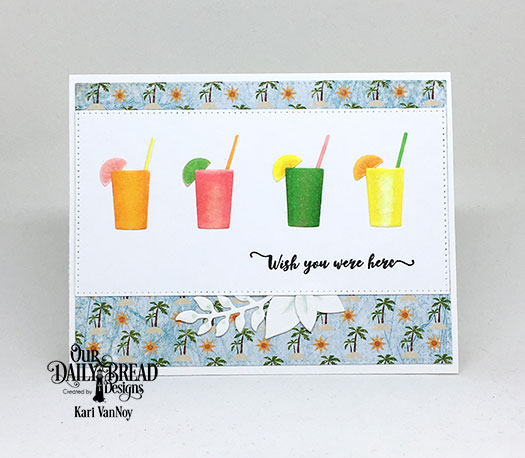
All those colorful drinks are just delightful! I’m thinking lemonade, watermelon juice, limeaid, and orange fizz! So fun. And if I were drinking one of these on a beach somewhere I really would “Wish you were here!”

I used this paper pad for the background paper, this die for the leaves, and this set for the sentiment.

That’s all for me today…check out the ODBD website for more information about these sweet new dies. I am loving them!

For more inspiration using the May Release and to see the other designers projects, be sure to visit the ODBD Blog.
Comments { 0 }
sunshine-love-you-a-latte-lever-card-inside-2

Grateful Heart

Hi again! I hope you are having a great day! Today I have some fun cards to share using the May release from Our Daily Bread Designs.

These cards feature the Hug in a Mug Stamp/Die Duo. I love these duo sets…you get the stamps AND the dies to cut out the images. They also have wonderful sentiments to choose from!

Now, I don’t drink coffee, but I DO love to make coffee cards still (like for the coffee lovers blog hop and such…). Just look at how cute these stamps are:

sunshine-grateful-heart-coffee-cups

I used the Cups & Mugs dies to cut a heart into the middle of each of the coffee cups, and I put some of the new Latte Love patterned paper behind each one. Doesn’t that just look like the steaming coffee?! (Well, that was the idea behind it anyway! Lol.)

I watercolored each cup using Zig Clean Color Real Brush Markers (still loving my Zigs!) and popped them up using multiple die cuts of the cup. That sentiment is a favorite of mine: Start each day with a grateful heart!!

You know what would be in my cup? A green drink from Nekter, or a cup of ICE. Ha!

Next, I made a card using more of that paper and a different coffee cup image. I couldn’t resist turning this into a Lever Card!! Did you see my turtle lever card? Check it out here.

Back to my coffee cards…Here’s the front of my Love You a Latte Lever card:

sunshine-love-you-a-latte-lever-front

Isn’t that paper cool?! I stamped the image a second time on kraft paper and cut out only the coffee cup sleeve. Then I popped it up using foam tape. I colored the top of the cup with Copics.

Here’s the inside of the card:

sunshine-love-you-a-latte-lever-card-inside-2

I used the stamp to make a watermark on the inside panels. The sentiment “You’re the Cream in my coffee” was perfect for the inside! These lever cards are so fun. I love having the Lever Card Layers Dies to easily make the inside panels. This Lever Card is such a great design!

See you next time!

Comments { 0 }
youre-sweet-2

Sweet wishes

Hello! Today I have a Sweet card to share with you…these are all products from the May 2018 Hedgehog Hollow subscription box. These boxes are packed full of amazing goodies, if you haven’t seen them yet click here to take a look!

In this May box is a cute set from Waffle Flower, some sequins from Pretty Pink Posh and a ton of other fun supplies to try. But I think I am the most excited to see the FIRST EVER die and stamp set produced by Alexandra of the Hedgehog Hollow! My card today features the new “Sweet” die that is such a good size…it almost fills my entire A2 sized card:

sweet-striped-background-card

Those mice are the cutest! I die cut the “Sweet” die out of white cardstock and then I used silver embossing powder to make it shine! It reminded me of the old-time ice cream shoppes where they’d serve ice cream in the silver sundae cups. Love that!

For the background, I masked off stripes and ink blended using Distress Inks and Clarity Brushes to get that nice, soft color. I was inspired by the card included in the box for this background, take a look:

HH-inspiration-card

The mice were colored with Copics, then adhered to the card. I popped up the cherry and the ice cream sundae with Scotch 3M foam tape. After I took a photo, I decided it needed a “You’re” word added to the card, so it reads “You’re Sweet”….It just finishes the card nicely. 🙂

youre-sweet-2

I hope you enjoyed this sweet ice cream card today! For more information, visit The Hedgehog Hollow.

Have yourself a delicious day!

Comments { 0 }
sunshine-i-will-give-you-rest-3

May 2018 Release with Our Daily Bread Designs

Today I am sharing a project(s) I created using Our Daily Bread Designs May Release. I am so excited about this release because everything is so calm and peaceful…let me show you what I mean.

This first set I’m featuring is called “Come to Me” and is a beautiful scene of beach chairs at the ocean…oh, how I wish I was here in this picture!

sunshine-i-will-give-you-rest-3

I colored this up with Copic markers and added some white gel pen dots to the ocean waves to make it look like the ocean foam. Doesn’t this scene just look dreamy!?!

And here are the projects I have to share using the Turtle Love set:

sunshine-turtley-awesome-birthday-2

That turtle is just so AWESOME! Lol. I colored him up using Zig Clean Color Real Brush Markers and then added him to some paper from this paper pack. This is probably my favorite ODBD paper pack of all time!

For my last card today, I am featuring the Lever Card Die. I have never used a die like this before, and I LOVED it! Just look at how fun this turtle is on a moving lever card:

sunshine-turtley-lever-card

and here is the inside:

sunshine-turtley-lever-card-inside

Which one is your favorite of these beachy projects today? I had such a great time making them that I just can’t pick a favorite! Bye for now…I hope your week is filled with calm.

For more inspiration using the May Release and to see the other designers projects, be sure to visit the ODBD Blog here.

Comments { 0 }
sunshine-beach-collection

Totes Beach Collection

Hello again! Today I’m so excited because I have another collection to share with you using the Timeless Totes dies and Layers add-ons from Daily Bread Designs. It is a fantastic die, and probably my favorite crafty item right now!

I have created a beachy theme (another of my favorites) for this collection:

sunshine-beach-tote

This beach tote has a watercolor feeling, using these papers from Our Daily Bread Designs. Oh, and did I mention they also have a wallet die that fits inside the purse? It is called the Petite Pocketbook Die and it is so cute! Here I made a beachy sand wallet using papers from the same collection.

sunshine-beach-tote-with-wallet

But that’s not all….oh, no. If you know me, you know that I love making collections and this purse die was screaming out for a collection!

sunshine-beach-collection

See that one on the left? It is so beautiful to use the Tote Embossed Inset Die as a stencil!! Normally, you would use this die to emboss a darker cardstock to make it look like leather. But I wanted a BEACH feel, so I used the die to emboss that beautiful design, then I inked it using Salty Ocean Distress Oxide ink and a finger dauber.

The striped one in the middle is painted with watercolors! I used a kraft paper for the base of the purse on this one, reminiscent of sand. Notice the fun rope knots on the handles; doesn’t that just scream beach tote to you? (it does to me!)

I also created a video for you to show you just how easy these purses are to assemble! Watch it below or on YouTube:

And I also had a little fun creating a no-line watercolor card to match my beach tote. I wanted it to have the same feeling as the tote:

sunshine-beach-purse-and-fish-card

This fish set is also from the April release of Our Daily Bread Designs, and you can find it here. I used the bass fish and Gansai Tambi watercolors to paint the water, then I stamped the bass using a very light colored ink. I colored over it using watercolors and I think it has a soft, beautiful feeling.

If you haven’t already seen my Essentials Collection, you can view it here…it’s a beautiful collection of neutrals and black and white purses that are much more elegant! Here’s a peek at one of my favorites:

sunshine-embossed-square-with-stitches-straight

The Beach Collection is much more informal and beachy! So fun that there are so many options you have with this set. I might be a little obsessed…Lol.

sunshine-beach-collection

I hope you enjoyed my collection of beachy totes and cards today! I love that you can make so many variations with these dies! So. much. fun.

Comments { 0 }