Archive | Paper Crafting RSS feed for this section
sunshine-fish-coloring-page-1

June Release for Our Daily Bread Designs

Happy June! Today is a very special day because it’s the new JUNE 2018 Release for Our Daily Bread Designs! Today I have three projects to share with you.

I’m using affiliate links when possible, at no additional cost to you. Thank you for supporting my blog!

The first uses two brand new products that I love: Sister in Christ stamp set and Flourishy Frame Die set.

sunshine-for-a-special-sister

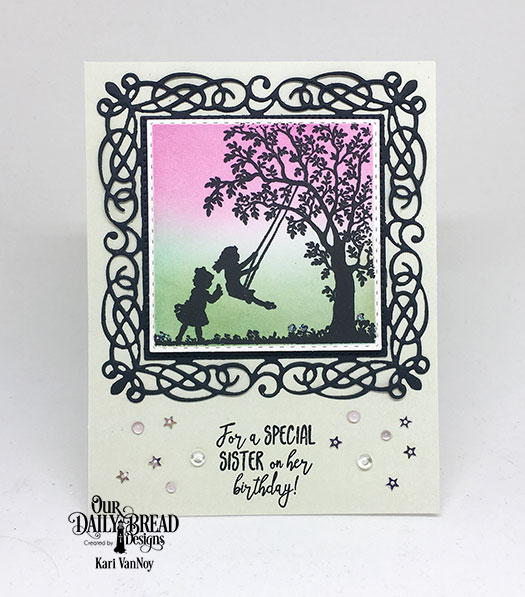
Aren’t they just beautiful? I added a few sequins and Jewel Nuvo drops to add some fun! For the background, I masked the edges of the die cut square and then inked on Distress Inks in Picked Raspberry, Cracked Pistachio, and Evergreen Bough. Then, I stamped the image over the top in my favorite crisp, dark black ink.

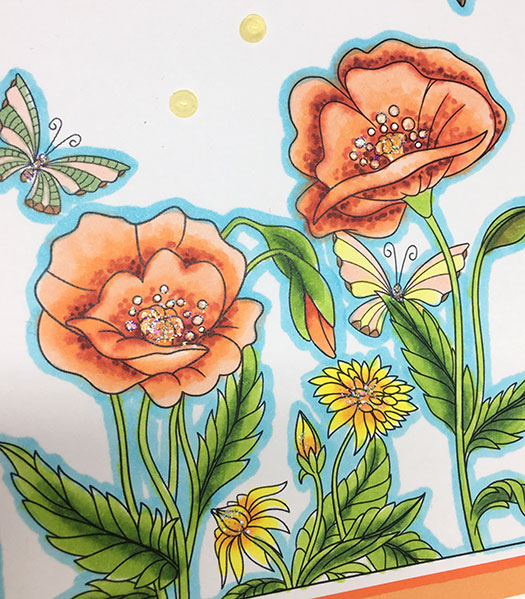
The next two projects use the new God’s Beauty Coloring Pages. These pages are sized at 3.5 in x 4.75 in, so they will easily fit on an A2 size card.

sunshine-poppy-coloring-page

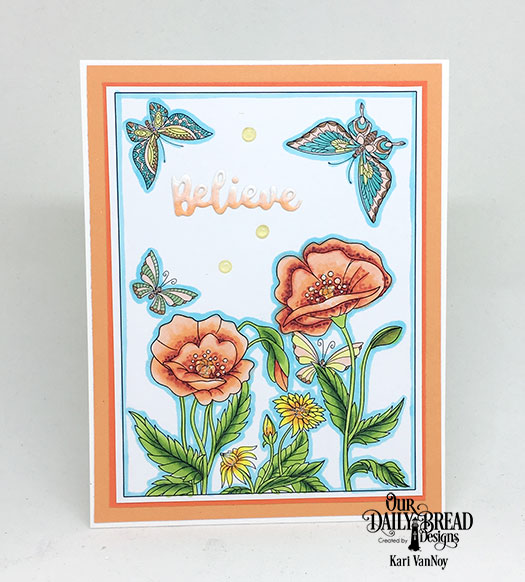
I added some glitter drops and Nuvo Jewel drops for fun. This page I colored with Copics, and as we all might know, the reds/oranges have a tendency to bleed…so I did have a bit of a problem with bleeding on the flower itself. But I found that the paper was nice and smooth. I added just a touch of sparkle in the middle of the flowers and on the butterflies.

sunshine-poppy-close-up

On my second panel I used my favorite Prismacolor colored pencils on the coloring page. At the time of posting this, there is an amazing sale on these pencils at Amazon here! (A WAYYYYYY better deal than I got when I bought my set. Lol.)

For this card, I colored up the fish coloring page and popped up a turtle on the top for a dimensional look! The sentiments on both cards are from the Inspiration Words Die. I partially inked the die cut word using Distress Inks in Scattered Straw (on the fish card) and Abandoned Coral (on the poppy card). I’ve been collecting the Mini Distress Inks lately so I can keep even more colors organized in my craft room!

sunshine-fish-coloring-page-1

I have a quick video sharing 6 Ways To Add Dimension and Interest to a flat card. Watch it here or on Youtube:

**VIDEO


Thanks for visiting today! I’ll be back next week sharing a few more of the new June release items that I love. See you then!

Comments { 0 }
cherry-tall-card-with-mouse-close-up

Creating a “Disappearing Die” Background

Hello! Today I have fun technique to share with you, using a small stamp to create a background for a “disappearing die” card! I used the May 2018 Hedgehog Hollow subscription box products, which include some great stamps & a beautiful “Sweet” die! I love this box and I cannot stop creating with these products. (You can see everything included and more information about this box here)

Affiliate links used in this post where possible, at no additional cost to you. Thank you for your support of my blog!

This is the FIRST card I made with this technique:

cherry-sweet-original

See how that die sort of disappears? But in real life you can read that it says “SWEET!” Here’s a close up:

cherry-sweet-original-close-up

Today I have  a video to share with you, making a variation of this card. I wanted to see if I could fit that sweet die on a vertical card…and YES! You can!

cherry-tall-card-with-mouse

I have a video on just how to make this card here, including a short clip on how I colored those sweet cherries! Watch it below or on YouTube:

I love how you can create this card using a small stamp!

I stamped those cherries first, as close together as I could without using a mask. Then I colored them up using copic markers in R89, R27, and R14. For the leaves I used YG17 and YG05. I added some blue ink around the edges using “Daydreaming” ink from Waffle Flower Crafts using a round ink blender. I added the sentiment from the “Sweet Sentiments” set from The Hedgehog Hollow using my Misti and my favorite black ink for sentiments. Then I cut out the Sweet die from the card panel and added it back in over black craft foam. I added all the inside pieces as well…that’s what creates the “Disappearing die” effect! I popped up that cute mouse from this Waffle Flower set using Scotch 3M Foam Tape.

cherry-tall-card-with-mouse-close-up

I hope you enjoyed this project today! For more information about the subscription boxes, visit The Hedgehog Hollow website here. (I am really enjoying these boxes!) And, if you didn’t know, Alexandra is the face behind the Hedgehog Hollow and she designed this “Sweet” die and “Sweet Sentiments” set as her VERY FIRST ones! So exciting! I am glad to have them and also to know that you can create a card either vertically or horizontally and that die will fit! Love it.

Comments { 0 }
birthday-greetings

Studio Katia Turns 2!!

Studio-Katia-turns-two-header

Hello all! I want to say a big Happy Birthday to Studio Katia! Today I’m a part of a blog hop for Studio Katia to celebrate and to share some of the NEW, beautiful products!

It’s no secret that I’m a big fan of all things Studio Katia….the products are all so fabulous, and have you seen the sequins, shaker bits, and shiny mixes?! Wow!

Today, I wanted to make a birthday card (or two…LOL) for Katia! Here’s my first one:

turquoise-flower-on-black

This is a bit dramatic, with the black card panel! But I wanted to show off those GORGEOUS Silver Crystals…aren’t they fun?! And so elegant. They are even more impressive in real life! I Copic colored this Japanese Peony in my current color obsession (BG45, BG49, BG09, N5)! Then I put the flower BACK INTO the MISTI and stamped over just the middle portion with some Versamark ink so I could add that SILVER embossing powder in the center.

The sentiment is from Birthday Greetings…and there are all kinds of awesome sentiments in this set! I really love that she included sentiments for CRAFTY FRIENDS!!

My next card is another birthday card, and this time it’s Pretty in Pink:

pink-stripes-happy-birthday

This features the new beautiful Lovely Blooms stamp set. Isn’t it fabulous?!? Oh my gosh….I’m in love with this set. I watercolored using my Zig Clean Color Real Brush Markers. For the background, I simply painted the pink stripes and let them dry before popping up the Lovely Blooms on top with foam tape. Those gems are from the Spring Gems collection.

For my last card today, I used the Lovely Blooms set again, but this time heat embossed it in Gold and watercolored with Daniel Smith Watercolors. I also used the Scallop Window Shaker Die on this one for a fun Peek-A-Boo surprise!

peek-a-boo-shaker-card-1

peek-a-boo-shaker-2

The stars are the beautiful Crystal Stars, and the jewels on the outside are the gorgeous April Crystals. I’m still on the fence about the paint splatters. You know how you think of an idea and it turns out not quite what you wanted? Well, just maybe that happened here. Lol.

But those flowers are so fun to use…and so many different ways to show them off! The Make A Wish sentiment is from the Birthday Greetings set.

I hope you enjoyed these projects…don’t forget to enter for the giveaway! Here’s how you have a chance to win:


GIVEAWAY!!

To celebrate Studio Katia is giving away TWO $100 CAD Gift Certificates every day of the Blog Hop! That’s FOUR chances to win. The winners will be chosen randomly from comments left on ALL blogs of our Blog Hop.

To enter:
– Leave a comment on this blog post and on every stop of the Blog Hop
– Follow us on Instagram
– Like us on Facebook
– Make sure to leave all the comments by Saturday, June 2nd, 2018 11:59 PM EST.
All winners will be announced on Sunday, June 3rd, 2018 on the Studio Katia Blog.


Ready to get hopping? Here’s the complete Blog Hop List:

Saturday, May 26th
I hope you enjoyed these projects! Do you love the new floral stamps as much as I do?! Good luck and enjoy the hop!
Comments { 91 }
scone-and-tea-tote

Two Totes, Two Turtles, and a Beach

Hello! How do you like my title for today? I just had to share a few more projects featuring my FAVORITE products from Our Daily Bread Designs for the month of May.

With the Royal Wedding last week, I just had to make some scones and Tea Totes/Purses. Yes!! I really did make scones (see below). The “Tea Totes,” as I like to call them, work so well with the Mini Cups & Mugs dies I used on the tags:

sunshine-tea-purse

That sentiment is from the Hug In A Mug Stamp Set…it’s so perfect! The paper I used is from this paper pack, and I think it’s perfectly girly with that Small Bow Die!

This purse was a bit lonely on it’s own, so of course I had to make another…this time using a fancy whipped cream-topped drink for the tag.

sunshine-two-tea-purses

scone-and-two-totes

scone-and-tea-tote

Add a few scones…and some tea bags…and you’ve got a perfect little Tea Tote to give to a friend. Or, if you’re like me, eat all the scones and then replace them with a store bought treat to put inside the tote. Lol.

I have my recipe here to share, if you would like to make them yourself!!

Now for my turtles! I LOVE this set from ODBD and I can’t stop creating with it. I was searching online for some photos of real turtles and I kept seeing some that had golden lines on them…which caused me to think of GOLD embossing on my turtles!

sunshine-gold-turtles

I made a video for you on how to create this background and I share my favorite TRICK for adding just a touch of embossing powder on any image! Watch it here or on YouTube:

And then of course I needed to try it out in silver! Oh…I love the little holes in the embossing on these “coral”…it makes it look so real. When I use only one layer of embossing powder I can get this fantastic result!

sunshine-silver-turtles

I was not only inspired by photos online for these turtle cards, but also by a little turtle we picked up in Newport Beach…here he is:

sunshine-turtle-inspiration

He’s cute, right? I’ve been playing around with other variations of this turtle and it has been so fun to make cards, tags, you name it!

And my last card today is this beautiful beach scene. I cannot tell you how much I love this set with ALL of it’s sentiments.

sunshine-breath-beach-chairs

Breathe. Just Breathe.

Don’t you love those wispy clouds? I used Distress Oxide Inks and then a barely damp chamois to lift off some of the color, leaving these beautiful clouds. For the sand, I inked on some Distress Oxides and then used my favorite SAND TECHNIQUE using the Distress Spritzer. I have a video here if you’d like to see just how I did this.

So there you have it. Weddings. Scones. Totes. Turtles. And Beach Chairs.
A lovely combination, don’t you think?

Check out the entire May release here at Our Daily Bread Designs.

Comments { 0 }
mice-cloudy-2

Chocolate Covered Everything!

Hello and good day to you! Today I have a delicious chocolatey post for you…well, it’s a CARD so please don’t try to eat this one. Lol.

I’m using supplies from the May Hedgehog Hollow kit, which included these beautiful Waffle Flower images and a die designed from the Hedgehog Hollow creator herself! This is a card that has been in my head ever since I was out of town and as soon as I got home, I created it right away.

[Affiliate links are used where possible at no additional cost to you, thank you for your love for my site!]

I added a “Chocolate” drizzle to all the sweets and I just love how it turned out:

chocolate-covered-sweet-cream

That “chocolate drizzle” is so fun and shiny that it was difficult to capture it in a photo! But look at that shine! I even added the “chocolate” to the Sweet die cut! (see below for what I used to “make” that chocolate). The cute striped paper is from the March HH subscription box, which is sold out.

Now if you brought me all these treats I might just declare “Well, aren’t you a sweet thing?!” That’s the reason I decided to use this sentiment.

If you haven’t seen the contents of this box, click here to view my unboxing! It’s a fantastic subscription box and I love each of them I’ve received so far!! And here’s the first card I made with the supplies in the box, too!

Another card that has been waiting for creation is this shaker card:

mice-cloudy-with-a-chance-of-sprinkles

This entire card is a shaker! I embossed some clouds in the background then colored up those cute mice that are included in the box, and added those Pretty Pink Posh sequins from the box! This shaker card really has a fun sound when you shake it!

The sentiment is also included in the box, it’s the new sentiment set also designed by Alexandra! I just love all the options she gives for sentiments! I stamped the first portion in black ink, then the “sprinkles” I stamped using Distress Oxide raspberry ink. The background for the little mice was inked using Distress Oxide ink as well in Twisted Citron and Lucky Clover.

mice-cloudy-2

Such fun! I hope your day is full of sprinkles, too. See you next time!

For more information about the Hedgehog Hollow subscription boxes, visit the website here. I love that you can buy just one box if you want, or sign up for the subscription so you don’t miss a thing.

Oh, and if you were looking for how I made the “chocolate drizzle”….I used this pen:


Comments { 0 }