Archive | Paper Crafting RSS feed for this section
sunshine-retro-ornaments

November Release for Our Daily Bread Designs

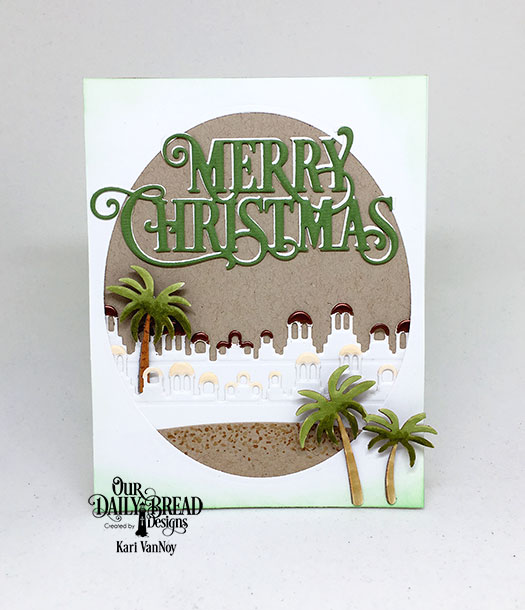
Hello again! I’m sharing some cards using the November 2018 release from Our Daily Bread Designs. This month is filled with poinsettias and ornaments and it is beautiful!

First up is this large poinsettia stamp and die set called “Merry Christmas.” This is my new favorite poinsettia of all time. It is so detailed and large enough to fill an A2 size card!

I love that this set includes the die to cut out that beautiful poinsettia.

sunshine-pink-poinsettia-with-banner

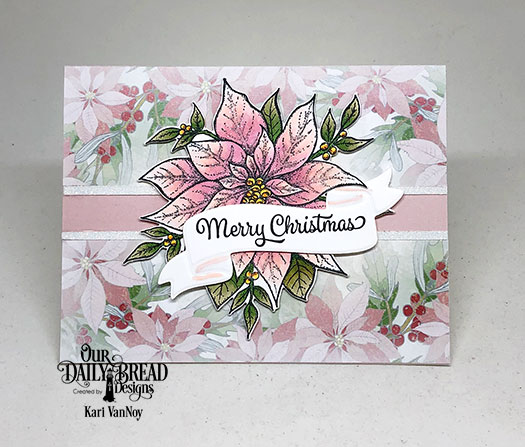
The background paper is a part of the new Christmas Paper Pack 2018. I had to create a pink poinsettia just so I could use this dreamy paper featuring the blush colored florals. The banner die is from a previously released set here.

Next is the fun Poinsettia Box stamp. This one is so different from anything I’ve seen. Here I’ve paired it with some die cut florals and a sentiment “Joy” from the new Merry Messages die set.

sunshine-new-poinsettia-box

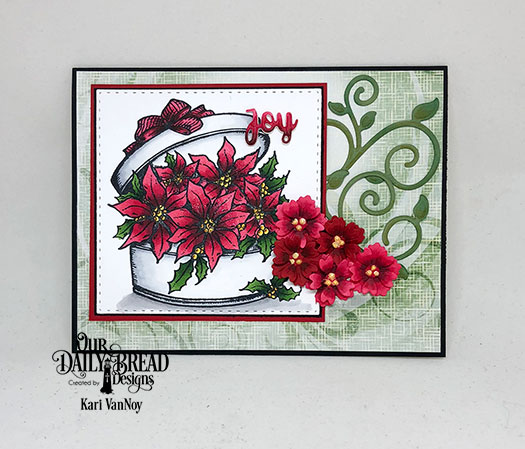
I hope it makes you think of overflowing joy, like it does me! I love the look of the flowers falling out of the box 🙂

The last card I’m sharing today features the new Retro Ornaments set. I’ve already made a sneak peek card with this set using Copic markers to color them (find it here); and today I’m using the new Retro Ornaments Paper Pack with these fun ornaments.

sunshine-retro-ornaments

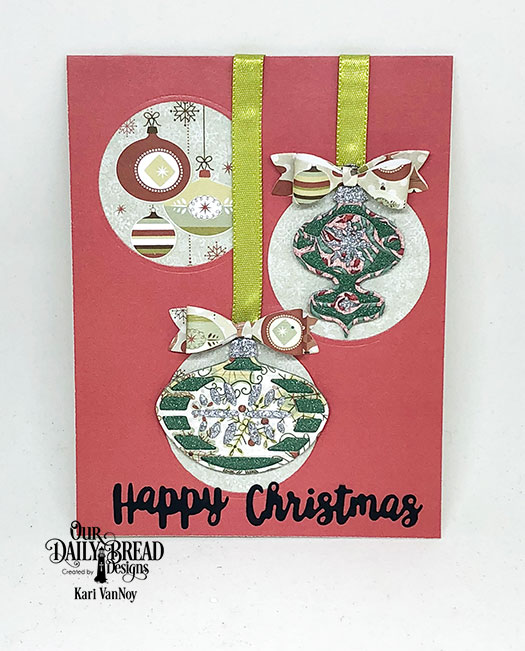
Don’t these just scream RETRO? Lol. I have so many projects I have in mind with these fun dies.

I hope you enjoyed these projects today. For more inspiration using the November Release and to see the other designers projects, be sure to visit the ODBD Blog here.

Thanks for stopping by!

Comments { 2 }
sunshine-nativity-diorama-2

Diorama Cards make Sweet Scenes

Hello again! I’m back with a few more Diorama cards. I love that you can make sweet little scenes with these dies. Here I’ve created a little snowy neighborhood with visiting deer!

sunshine-deer-in-neighborhood-diorama

These dioramas have the option to have multiple layers inside your frame. I have 2 different layers here and in real life it’s so dreamy. I love adding a little Star Dust Stickles to the icicles, it adds just the right amount of glitter!

My next Diorama features my all-time favorite nativity set:

sunshine-nativity-diorama-2

sunshine-nativity-close-up

The angel and the star are cut from silver foil paper. I heat embossed the sentiment in the back with silver embossing powder.

To make the nativity characters a little sturdier, I die cut and backed them with chipboard.

There are so many options you can choose with papers and additions for these Diorama cards. I added the red & white washi tape to the front layer for a pop of color. All other products are from Our Daily Bread Designs.

I wish you could see the multiple layers…these photographs don’t do these sweet little scenes justice!

To see just how easy it is to put together these Dioramas, watch my video here or on YouTube:

Here are a few more diorama cards I’ve created. Can you tell I just LOVE these Diorama with Layers dies?!

sunshine-lots-of-diorama-cards

I hope you enjoyed these projects today. Thanks for stopping by!

Comments { 0 }
white-sign

Stamping on Wood with the Hedgehog Hollow

Hello! Today I am sharing a fun table decoration project featuring Stamping on Wood with the October Hedgehog Hollow box! I am also a part of the Save the Crafty YouTuber video hop…which is a fun hop that offers over 120 prizes. To win, just comment on the videos in the hop (the more you comment on, the better your chances) and indicate if you are in the USA or international!

Here’s my project, to see the full tutorial with video, head over to The Hedgehog Hollow blog here!

all-three-with-gold-pumpkin

To go directly to see the video, check it out here.

I made these little signs to add to our outdoor family dinner tables for 50 people to celebrate my son’s wedding! We had a delicious dinner of BBQ, salads, cornbread and lots of desserts! We put up lights outside and had lots of candles on the tables and it turned out so dreamy. These were the perfect addition to my tables.

white-sign

Thanks for stopping by! And I hope you enjoy the hop!

Comments { 0 }
the-group

Our Daily Marker Road Trip Review

I had the blessed opportunity to attend the Daily Marker Road trip in Glendale a few weeks ago. Since I’ve been so busy with my son’s wedding (which was October 19th…yay!) I haven’t had a chance to post a review about it.

If you ever have a chance to attend one of these with Kathy Racoosin, DO IT!! I was so impressed with the day, the people I got to meet, and the prizes. I learned a lot, had fun in the make and takes, and met some new life-long crafty friends.

The event was held at Kim Hughes’ new store Our Creative Escape in Glendale. Kim is the designer and creator of Paper Smooches stamps! So she had some fun stamps for sale AND a few in our goodie bags! (Thank you, Kim!)

Here’s a couple photos of the space we got to work in…it was so inspiring!

our-creative-escape-space

our-creative-escape-space-2

our-creative-escape-space-3

See all those canvas paintings? Those are some of the samples of the classes that Kim and her husband teach at the store…painting on canvases. This looks so fun and I definitely have to go back to try it out!


paper-smooches-samples

There’s also a little store with some Paper Smooches and other papercrafting products! (I loved that little jar.) You can bet that I picked up a few Paper Smooches products while I was there. *Wink*

Kim is an inspiration to me and her illustrations and stamps are what got me back into stamping and cardmaking all those years ago! In fact, I have quite a collection of Paper Smooches and now I’m inspired to get them out and color more of them up!

color-smooshing

One of my favorite of Kathy’s techniques is what she calls “Color Plucking” or “Color Mashing.” Here my new friend Trina tried it out with colors you wouldn’t THINK would go together….but look how beautiful her coloring sample is turning out! So cool.

Here are some pictures of my new friends (and some I already “met” on instagram and finally got to meet in real life):

angela-and-skypaperscissors
Angela and Seeka! (they came all the way from California!)

kari-and-jean
Jean Chaney! (from Arizona, too!)

kathy-and-kari

And of course, Kathy! She’s just awesome. It was still quite hot here (even though it’s October!) and Kathy had just put her hair up. Yep, Arizona life!

I met so many more and unfortunately didn’t take pictures of everyone, but wait! Here’s the famous group picture:

the-group

You might recognize Anita, Tricia, Trina, Seeka, Angela, Jean, Kelly, Hellen, Jody, Teri, Kim, Kathy….and lots more!

It was a super fun day. And I have one more tip from Kathy. I was talking to her about what to carry my Copics in to go to Boot Camp (coming up in November….yay!! Who else will be there?)

And she recommended this Mini Meori traveling case. So I’ve got another on the way! I hope it gets here in time for Boot Camp! I’m linking here so you can see what I’m talking about. 🙂

I hope you enjoyed this look at my experience with the Daily Marker Road Trip. I had such a great time! Next time Kathy is here I hope to make it again.

Comments { 0 }
sunshine-brick-neighborhood-diorama

A Look back at the October Release with Our Daily Bread Designs

Hello! I hope you’ve had a chance to see the entire October Release from Our Daily Bread Designs, because it is fabulous! Today I’m sharing two cards using some of the products.

First I had to create a card front using the beautiful Bethlehem dies set.

sunshine-bethlehem-A2-card

I used the Pierced Ovals dies to create the frame and inked it up slightly with Cracked Pistachio Distress Oxide ink. I heat embossed the back layer of the building tops with copper embossing powder before adding them to the kraft background. The trees are colored with copics. Isn’t this a beautiful scene?

To finish it all off, I added the Merry Christmas Caps die at the top.

Here’s a look at the inside of the card, where I stamped a sentiment from the Christmas Card Scriptures Stamp set:

sunshine-bethlehem-A2-inside

This sentiment is such a beautiful way to say Merry Christmas!

My next project features the Diorama with Layers set. This is another new favorite of mine and this time I’ve paired the Brick Gate Border with the Neighborhood Border die.

sunshine-brick-neighborhood-diorama

Look at that sweet little neighborhood! I’ve added some chunky glitter to the rooftops to add a snowy feeling. The paper is from this set. The Pinecones Dies and Pine Branches Dies are must-haves, in my opinion!

The Brick Gate Border offers a way to ink up those bricks through the die when you leave it on the die cut piece! (That’s how I got all those individual grey bricks).

I hope you enjoyed these projects today and got inspired.

For more inspiration using the October Release and to see the other designers projects, be sure to visit the ODBD Blog here.

Comments { 0 }