Archive | Paper Crafting RSS feed for this section
logo-clh

Christmas Joy Hot Cocoa

Hello there! Today I have a quick card to share featuring my new favorite: Poinsettias on Coffee cups (or hot chocolate cups, in my case!)

A week or so ago I shared a quick video, where I masked off the coffee cups so only the middle showed, lightly stamped on some poinsettias using the Poinsettia Box stamp set, and no-lined colored up the poinsettias using Copics.

Well, I finally put them on a card!

christmas-joy-hot-cocoa

I used some corrugated cardboard in the background as a nod to the coffee holders, added some greenery, and popped up those coffee cups using foam tape. (Most of the supplies used are from Our Daily Bread Designs.)

I white heat embossed the sentiment on black cardstock and cut it out using a fishtail end.

Linking up to the Winter 2018 Coffee Lovers Bloghop!

logo-clh

Thanks for stopping by.


Comments { 8 }
sunshine-peace-and-joy-side-view

December with Our Daily Bread Designs

Hello! Today I have some projects featuring the brand new December products from Our Daily Bread Designs.

My first card features the new Winter Greetings set with this adorable owl image:

sunshine-bokeh-owl-card

I created a bokeh effect background using Distress Oxide inks in Peacock Feathers, Twisted Citron, and Iced Spruce. Then I added some circles with white ink and pearl Gansai Tambi watercolor paint.

I colored up that owl in Copics and added some white gel pen to make him look more fuzzy. Don’t you just want to squeeze him!? Here’s a close up of him:

sunshine-bokeh-close-up-of-owl

My next card features the new Flourish Tree Inset die:

sunshine-tree-joy

Isn’t that a beautiful tree. Imagine how easy cards can be using this die and some colored cardstock! I used paper from this paper pack and added some red glitter cardstock behind the die cut image. Then, I used the word “JOY” from the Peace and Joy die set as the sentiment. I colored it in three colors of green Copics and used the same green Copics on the bow on top of the tree. The bow is from an earlier set that I adore: the Ice Skate die set.

My last card today features the new Peace & Joy die. It is a great size for a card front!

sunshine-peace-and-joy-front sunshine-peace-and-joy-side-view

Here I used paper from the Christmas Collection 2017 Paper pack. I die cut the Peace & Joy, then added some red fun foam behind the letters to pop them up. To finish it off, I added some Pine Branches and a Pinecone next to the word “Peace.” I just love the size of this die cut!

There’s a lot more to see of the new December Release! Check out the Daily Bread Designs blog here to see the full release and a lot more inspiration from the Design Team!

Thanks for stopping by.

Comments { 0 }
both-cards

Gingerbread Hot Chocolate

Did you know you can add gingerbread flavoring to your Hot Chocolate at Starbucks? I saw this the other day and I thought…well, that sounds interesting! I haven’t tried it yet, but these cards today are inspired by that idea.

Do you prefer whipped cream in your hot chocolate?

gingerbread-hot-cocoa-with-whipped-cream


Or do you prefer marshmallows?

gingerbread-hc-with-marshmallows

I used products from the November Hedgehog Hollow box to make these cards. But I cut the coffee cups from my Silhouette! The cute background paper is from the Limited Edition Christmas Box.

both-cards

For more information about these cards and the products, visit the Hedgehog Hollow blog here.

Linking up to the SSS Wednesday Anything Goes Challenge.

Thanks for stopping by!

Comments { 2 }
gnomes-with-tree

Joyful Gnomes

Hello! Today I have a quick project to share featuring a stamp set available only in the Hedgehog Hollow Exclusive Christmas Box!

The papers and the stamp set are all included in the box (I added the green glitter paper from my stash):

gnomes-with-tree

I just love this stamp set from LDRS Creative! The background papers are also from LDRS creative and an entire 6×6 pack is included in the Limited Edition Exclusive Christmas Box.

If you are interested in my Copic Colors used, I have the list below:

Reds: R05, R46, R59
Greens: YG67, YG17, YG03, G09
Blues: BG49, BG57, BG53
Browns (stool and tree trunk): E43, E41, E79
Yellows: Y17, Y21
Greys (gnome 1 beard): C1, C3, C5
Greys (gnome 2 beard): W1, W3, W5

For more information about this Exclusive Christmas box, click here. Oh, and remember, today is the last day of the sale for 10% off!

Comments { 0 }
sunshine-silver-blue-poinsettia-new-year

Poinsettias for Days

Hello and welcome to my “Poinsettias for Days” post! I just cannot stop with these poinsettias…I’m in love. So today I have a bunch of projects to show you!

This first project features that beautiful poinsettia from this set from Our Daily Bread Designs that I colored “white” using Copic Markers in W3, W1, and Y11. I stamped the same poinsettia on red paper and heat embossed it with gold embossing powder. It adds such a glamour to this card, I think.

sunshine-red-and-white-poinsettia-card

The Merry Christmas sentiment is from the Holiday Words dies, and I die cut it with green paper. Then I used mowed Lawn Distress ink and a finger dauber to ink up the lower portion of the words. I also added Vintage Photo Distress Ink around the outside corners of the red panel.

This next card shows off the Poinsettia Box stamp. This time I colored it up with watercolor markers and added details with colored pencil. I used Kathy Racoosin’s method of paying attention to those “nooks and crannies” with a darker color of pencil. I love how this makes the image really pop!

sunshine-poinsettia-box-card

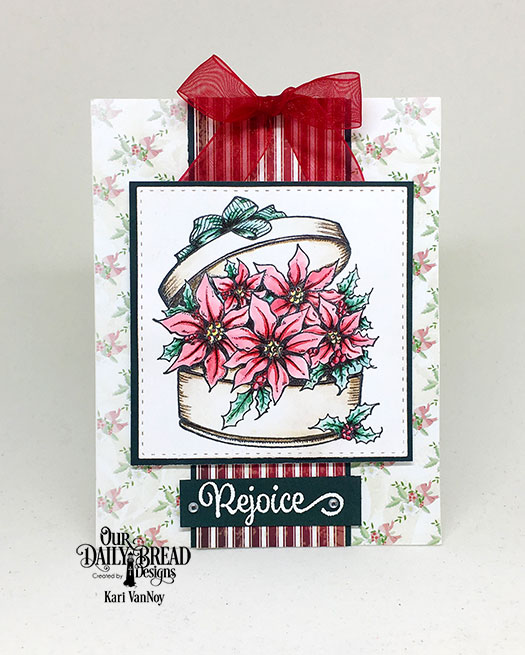
The background paper is from the new Christmas Collection 2018 paper pad, and the striped paper is from the Christmas Collection 2013 paper pad (one of my favorites)! That sentiment is white heat embossed on the dark green paper. I added some rhinestones for a fancy flair.

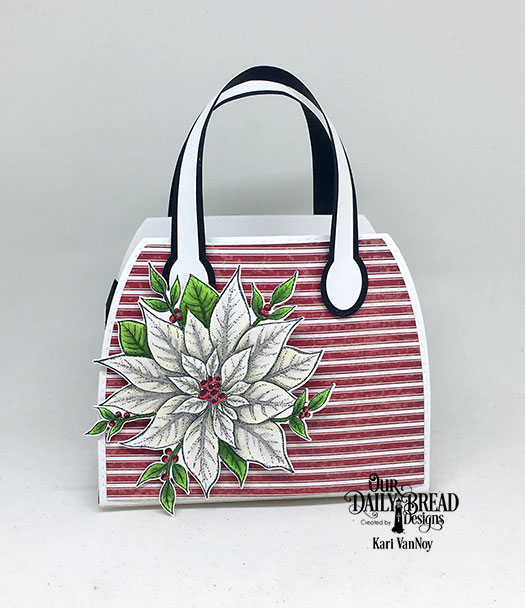
I couldn’t forget about my favorite purse dies! I thought they would be perfect with these large poinsettias. Who wouldn’t want a poinsettia purse this time of year!?! 😉

sunshine-green-purse-with-poinsettia

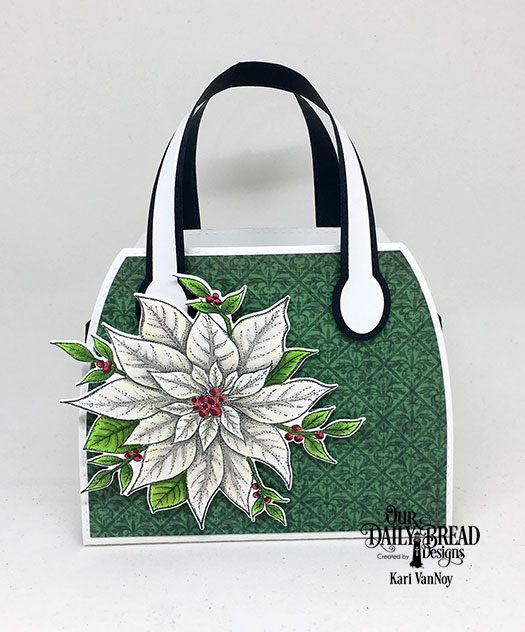
My first one uses a green paper layer for the body of the purse, and then I thought I definitely need a red striped purse, so this one was created:

sunshine-red-purse-with-poinsettia

It’s so fun right?! I love this purse die and the layers dies…it’s one of my favorites of the year! There are so many things you can do with it. Check out my other purse posts here and here.

For my last project, I made a New Years card with a blue poinsettia and lots of glittery silver goodness! I die cut the Vintage Flourish Pattern die in silver glitter paper, then before I adhered it to the card base I heat embossed around the edges with silver embossing powder. Such a sparkly, festive look!

sunshine-silver-blue-poinsettia-new-year

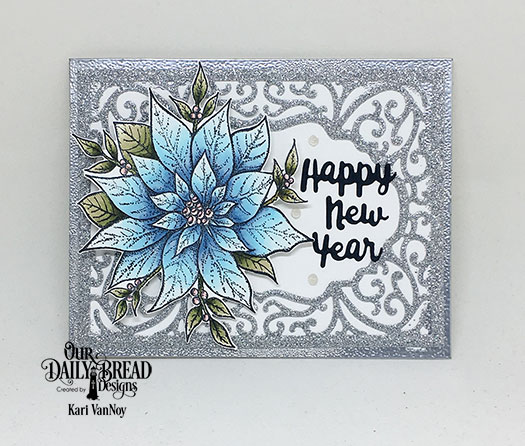
To finish it off I colored up the poinsettia in B00 and B000 Copic blues and the leaves in YG Copic greens. I love this combination of colors. The Happy New Year die cut is also from the Holiday Words dies. Last, I added some clear/gray dots with Nuvo drops.

Poinsettias galore! I hope you enjoyed these projects today. These will be the last poinsettia projects I share for a while, but I had such a great time making them all! Thanks for stopping by.

Comments { 0 }