Archive | Paper Crafting RSS feed for this section
all-four-cards

Guinea Pig Love

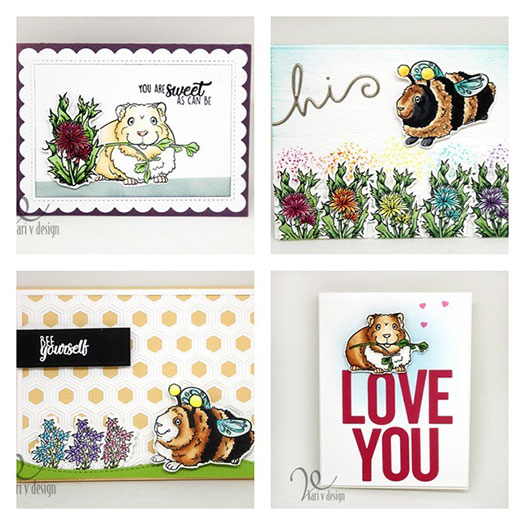
Hello! Today I have a fun new stamp set to share from Jessica Lynn Originals. I adore her work! For today, I’m sharing her brand new set called “Playful Guinea Pigs.”

These cute critters have stolen my heart, and I couldn’t stop at just one card…instead I made FOUR cards to share today. Here’s my first one:

bee-yourself-honeycomb-3

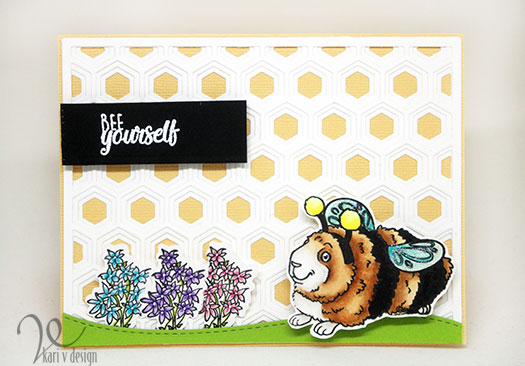
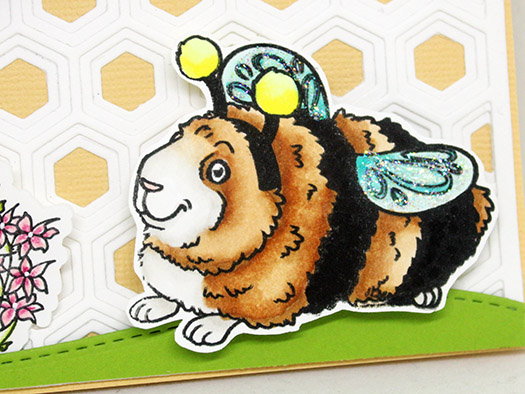
That Guinea Pig is dressed like a bee! It made me laugh and I thought he’d love some flowers to accompany him (the flowers are from the Bernese Mountain Dog set, which I will share with you soon!)

I colored him up with copics in E30, E33, E35 and added some glittery wings. Doesn’t he look happy?

bee close up NEW

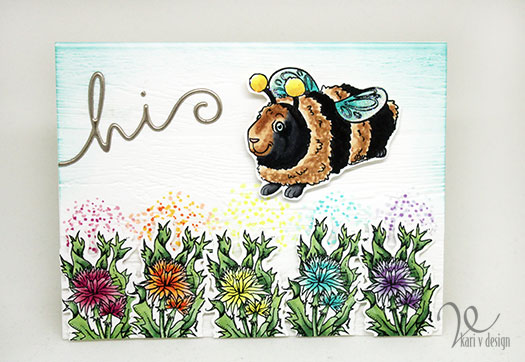
My next card uses the thistles that are included in the Guinea Pig set, and I knew I needed a rainbow of thistles.

bee-flowers-2-NEW

I love this sweet Guinea Pig. Here I turned him into a black/tan/white guinea pig, which is the coloration I’m most familiar with. I used a rainbow of Copics to color up the flowers and some dots in the same colors just above them. The sentiment is heat embossed in my favorite Ranger embossing powder to look like a metallic element on the card. Here’s a better look at the metallic:

bee-flowers-close-up

I embossed the background with a wood plank embossing folder for some texture.

Next, I used the cute Guinea Pig holding a branch of leaves:

love-you-NEW

I call this my Valentine Guinea Pig. He brings treats to the one he loves! Lol. There is a small heart in the set that is perfect for adding those pink hearts to the background.

My last card features a lighter Guinea Pig with one of my favorite sentiments from the stamp set:

sweet-as-can-be-NEW

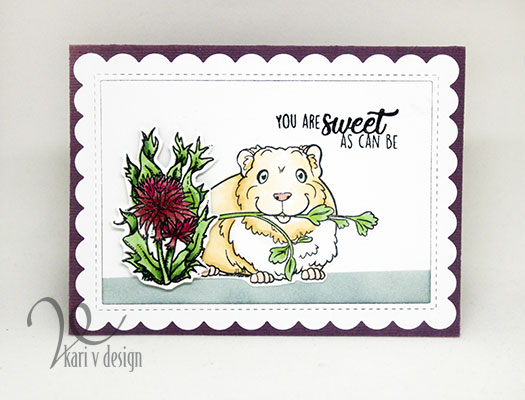
The sentiment actually reads “You are sweet as can BEE,” but I removed the last E so I could use it with this little guy. It would be perfect with the guinea pig dressed up like a bee, too!

sweet-as-can-be-close-up-NEW

Isn’t he just as sweet as can be?!

Thank you, Jessica for giving me the opportunity to work with your cute stamps! I love these Guinea Pigs and I’m excited to share some more cards with you very soon using Jessica Lynn Original artwork. For more information about these sets, visit Jessica Lynn Original here.

all-four-cards

Comments { 0 }
sweet-heart-card

You’re a Sweet Heart

Hello! Today I have some fun Geometric heart cards to share with you. I’m on the Hedgehog Hollow blog again today to talk all about how I made them, but I wanted to give you a sneak peek here! I used the same Distress Oxide colors on both cards: Worn Lipstick, Seedless Preserves, and Weathered Wood.

Same colors, different techniques.

both-cards-together

Check out the interest in that card on the left…in the geometric heart I added some “extras:” gold sparkle paint, Stardust Stickles for the glitter, and Glossy accents! It makes that heart look so magical in real life.

close-up-of-silver-hearts silver-heart-love-card sweet-heart-card

So, which card do you like better? Are you TEAM SILVER or TEAM GOLD?

Head on over to the Hedgehog Hollow blog here to read the details! Thanks for stopping by!

Comments { 0 }
three-snails-with-envelope

Valentine Snail Mail

Hello! Today I have the cutest Snail Mail to share….delivered by snails! This new set is from Trinity Stamps and I just adore this little guy.

snail-mail-with-postage-and-confetti

He’s called Mr. Snailman and in this card I made him “Valentine snail”….notice his colors. 🙂 The heart confetti is called “Skip-A-Beat” (eep…that’s too cute!) and it’s also available today.

I was having way too much fun coloring him up, so I made another card using some creative masking. I couldn’t resist a matching envelope!

three-snails-with-envelope

TIP: for your envelope…if you want your stamp to stay crisp and not smear in the transit, heat emboss it with clear embossing powder! Here I used Versafine onyx black ink and embossed in clear. I did not color up the image because that envelope is already a nice red.

three-snails-pink-clouds

I love this Snail Crew! Delivering happy hugs, no doubt. I love the pink sky…it just feels like a hug.

Hooray for snail mail! Well, that’s it for me today. I hope you enjoyed these projects.
For more information, please visit the Trinity Stamp blog. Happy Day!

snail-mail-with-postage-border

Comments { 0 }
lion-flatlay-wooden-background

Five Ways to Use Gilding Flakes

Hello again! I’m up on the Hedgehog Hollow blog today (here) to show you my favorite ways to Use Gilding Flakes.

Here’s my card I’m sharing with that Geometric Lion. When I saw him, I just knew he needed a golden mane!

lion-card-gilding-flakes

When you are using Gilding Flakes, make sure you don’t have a fan on, OR you don’t sneeze, OR you don’t breathe! LOL….those lightweight little flakes will travel!

Watch my video below or on YouTube:

Here’s a little close up of that lion. I added some Glossy Accents to his nose to make it shine!

lion-close-up-1

These gilding flakes are so fun to use. Have you tried them? All the gold on this card is made with Gilding Flakes! Isn’t it interesting to see the different textures on the background, the letters, and the lion’s mane?

I just cannot wait to try my favorite technique I shared in the video (hint: it’s the last one that involves water…yes! WATER!)

I hope you enjoyed this project today. Be sure to watch the video for more ideas and tricks on gilding flakes! Thanks for stopping by.

I’m taking a card photography class and here are some of my practice shots with my new camera. The background is darker than I’m used to and I have some learning to do still, but what do you think so far?

lion flatlay wooden background 3

lion-flatlay-wooden-background

Comments { 0 }
close-up-of-butterfly-with-gold-under

You are acute One

Hi again! Today I’m up on the Hedgehog Hollow blog with a cute Geometric Butterfly card. The sentiment on this card has me laughing…”You really are acute one.” It’s kinda a play on words about those triangles!

acute-one-full-card

The butterfly is actually two layers:

close-up-of-butterfly-with-gold-under

And I created the background just using post-it tape and distress ink. With a few gold splatters. So easy!

To see the whole tutorial, visit the Hedgehog Hollow blog here.

close-up-butterfly-in-lightbox

Thanks so much for stopping by! I hope you enjoyed this “cute” project!

Comments { 0 }