Archive | Holidays RSS feed for this section
sunshine-pink-and-yellow-with-lindt

Easter Boxes with Our Daily Bread Designs

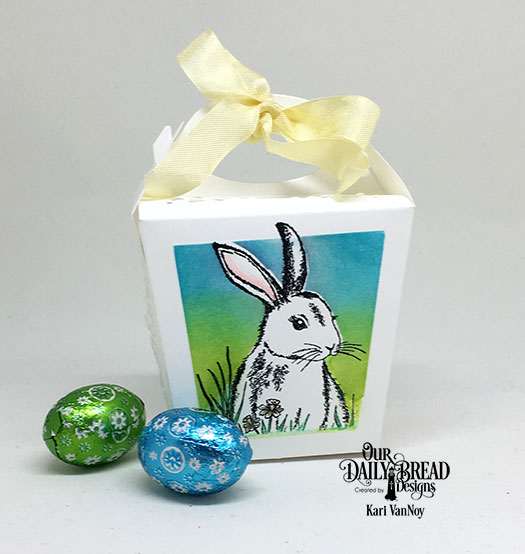
Hello! With Easter inching closer and closer, my mind is on all things bunnies and chocolate. So today, I’m sharing an adorable Easter Box using the new Hoppy Birthday stamp set from Our Daily Bread Designs.

Sunshine-both-with-bows-and-candy

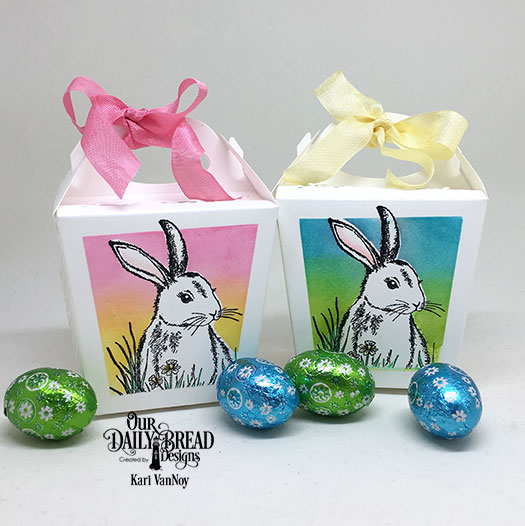
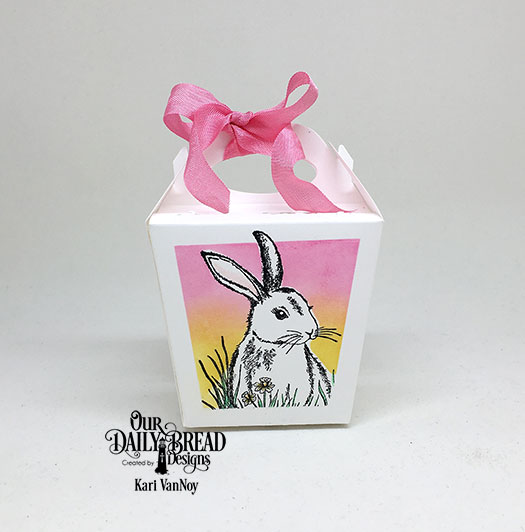
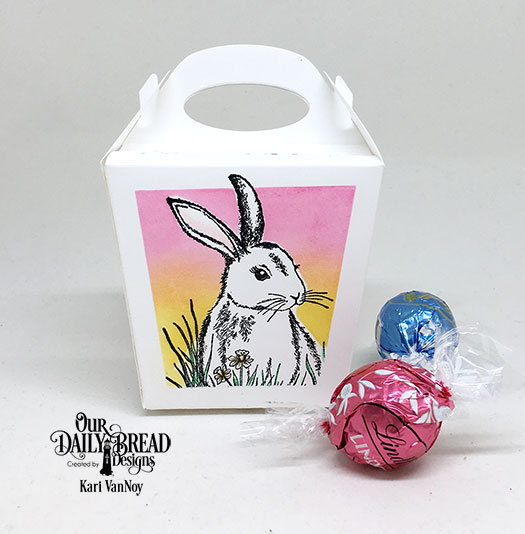
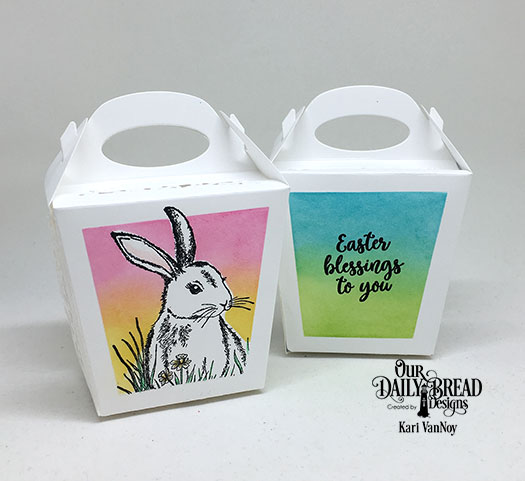
I love this bunny stamp, and I paired it with the Glorious Gable Box die to make this cute Easter gift box! To do this, I cut the die and before folding it to assemble the box, I stamped the bunny stamp, masked it off and inked up the background.

I created a movie to show you how to easily create this project!

sunshine-pink-and-yellow-with-bow

sunshine-pink-and-yellow-with-lindt

On the back, I also used the gradient inking technique, and then I heat embossed the sentiment from the same stamp set.

sunshine-both-together-without-lindt

I love this Glorious Gable box die….it not only cuts the shape, but also embosses the design to make it look fabulous! I’ll show you what I mean; Click below to watch the video:

I used some seam binding ribbon from my stash to finish off the boxes. I’m giving these to my granddaughters this year…one of them has the favorite color of Orange, and one of them loves Green! How perfect is that?

I hope you enjoyed this project today! Happy Easter!

Sunshine-blue-with-bow-and-candy

Comments { 0 }
shaker-card

One stamp, Five Polar Bear Valentines!

These MFT Polar Bears have got to be a new favorite! If you follow me, you already know that I have a soft spot in my heart for bear stamps (of any kind!) so I can make cards for my Dad…it’s become a thing. So yeah, I collect all the bear stamps I can find that I think he might like.

This year, I purchased this set called “Polar Pals” from My Favorite Things. When I got it in the mail, my 3-year-old nephew was with me and when he saw them, he exclaimed “Oh, I love polar bears!” Then he ran off with my stamp set! Lol. So I thought I’d better make a Polar Bear valentine for him.

I ended up making FIVE different valentines, using this stamp set and Stitched Alpha dies as the common theme. Here they are!

xoxo-background-bear

This was the card that started it all! I woke up one morning with the idea to have a bunch of Xs and Os in the background (white on white). Yes, I did quite a bit of die cutting that day!

xoxo-bear

Then, this cutie became one of the “Os” in this card. I colored up all the bears with Copic Markers. It may be hard to see…I used red glitter paper behind the die cut Xs and Os on this card, so it has a glittery pop!

bear-holding-heart

This one HAD to hold up a heart! So, using that same glitter paper, I die cut a heart for him. Added a couple Xs and Os colored with the same Copic colors as his scarf, and put him standing on top of a snowy hill. The stencil background is a favorite of mine from Penny Black. And that frame is a new favorite from Our Daily Bread Designs.

ice-skating-bear

This ice skating bear has got to be one of my favorite images from the bunch. I love it when a stamp set includes great images….so great that you love them all! Here, he is skating on a silver glitter “pond” with trees and snow in the background. I popped up the trees in the forefront so there is some good dimension to this card. Those Copic Colored Xs & Os really pop on the pink inked background!

shaker-card

And of course I had to make a shaker card! The cutest little red heart sequins are inside, along with a Valentine mix of sequins sure to make the recipient smile (I hope)!

I really enjoyed thinking of different ways to make a Valentine card with one stamp set! I hope you enjoyed and got inspired to make some of your own. 🙂

Comments { 0 }
reindeer-tag-2

Happy Reindeer

Ok, I love this happy reindeer from Paper Smooches. Doesn’t he just make you smile? This is my final project (I think) for my Online Card Class Holiday Style.

reindeer-tag

I used some of my favorite RED SPARKLE embossing powder on the sentiment and the candy cane stripes! Can you see the sparkle? I love that stuff.

I had to do a bit of masking to add that HOLLY to the neck on the reindeer, and then to do some of the inking. Oh what fun this tag was to make!

reindeer-tag-2

I used distress markers as watercolor to color that cutie. I think I’ll add the “To/From” to the back of this tag for a Christmas gift!

Comments { 0 }
christmas-baubles-2

Christmas Tree Baubles

Wow, this technique was so fun but time consuming! In the Holiday Style Online Card Class, May Park had an awesome sample of a triangle tree shape stamped with all kinds of small stamps and I thought I’d give it a try.

Turns out I have a LOT of small stamps that worked so well for this technique.

christmas-baubles-1

I decided to round the bottom of my tree and make the sentiment curved to match. I used my GOLD delicata ink for the very first time (thank you, Wendi!) and I love it! See those stars? They are stamped with the gold ink.

christmas-baubles-2

I used the same gold embossing powder on the sentiment and on the right and left edges of the card. So pretty. My husband loves this one! But I don’t think it’s a candidate for mass production. Lol. 🙂

Have a blessed Christmas!

Comments { 1 }
inked-edges-1

Vintage Christmas

This card was definitely out of my comfort zone. I was nervous to use brown distress ink over my stamping. But vintage fancy was the topic of the day at Online Card Classes Holiday Style!

inked-edges-2
I used Neenah desert storm for the card base (I have a TON of this, but rarely use it) and I think it complements the vintage look.

After I finished all my stamping and inking I slapped some Versamark clear ink over it all and sprinkled Judikins sparkle embossing powder over it! Then I heat-set it and I think it turned out so fancy! I love that the glitter doesn’t come off on your hands when you use heat embossing.

inked-edges-1
Well, Kristina Werner totally inspired me to try this card…something very new for me! What do you think?

Comments { 0 }