Archive | Holidays RSS feed for this section
Heffy doodle pie stamp

Heffy Doodle New Release Inspiration Blog Hop

Welcome to the Heffy Doodle New Release Inspiration Blog Hop!  We are so excited to share amazing cards from our Design Team members using the new release!  For today’s special Blog Hop, you can win a £50 voucher to the Heffy Doodle store! You can shop the BRAND NEW RELEASE HERE.

Today I’ve made TWO cards to share with you, so let’s get started!

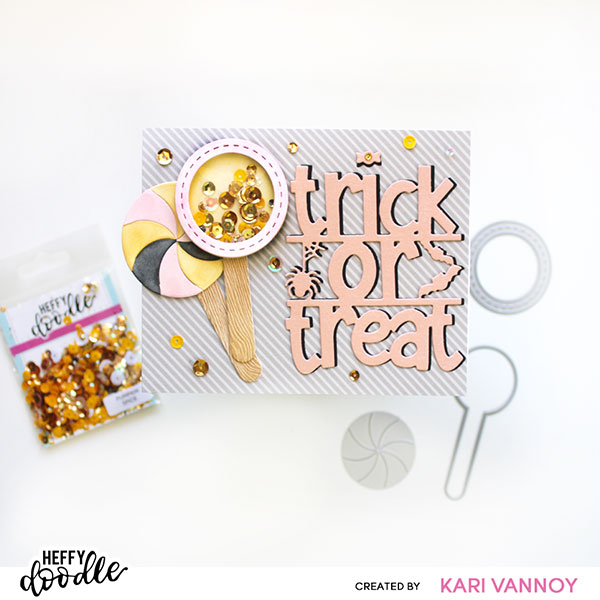
Card 1: Trick or Treat Shaker Lollipop Card

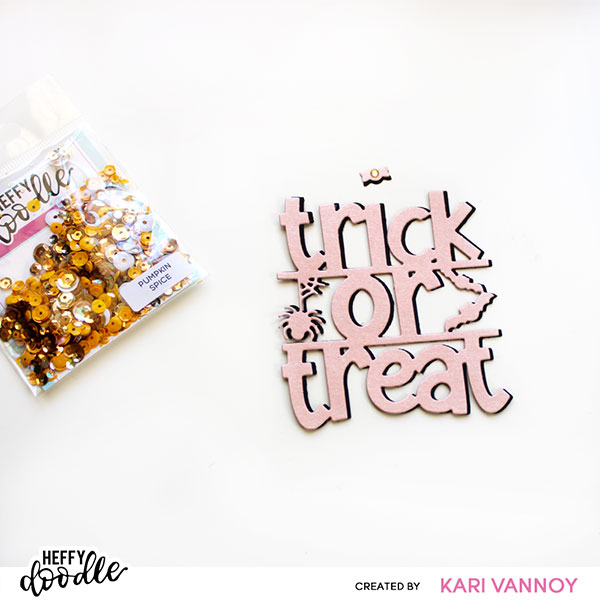
I am loving the new Trick or Treat Jumbo Sentiment Die. Today I am going to use a Halloween color combination that I have always wanted to try: PINK, ORANGE, BLACK, and GRAY.

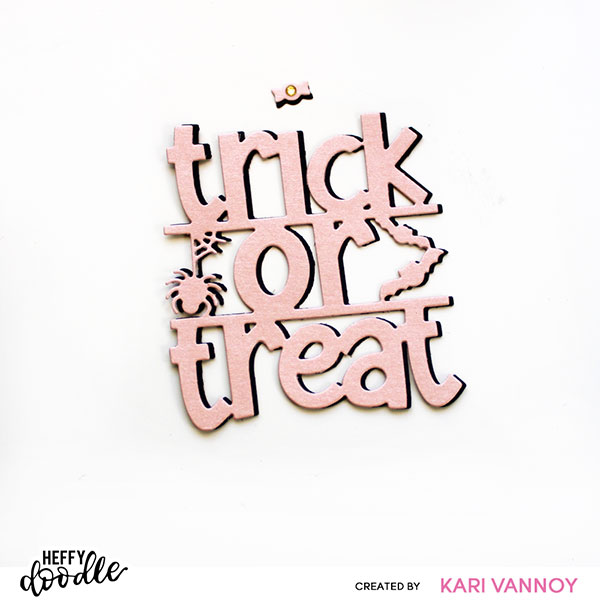
I cut the Trick or Treat Jumbo sentiment die out of pink pearl paper, and then I cut a second sentiment from black cardstock for the shadow. I offset the black cardstock a little to give it some depth.

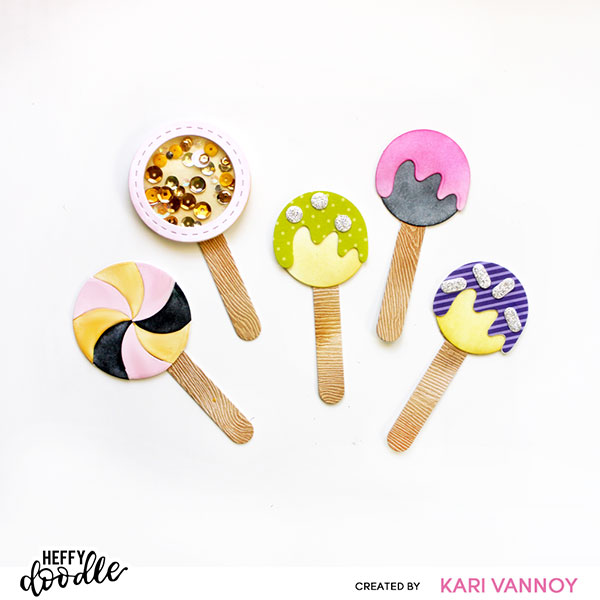
I chose the NEW Pumpkin Spice Sparkle Mix to use on this card…together with some TREATS from the NEW Sweet Tooth Shaker Dies. These dies can create lollipops, cake pops, wrapped candies, and shaker pops! I’m sure there’s more combinations, too! Today I made some lollipops and cake pops.

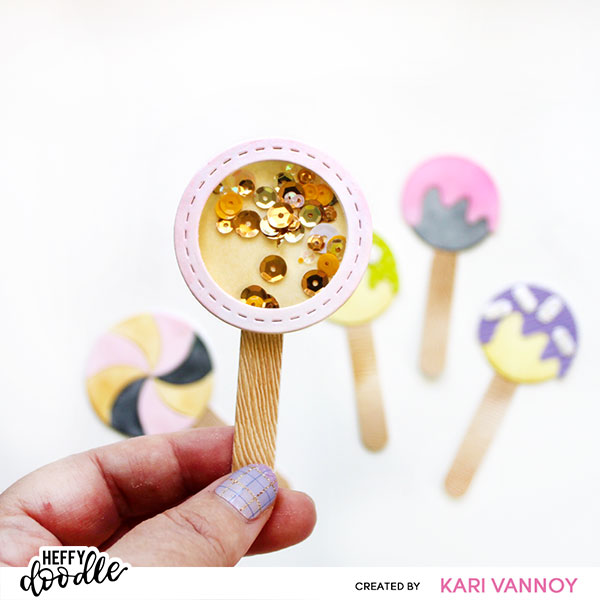
How cute is that shaker lollipop?! I put the lollipops together with the Trick or Treat Sentiment and added the gray striped paper from the NEW 6×6 Fright Night Patterned Paper Pack for this first card.

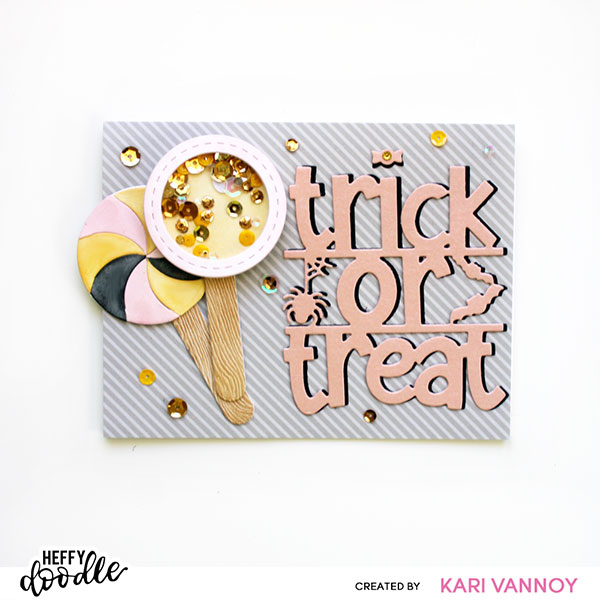
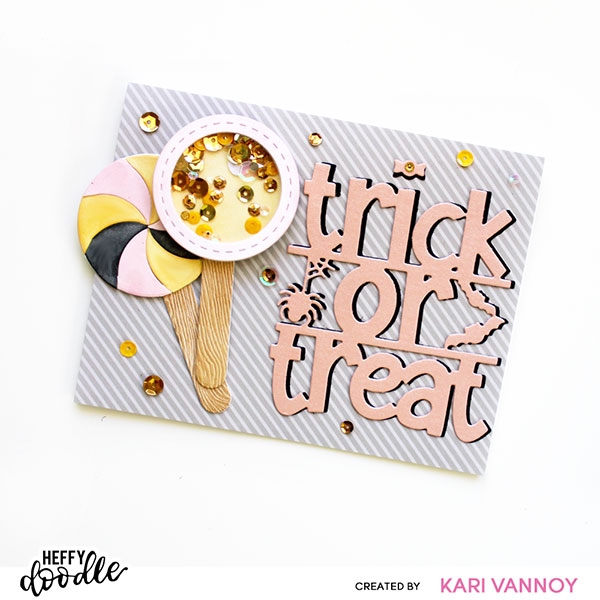
I scattered more of the sparkle mix around the card for good measure. This one is fun to shake!

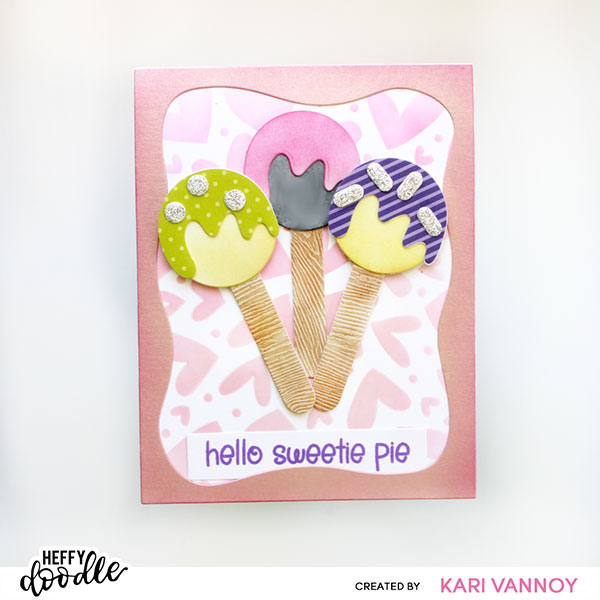
Card 2: Cake Pops Birthday Card

Since I had already created extra cake pops, I wanted to add them to a card! So I created a birthday card and popped up those pops with foam tape.

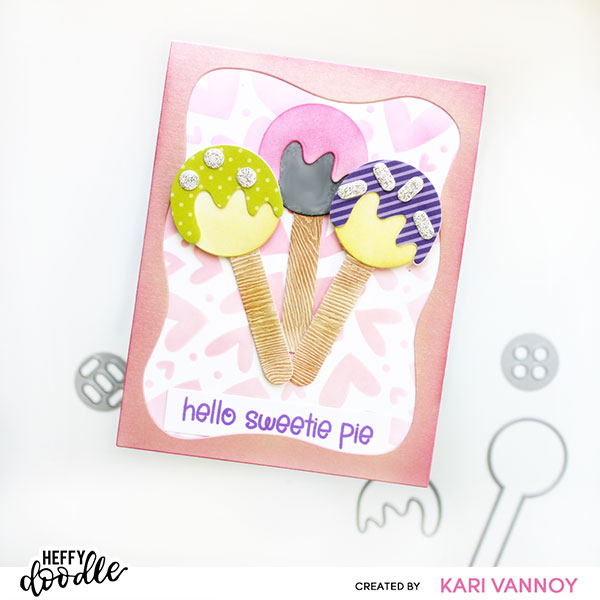
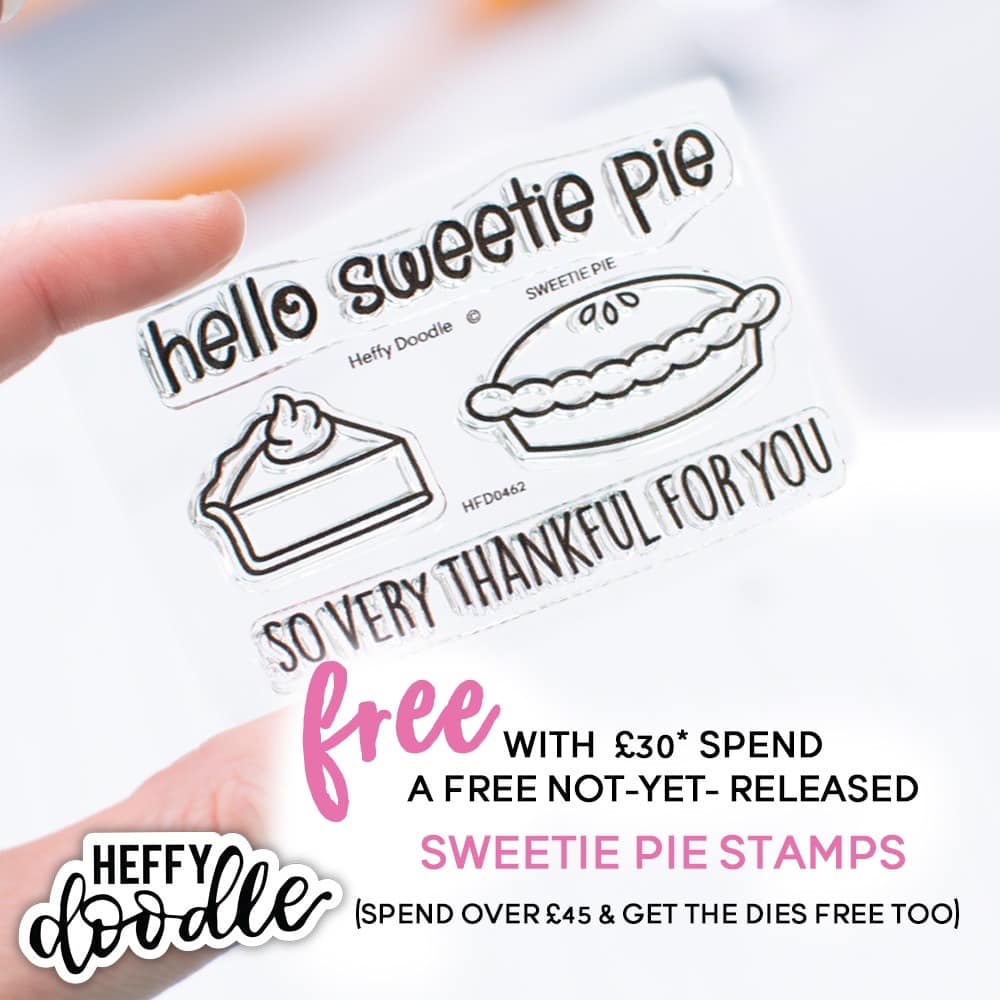
The hearts in the background are from the NEW Love is Everywhere Stencil. I love this stencil. The sentiment is from the Sweet as Pie special stamp set (that’s free with qualifying orders! See below).

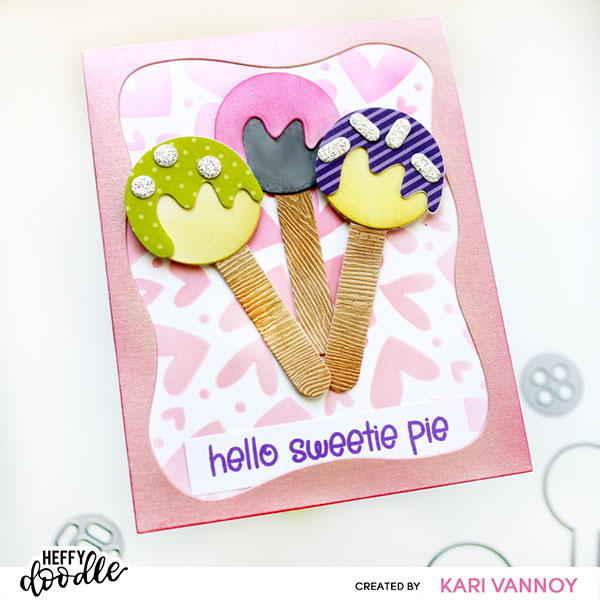
I love that there is a drippy frosting die in this Sweet Tooth Shaker Dies set…perfect for these cake pops! I cut the “popsicle sticks” from woodgrain paper that I inked on with distress inks.

The frame is cut from the NEW Elm Street Dies. The frame is so perfect for a lot of different cards, not just Halloween cards! I can see a lot of use for this frame die in my future.

I hope you enjoyed these projects today! I’ve gathered the supplies I’ve used and included them here in case you are interested.


Get your Sweetie Pie stamp set for FREE with a £30 spend (not inc. shipping). And get the coordinating dies too with a £45+ spend!

The Giveaway!

To be entered to win the giveaway, all you need to do is comment at each stop along the Blog Hop before Sept 13, 2022 at 11:59 PM EST.  The winner will be announced on the Heffy Doodle Blog on Sept 15th at 10:00 AM EST!


You should have come from the Heffy Doodle Blog and the next stop is the talented Tallie Clewley!


Blog Hop Lineup:

Heffy Doodle Blog
Kari VanNoy
Tallie Clewley
Zsofia Molnar
Claudia Mauri
Amanda Fitterer
Lauren Taylor
Lidya Wirani
Tatiana Trafimovich
Cassie Trask
Amanda Stevens
Franci Vignoli


Thanks for stopping by!

Comments { 23 }
SUNSHINE-Christmas-at-the-Cabin-card-3-Kari-V

Foiled Background

I love a good foiled background! Today I have a tone-on-tone card to share with you using a favorite stamp set from the last Maker Forte Release.

[Note: I’m sharing all the details HERE at the Maker Forte blog if you want more detailed information on creating this card.]

Those lantern images come from the Christmas at the Cabin stamp set…this set has so many cute images to put together! I paired it with the Christmas naturally stencil to create that foiled background. (LOVE this stencil!)

I’m often asked what supplies I use to make my cards and projects, so I’ve put together a list using affiliate links when possible. If you make a purchase with these links I may receive a small commission. These help me to keep up with blog costs and continue bringing you fun projects. Thank you so much for your support!


Thanks for stopping by today!

Comments { 0 }
SUNSHINE-stars-flip-flops-card-2

Patriotic Flip Flops

Hello and Happy 4th of July! Today I have some patriotic flip flops to share…inspired by a pair of flip flops I actually own.

I die cut the flip flops from white cardstock and then inked up the blue one with Vegas Strip ink. I used a stripe stencil from my stash to ink on the red stripes with Telephone Box ink. I used these same colors to ink up the straps.

Then I used a mini star stencil from my stash to add embossing paste on the blue flip flop. I set this aside to fully dry.

To assemble the card, I used a background paper from Honeybee stamps. I layered 3 sets of straps per flip flop and attached them with liquid adhesive.

Of course I had to add a gemstone! Then I stamped the sentiment with the same blue ink and die cut with matching dies.

I’m often asked what supplies I use to make my cards and projects, so I’ve put together a list using affiliate links when possible. If you make a purchase with these links I may receive a small commission. These help me to keep up with blog costs and continue bringing you fun projects. Thank you so much for your support!


Thanks for stopping by today! Happy 4th of July!

Comments { 0 }
SUNSHINE-gnome-flag-card-3-close-up

American Gnome

Hello! Today I have a quick card sharing the June Hedgehog Hollow kit products. This month is full of fun Patriotic themes: 2 stamp sets, 3 stencils, 1 pack of Americana ephemera, and 1 pack of papers! Of course, I had to start off with my favorite stamp and stencil to create this card:

I love that flag stencil! I used Telephone Box ink for the red stripes, and Vegas Strip ink for the blue part. Then I added the white stars using embossing paste.

While that was drying, I stamped the gnomes in the same blue Vegas Strip ink and added spots of color with Copic Markers.

That sentiment is perfect for this card! I fussy cut the gnomes and popped them up with foam tape. The entire panel is matted with black cardstock. Isn’t this a fun card!?

I’m often asked what supplies I use to make my cards and projects, so I’ve put together a list using affiliate links when possible. If you make a purchase with these links I may receive a small commission. These help me to keep up with blog costs and continue bringing you fun projects. Thank you so much for your support!


I hope you enjoyed this project! Check out my reel on Instagram to see a sneak of everything that’s in the kit and how I made this card.

I’ll be back soon with more to share!

Comments { 0 }
SUNSHINE-Layering-Pansies-with-bow-Kari-V

Pretty Pansies

Hello! Today I’m excited to be up on the Maker Forte blog to share a set of cards with Pretty Pansies! I am using their new Layering Pansies stamp set to build up these flowers…and they turn out amazing. Check out the blog post HERE.

I also have a video showing you just how easy these flowers are to layer up with this set. Watch it below or in HD on YouTube:

I packaged these up as a gift set for my mom, who nearly cried with joy at opening them. You might remember that when my Dad died, we made a Pansy garden memorial for him (he LOVED pansies, which he learned from his mom…my grandma).

I’m often asked what supplies I use to make my cards and projects, so I’ve put together a list using affiliate links when possible. If you make a purchase with these links I may receive a small commission. These help me to keep up with blog costs and continue bringing you fun projects. Thank you so much for your support!


Thanks for stopping by!

Comments { 0 }