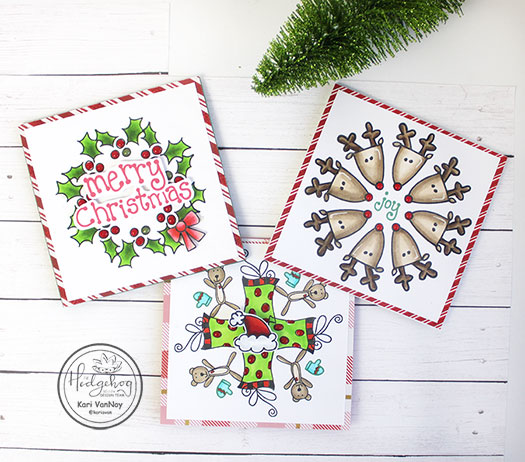
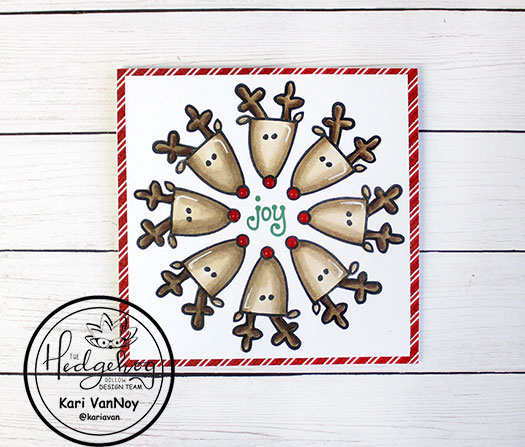
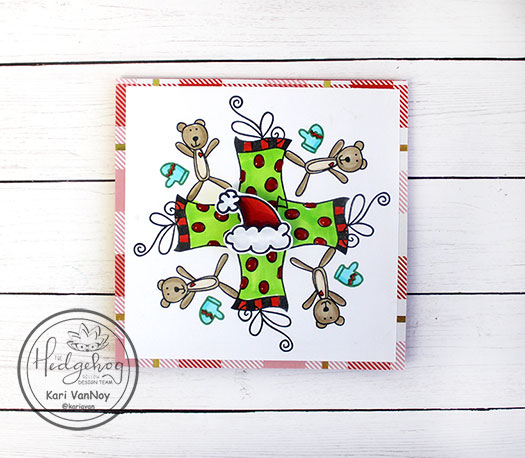
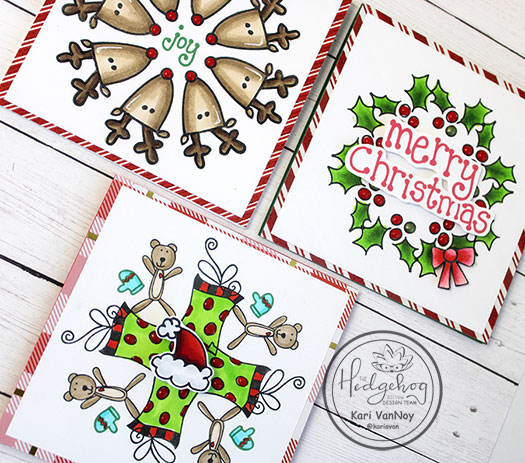
Hello! Today I’m showing you how easy it is to create a wreath card using small stamps! I made 3 cards to share, choosing stamps from The Hedgehog Hollow November Kit.
These are soooo fun to make (and a little addicting…that’s why I made three! Lol)
I made a quick video to show you just how easy it is when you have a MISTI or other stamp positioner. Watch it below or on YouTube:
https://youtu.be/8UYpgr8Jr8w
These stamps are so cute from this month’s kit, don’t you think?
I’m often asked what supplies I use to make my cards and projects, so I’ve put together a list using affiliate links when possible. If you make a purchase with these links I may receive a small commission. These help me to keep up with blog costs and continue bringing you fun projects. Thank you so much for your support!
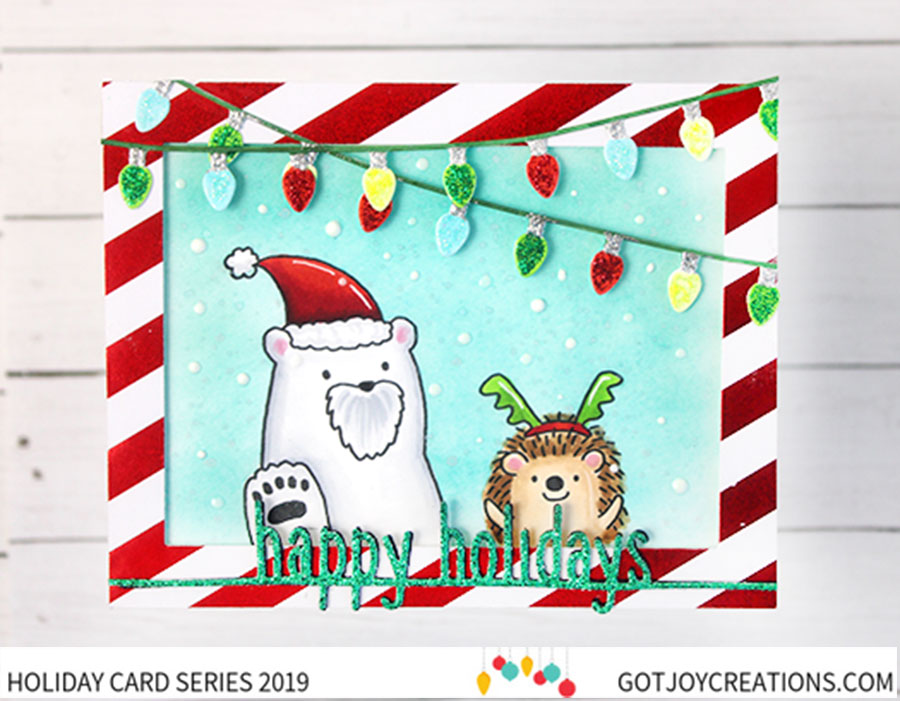
Hello, everyone. Today I’m over at Dana’s blog and Youtube channel today for Dana’s Got Joy Creations Holiday Series 2019. Make sure you are following this series for amazing holiday inspiration, giveaways, discount codes and don’t forget to leave a comment below to qualify all the giveaways. There will also be tutorials and cards shared by Dana as well and she will have a few surprises to share with you!
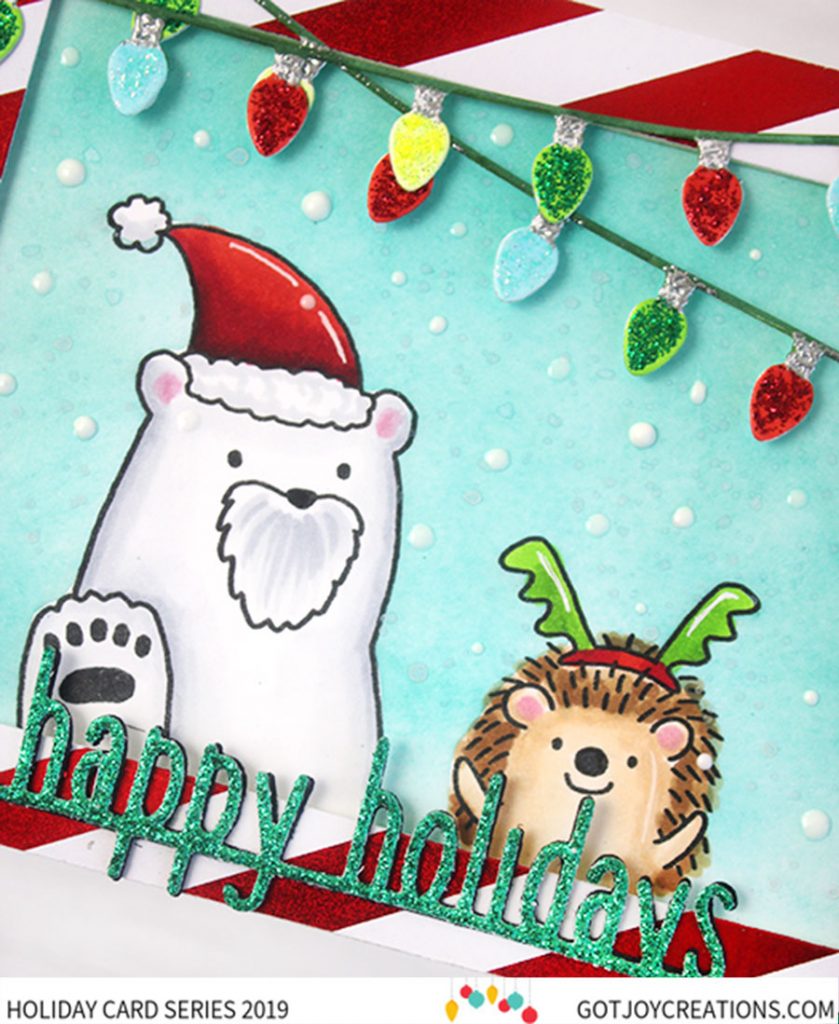
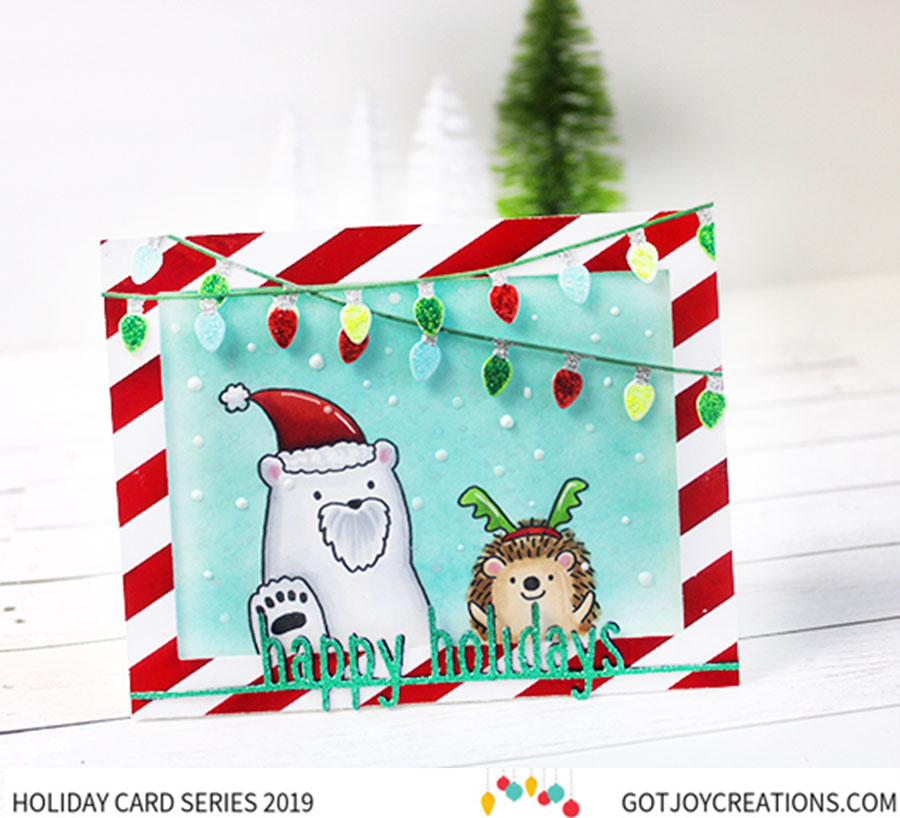
Today I have a fun holiday card for you featuring a little hedgehog friend visiting Santa. This card is filled with lots of foil shine and glittery goodness…everything a that makes holiday card extra special, right!?
I have a video showing you how I put this card together, as well as lots of tips on adding snow, glitter (that doesn’t come off!), and even foil shortcuts. Be sure to check out my video at Dana’s Channel (Here) and make a comment to be entered to WIN!
Aren’t these critters cute?! I colored them up very quickly with Copic Markers. Don’t worry about making the coloring perfect, there is so much detail and glitter and shine on this card that will delight your recipient!
I hope this card put a smile on your face today! I have a list below of all the supplies, if you are interested.
The GJC Holiday Card Series runs from November 17 to December 14. Each day Dana will have a Guest Designer on her blog sharing their holiday card ideas just like I did today. Hopefully you will find something to inspire you to create holiday cards for your family and friends this year. Follow along on her YouTube Channel and make sure you leave comments on each designer’s posts or videos for chances to win.
Disclosure: The links below are affiliate links. If you decide to use these links to shop, you are supporting today’s post writer – thank you! They may receive a small portion of the sale, at no extra cost to you. These products are endorsed by the author, and we hope you will love them too!
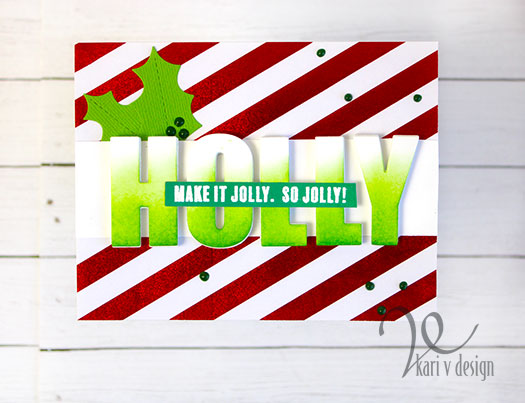
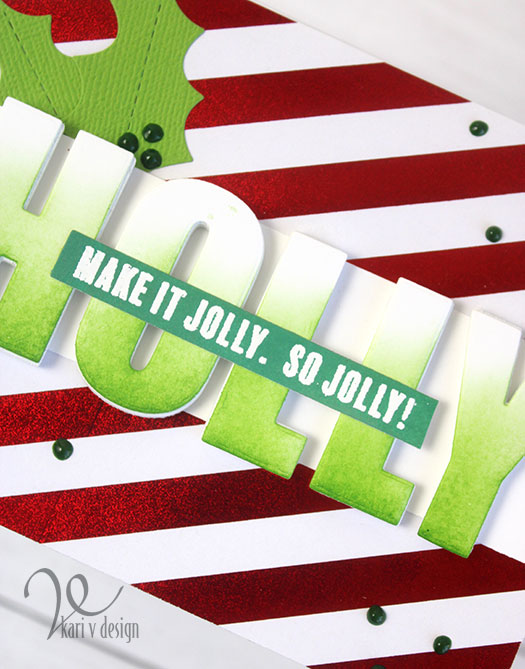
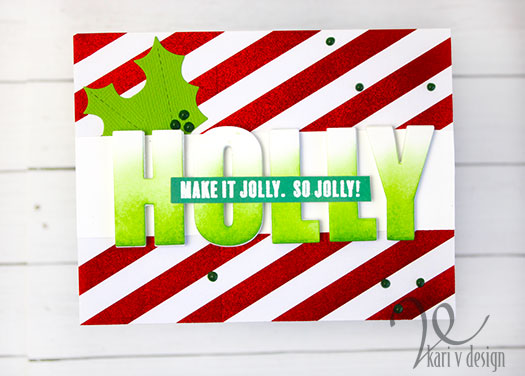
Hello! Today I have another beautiful holiday card to share with a favorite sentiment of mine this season.
Make It Jolly. So Jolly!
This card came together so quickly with the use of some glittery foil striped paper I found in my stash! Love the extra sparkle.
I first die cut the large HOLLY with bold alpha dies and inked them up with green Distress Ink. Then I popped those up on fun foam and added them to the foiled striped paper.
I used the same green ink to make a paper strip and stamped on the sentiment “Make it Jolly. So Jolly!” with embossing ink, then white heat embossed it.
To finish it all off, I added some holly die cuts and some Green Nuvo drops. You might be wondering why I didn’t add red Nuvo drops…well, the red that I had didn’t match the red foiled paper (it was too pink). So green it is!
I added it all to a pre-scored card base (these are a dream for making cards so easily!) and that’s it!
I’m often asked what supplies I use to make my cards and projects, so I’ve put together a list using affiliate links when possible. If you make a purchase with these links I may receive a small commission. These help me to keep up with blog costs and continue bringing you fun projects. Thank you so much for your support!
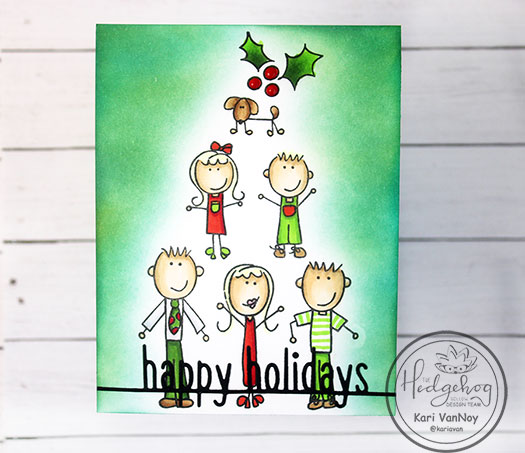
Hello! Today I created my family portrait Christmas card using stamps from the November 2019 Hedgehog Hollow Kit. These stamps include a bunch of line art drawings of people, so it is really fun to create a family with them! There is even enough characters that I’ll bet you could have an entire family reunion!
I started out by building up my family on the Misti stamping tool. I found that I could fit them all close enough together that I was able to stamp them ALL at once! A big time saver!
After I stamped them using amalgam ink (my favorite for Copic coloring), I began inking around them using makeup brushes for a soft look. I started building up the color slowly with a soft touch, then kept adding to it until I got the look I wanted.
Then I colored us all up with Copics!
I have a quick video to show you how quickly this card came together, watch it below or on YouTube:
Isn’t this such a fun set to build a family portrait Christmas card?! I had so much fun.
But my sister, who is a professional photographer, tells me it’s no longer cool to be all matchy-matchy in family photos. That it should be more natural looking. Lol.
So will you create a cooler family than mine? I’d love to see your creations!
I’m often asked what supplies I use to make my cards and projects, so I’ve put together a list using affiliate links when possible. If you make a purchase with these links I may receive a small commission. These help me to keep up with blog costs and continue bringing you fun projects. Thank you so much for your support!
I hope you enjoyed a look at my Christmas cards of the family photo this year! Lol. I’ll be back with more inspiration soon.
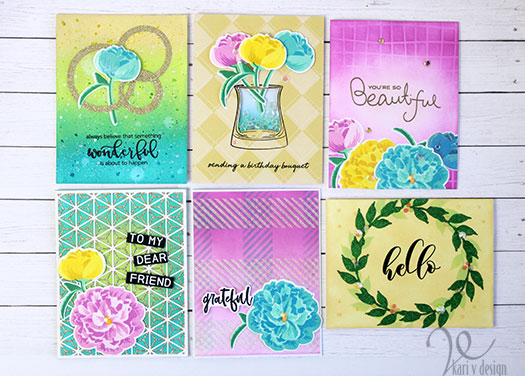
Hello! Today I have a fun gift card set with feminine cards and a gift card box to put it all together. (To see the masculine card set, go here.)
This is a part of my Altenew Level 1 FINAL project! I chose to highlight three techniques that I learned throughout all the Level 1 courses: 1) Ink Blending 2) Adding Sparkle & Shine 3) Stencil Techniques I use one, two or all three techniques in different ways on each card. Here’s a look at all six cards:
For these cards I first chose a color theme that I would use throughout the project. This would give the cards a cohesive look in the end. The colors I chose were pink, yellow, and turquoise (with a few green accents). I chose those colors because they were the colors of Altenew inks that I had. Lol. But I do think they all worked well together.
I have a video of how I put these cards together, AND how to create the box to hold these six cards with envelopes. Watch it below or on YouTube:
I started by inking a bunch of backgrounds, using some of the techniques I learned in the Easy Ink Blending Techniques course at Altenew Academy. Then I stamped out a bunch of flowers, flower buds, and leaves using my Altenew Inks and a few others that fit the color scheme.
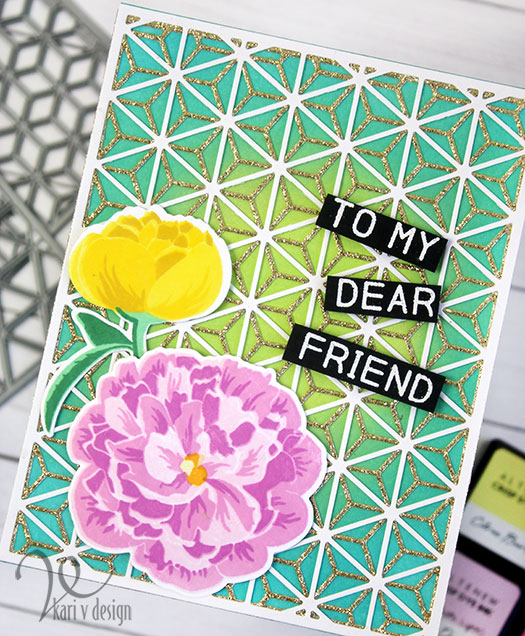
For the first card, I cut the Layered Snowflake Cover Die A in a gold glitter cardstock, and the Cover Die B in a white cardstock and layered them together. Then I added them to an inked background.
I added some beautiful flowers stamped in my color scheme. Then I heat embossed a white sentiment onto black cardstock and popped it up with foam tape. The yellow flower bud is popped up with foam tape, and the stem is glued down directly. The pink flower is also popped up with foam tape.
I really like how this card turned out. There is so much interest to it!
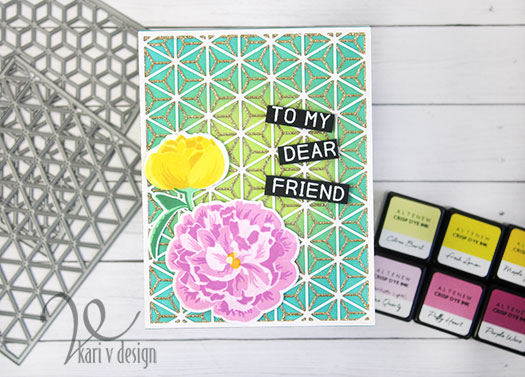
For my next card, I tried a technique that Carissa Wiley shared: to use two stacking circle dies to create a metallic frame. I created 3 circle frames and added them to my inked and splattered background.
Always believe something wonderful is about to happen
Then I added a turquoise bud in between the circles. I made sure to position the stem behind one of the circles. To me this feels like a big hug! And I love these colors together.
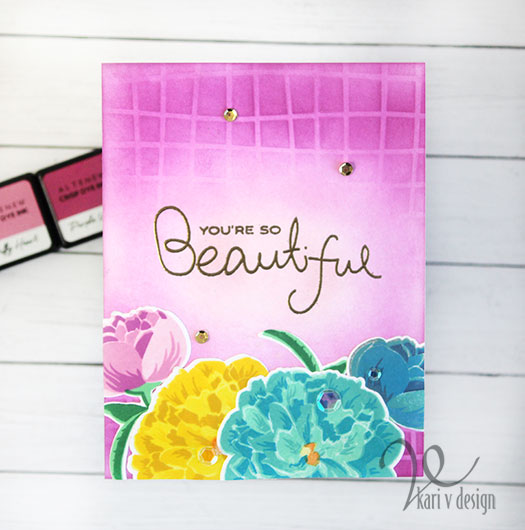
The next card uses some inking with Altenew pink inks, and then the Wavy Grid stencil inked on top. It creates a more subtle look for a stencil when you already have an ink blended background.
I spent quite some time arranging my flower on the bottom of this card. When I finally got the bouquet just right, I picked them all up with Glad Press-N-Seal and added liquid adhesive to the back. Then I pressed them back onto the card and allowed the glue to dry for a bit before removing the Press-N-Seal. This kept everything in place perfectly! Then I cut off the overhanging pieces to be flush with the card panel.
For the shine on this card, I heat embossed the sentiment in gold embossing powder and added gold AND clear iridescent sequins.
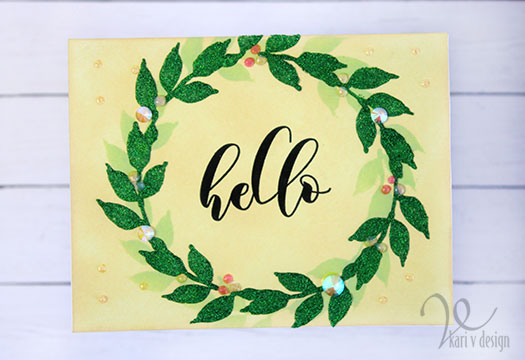
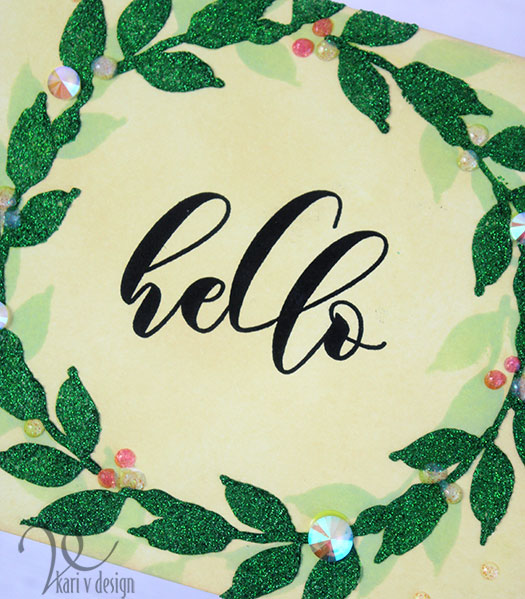
This next card uses a stencil TWICE…first I inked up the light green wreath with ink, then I re-positioned the stencil a little offset from the first one and added some glitter paste! Oh the sparkle this gives!
The background was a previously inked background and I love the buttery yellow with the green. I set this aside to dry for a while before adding the hello sentiment in the middle. Gems and Nuvo drops finish off this look, and I added some of the lightest pink Nuvo drops radiating out from the wreath.
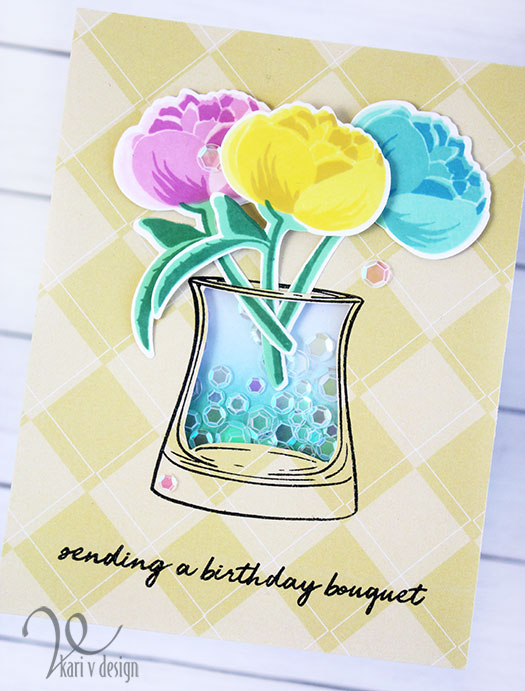
My next card is a shaker card! I started off by stamping the vase and the sentiment onto some Altenew Pastel Dreams paper with Versamark ink. I heat embossed it in clear so it would not smudge. Then I carefully cut out the inside of the vase with an exacto knife.
I added some acetate to the opening using packaging that I save for just this purpose! It’s a great way to recycle! Then I positioned the flowers so that the stems were BEHIND the acetate (they look like they are really IN the vase). I added clear sequins to the vase and attached the entire card panel with foam tape. The video explains the process for making this shaker card…it was so easy and something you can definitely do yourself.
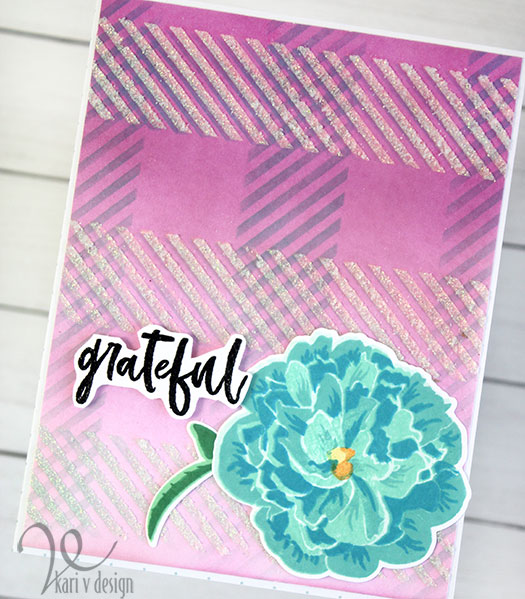
For my last card, I wanted to have a Thank You card in the mix, so I started off by using the plaid builder stencil. I inked it onto a pink background that I made earlier. Then I turned the stencil and inked it again using the turquoise ink…but I didn’t remove the stencil! Instead, I added a layer of Moonstone Glitter paste to add just the right amount of sparkle.
I stamped the grateful sentiment and fussy cut it out then added it with foam tape. I also added a turquoise flower and a leaf to finish off this card.
I hope you enjoyed a look at these six cards all ready to gift using inking, stencils and shine!
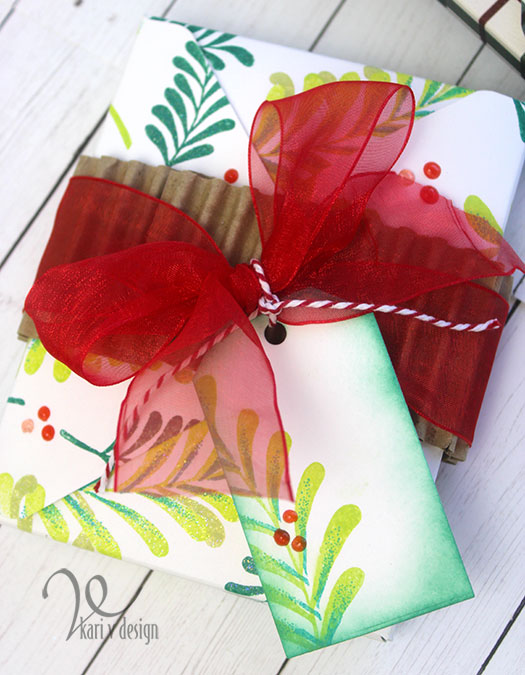
But wait! That’s not all…I also made the box to put them in!
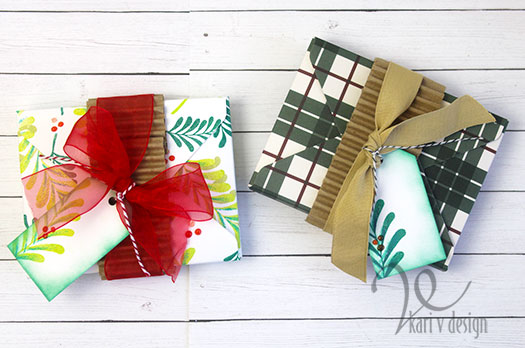
Ready to gift
I made the box by first stamping using the Majestic Mistletoe stamp set from Altenew (I love this set!) and then turned it into the perfect size box to fit all six cards and six envelopes. For this tutorial, be sure to watch the video. I used recycled corrugated cardboard to make a band around the box that can be slipped on and off.
If you are interested in any of the products I used, here is the supply list.
I’m often asked what supplies I use to make my cards and projects, so I’ve put together a list using affiliate links when possible. If you make a purchase with these links I may receive a small commission. These help me to keep up with blog costs and continue bringing you fun projects. Thank you so much for your support!
Thanks for stopping by today! If you didn’t see the masculine set of six card, check it out here. I really enjoyed putting these gift sets together!
Hi I'm Kari. I'm a creator, a card maker, and a day maker! I am Lucky in love to a supportive husband, blessed to raise 3 kids (all moved away now!), and happy to be watched over by 2 dogs.
I originally started this blog to remind me to be happy amid adversity, and I hope it inspires you, too!