About KariV

Author Archive | KariV
10-13-fireflies-brighter-card-2

You Make My Life Brighter Card

Today is my Paper Smooches card challenge! This stamp set called “Happy Bugs” is just so fun. I picked the Firefly (lightening bug) for this card and made each one a different color.

My husband and I were traveling back East a few years ago, and we saw a bunch of fireflies one night. We each thought they were different colors: I thought they were GREEN-ish, he thought they were ORANGE-ish, and we both thought some were YELLOW. So this card is a little joke, with each firefly a different color!

10-13-fireflies-brighter-card

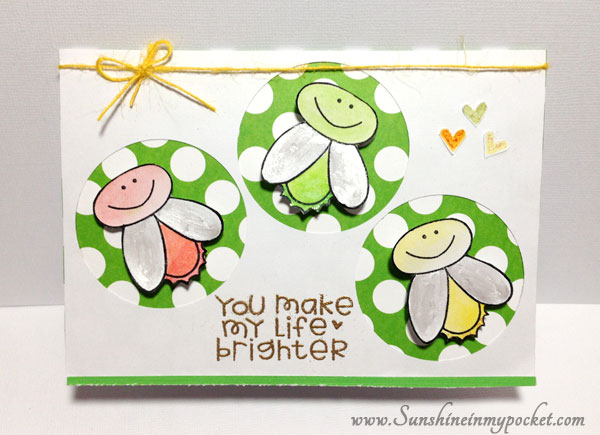
Each little firefly is in it’s own little circle I punched out to reveal the fun polka-dot green background. I used Inktense pencils to give each one their own little color personality, and I painted the wings with Liquid Pearls in white opal.

Then I added a gold heat embossed sentiment and 3 different color hearts (glittered)! You may not be able to tell in these pictures, but their little “light glow” is also glittered.

10-13-fireflies-brighter-card-2

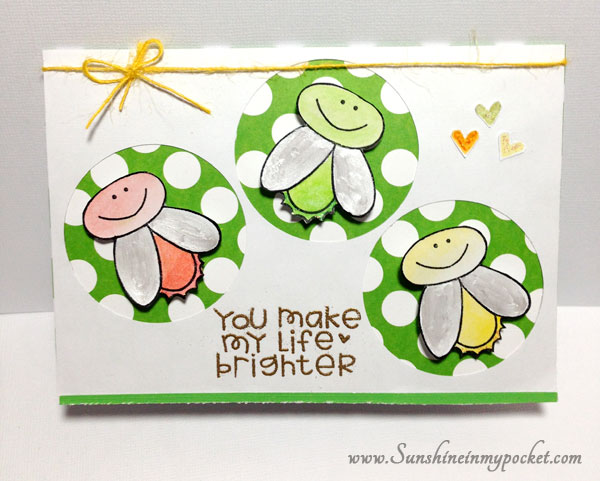
A little yellow twine finishes off the top of the card. I love how this card turned out.
But can you answer me one question: What color ARE fireflies?

Joining the Paper Smooches challenge here. And the Simon Says Stamp “Going Dotty” challenge here.

Supplies used:
Paper: Me & My Big Ideas green polka dot
Stamps: Paper Smooches Happy Bugs
Twine: American Crafts
Other: Inktense Pencils, Stickles, Liquid Pearls White Opal
Comments { 3 }
10-13-blessing-not-in-disguise-2

What I’m Looking for is a Blessing Not in Disguise

Did you know it’s World Card Making Day!? So this weekend I’ve been working on a few cards to share.
I got this stamp a while ago at Michael’s and it just made me laugh, so I had to get it! This card will go to my Dad, who I know will appreciate it.

10-13-blessing-not-in-disguise

That embossing folder looks like a metal tool box to me…looks manly, right? And I used some metal “rivets” in the corners.

The sentiment itself I heat embossed with silver to really make it pop.

10-13-blessing-not-in-disguise-2

This ought to put a smile on his face. Happy World Card Making Day!

Comments { 0 }
last-cookie-picture

Gluten Free Peanut Butter cookies

My co-worker moved away, but she left me the Best. Present. Ever: This recipe for Gluten-Free Peanut Butter cookies! (Thank you, Kait!)

Now don’t let “gluten-free” scare you away. These are the best gluten free cookies I have EVER tasted! And they are easy to make. (Bonus)! Add a drizzle of chocolate on top, and these are a true winning cookie!

A little chocolate, a little peanut butter! Yes, these will be a WINNER at my house.

gluten-free-peanut-butter-cookies-red

Here’s what you do: Mix together the peanut butter, sugar, egg, and vanilla with a spoon. Then toss in your “add-in” flavor of choice (full recipe at the end of this post). Bake. Drizzle. Eat. YUM!

We tried white chocolate chips in some of our cookies and marshmallows in others. Here’s the trick: if you add marshmallows, wrap the dough around them before baking.

wrap-dough-around-marshmallows

Also, you want to flatten them just a little with the palm of your hand before baking.

ready-for-the-oven

Then, when you take them out of the oven, allow them to cool a bit before you drizzle the melted chocolate. I microwaved the chocolate in a baggie for about 30 seconds, smooshed it around and microwaved it another 30 seconds. It doesn’t take long. Then, snip of a tiny corner of the bag.

getting-the-chocolate-ready


just-out-of-oven

These are the cookies just out of the oven. Notice those ones with the marshmallows in them on the left? The marshmallows do try to escape!

swirling-on-chocolate


last-cookie-picture

That combination of peanut butter and a little chocolate…oh, wow! You will love these little cookies…and you may not even miss the flour!

[amd-zlrecipe-recipe:13]

We all decided that even though the marshmallow cookies were a little messier, we liked those better than the white chocolate chip ones. But they are all delicious! Which ones would win at your house?

Comments { 0 }
9-13-life-goes-on

Dose of Sunshine Monday — It goes on

Today I combined one of my favorite quotes with one of my favorite pictures to share with you. These are some amazing Aspen trees in Northern Arizona. My husband and I were hiking with some friends and came upon an entire forest of Aspen trees with their leaves changing color to a bright yellow. It’s almost that time of year again! I just LOVE fall.

9-13-life-goes-on

Take a look at this picture and take a deep breath. Life goes on! No matter what you are going through, you can find amazing life all around. That is simply amazing, isn’t it?

Here in my city, we don’t experience changing leaves…nothing as amazing as these Aspen trees. We have to travel a ways to see beautiful, color-changing trees like this. Do you have changing seasons where you live?

Comments { 0 }
halloween-treat-sacks-3

Halloween Treat Sacks — A tutorial (and a free printable!)

I have Halloween on my mind. I know, I know…it’s only September! First, mini pumpkin pies and now Halloween in September! But these little DIY Treat Sacks are so fun to make and share, that I HAD to show you how to make them.

These little sacks are made from 1 sheet of paper and really can be used for ANY occasion. But filling them and decorating them with Halloween is super-fun. 🙂

halloween-treat-sacks

All you have to do is take 1 sheet of 8 1/2 x 11 paper and fold it up. It’s kinda like folding up an awesome note to pass around in jr. high, only this time it turns into the best little treat sack (and that’s better than a folded up note, right?!)

I made a video of just how to do this.  Check it out:

And for those of you who like simple, I created a printable Halloween tag you can use to dress up your treat sacks! It’s a chalkboard printable with a Halloween bat…a nice little combo. My nephew always says “Spoo-oooky” at this time of year, and that’s just the word I used for this printable! (Hi, Porter!)

9-13-spooky-halloween-tag-small

To download this tag, first like my page here

Then download the pdf here: halloween tag 6 up

halloween-treat-sacks-3

For a little added fun, take a spider ring and cut off the ring part. Attach it to a paperclip with a glue dot or hot glue, and sparkle it up with a little glitter glue on the body of the spider (see picture below). These work perfect to attach the tag to the treat sack. You can also punch a hole in the top of the sack and tie it together with ribbon.

So try your hand at making these little sacks. They would be perfect for a party favor, or to dress up a Halloween themed dinner table. I’m making some for my neighbor kids.

halloween-treat-sacks-2

Happy Haunting!

Comments { 0 }