About KariV

Author Archive | KariV
create-happiness-2

Create Happiness | Altenew 3D Peony Dreams

Hello! The Altenew 3D Floral class just started yesterday and I’m already loving it! This is my very first time using any 3D flower dies and I’ve learned lots so far.

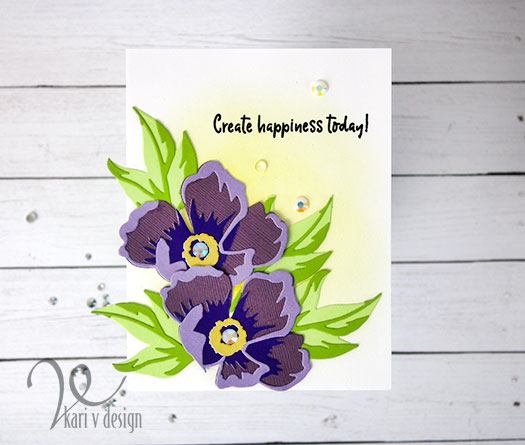
For my first card with the Peony Dreams 3D flower die, I found some random cardstock lying around by my paper cutter. Please tell me I’m not the only one to save all the little pieces of leftover cardstock? Anyway, I found three purples in different shades to cut out the flower; and two shades of green for the leaves.

I love that with this die, you can create smaller flowers OR layer them up with the larger dies to create a much larger flower! For this card, I just used the smaller flowers. But I know there’s a lot more I can do with this die set.

You might be able to see the texture on that flower…for the base I used a textured cardstock and I love the extra that it adds!

Textures with gemstones…beautiful match!

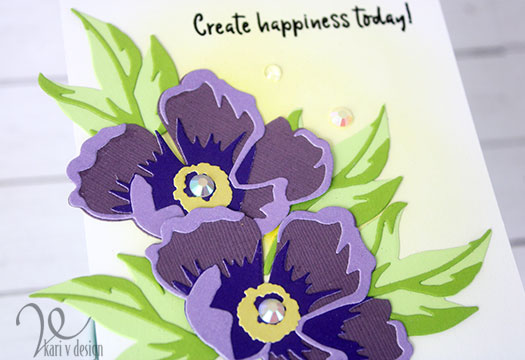
I ink blended a simple background using Distress Ink, and added some gems to finish off the card.

Here’s the supplies I used, affiliate links used when possible (at no extra cost to you!)


I hope you enjoyed this card today! I’ll tell you…these dies are a lot of fun.

Comments { 4 }
pink-pineapple-card-2

Glittery Pink Pineapple? Why not?

Hello there! Today I have a fun tropical card share. Yesterday I made a beachy card, and today I thought I’d take it one step further: to Hawaii Tropics!

This card uses my favorite background inking technique that is SO FAST!! In fact, I feel like it’s one of the most overlooked tools in the craft room right now. But today, I’m bringing it back!

This was a fun and easy card to put together and I have a VIDEO for you to watch below or on YouTube:

Did you watch the video yet? No? Well, I’m still going to tell you my secret: clarity brushes! (aka Stencil brushes). I love them for a fast and easy way to put ink onto paper. Sometimes I find the blender tool takes too long and is painful for me. The makeup brushes are great, but when I have a LARGE area to blend, I reach for these clarity brushes.

A Happy Pineapple!

I made him a glittery pink to play in the Paper Smooches contest going on this month: here.

This was my inspiration photo:

What do you think? Fun, right?

I’m often asked what supplies I’ve used on a project, so I’ve made a list for you here using affiliate links when possible (at no extra cost to you). When you purchase an item using these links, I may receive a small commission. This helps me with blog upkeep and to bring you more fun projects like this one! Thank you for your support.


I hope you enjoyed this project today! Thanks for stopping by!

Comments { 0 }
follow-your-rainbow-5

Hello Beach!

Hi there! It’s about this time of year that I long to go to the beach. Trouble is, I do not have a beach close by. So I make beach cards to tide me over!

This beach card is using the contents from the summer Hedgehog Hollow Kit featuring Sunny Studio Stamps. It’s a fun, bright, summery kit and it’s on SALE right now (at the time of writing this post). Check it out here.

At the beach!

I used two stamp sets from the kit: Coastal Cuties and Over the Rainbow sentiments set. I also used two dies from the kit: Rainbow, and Ric Rac dies (for the water.)

You might not believe this: I used only THREE colors to ink up that rainbow background. Yep. Only Picked Raspberry, Fossilized Amber, and Peacock Feathers in Distress Oxides. They blended together to make a beautiful orange and green in there, too! I love that trick.

For the ocean, I first inked up a Neenah Solar white cardstock panel with some blue Distress Oxides, then I splattered on some blue watercolor paint. I may have gotten carried away with this. Lol!

Once it dried, I cut it out using those Ric Rac dies and glued them onto my rainbow background.

I layered up five rainbow die cut words to make it pop. I also layered up the clouds three time for even more dimension.

Those cute girls are colored up with Copics and colored pencils, then popped up with foam tape.

I’m often asked what supplies I use on my projects, so I’ve linked them below using afflilate links when possible. When you purchase through these links I may receive a small commission (at no extra cost to you). These help me keep up with blog costs and continue to bring you fun projects. Thank you!


I hope you enjoyed this beachy/rainbow project today! Thanks for stopping by!

Comments { 0 }
all-three-on-worksurface

Heat Embossing on Foil

Hello! I recently had someone ask me if you can heat emboss on foil paper. The answer is YES! But there are a few tricks to doing this. So today, I’m going to share with you the tricks for heat embossing on foil paper.

June is wedding season here, so I have three wedding cards to share using foil paper and this technique.

The background florals are from the May 2019 Hedgehog Hollow kit, and I love them! This kit has sold out, but I hear that we may be seeing some more designs from Sophia Caldwell in the July Kit! Be sure to head over to the store here to pre-order your kit.

I used Ranger Black Sparkle embossing powder for all these cards today (it has glitter in it and you know I love my glitter!)

Foil is notorious for curling when you apply heat, so before you heat emboss, allow your heat gun to warm up for 30 seconds. Then apply heat in short bursts.

I have all the details of how to make these cards in my video below, or watch on YouTube:

Remember to avoid touching the foil card too much, as it likes to smudge and show fingerprints. And, if you get some curling just add something heavy to the top to flatten it out. You may be tempted to run it through your die cut machine again, but don’t! Foil card is susceptible to indentations and it’s much better to treat it carefully.

I hope you enjoy this technique! I’m often asked what supplies I used, so I’ve put together the list for you below. Affiliate links are used when possible, so if you click to purchase on one of these links I may receive a small commission. These help to keep up with blog costs so I can continue bringing you fun projects! Thanks for your support!


Thanks for stopping by today!

Comments { 0 }
diet-close-up

National Donut Day

Purple striped donut anyone?
How about a pink glittered donut?

Did you know it was National Donut day? I’m not eating donuts. But I had to make a donut card. (so many less calories) Lol. This sentiment was perfect for today.

Comments { 0 }