About KariV

Author Archive | KariV
both-cards-with-shell

Layering Stamp Ideas

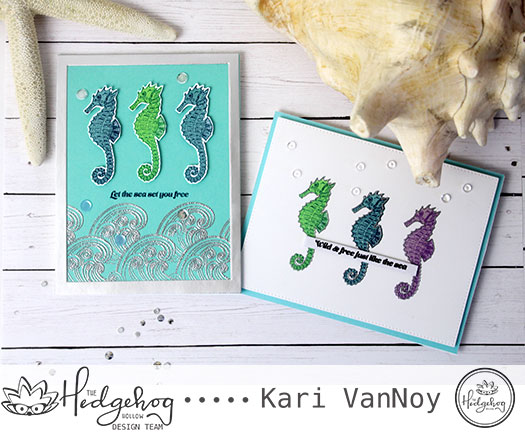
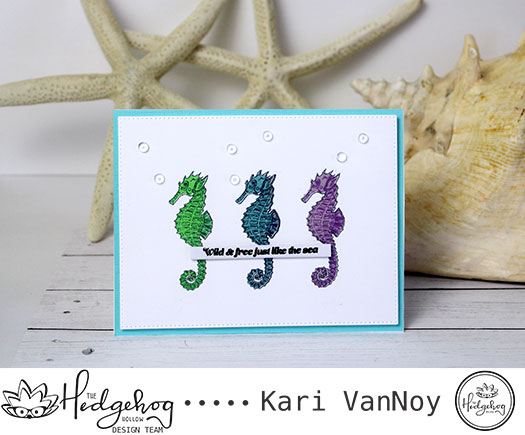
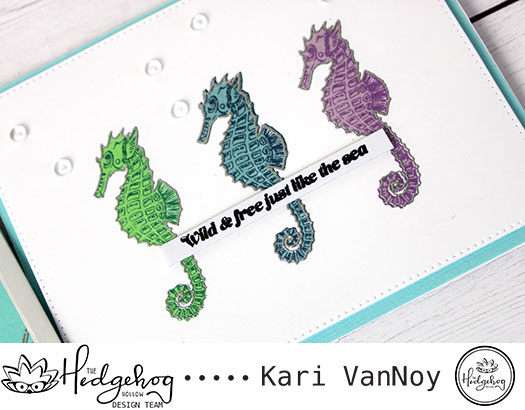
Hello! Today I have a layering stamp set of Seahorses from the Hedgehog Hollow June 2019 kit.

There are so many beautiful beachy images in this kit: shells, coral, bubbles, fish, etc. But those seahorses really spoke to me! So that is what I used for my very first card make with this kit.

Multi-colored seahorses

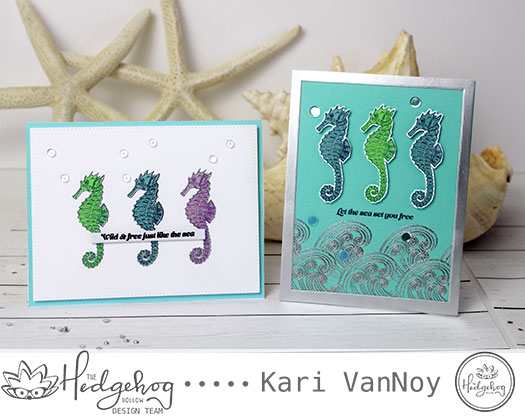
I love layering stamps for adding easy color to my cards. Just choose some different shades of ink and start with the lightest color. Then add the darker color over the top for the second layer, and so on. If you don’t have multiple shades, then stamp the ink multiple times to get a darker shade!

I have a process video for you showing you some tips on making LOTS of seahorses for your cards that is oh-so-easy.

Watch it below or on YouTube:

I love using a stamping platform with a ruler for such easy placement and stamping the many layers! So easy and quick.

Those layers!! Solid bottom layer, Detailed second layer in a darker ink

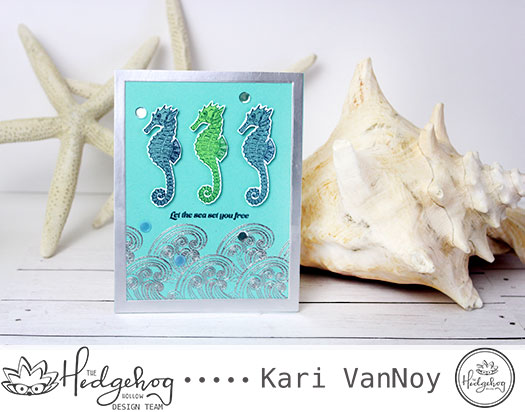
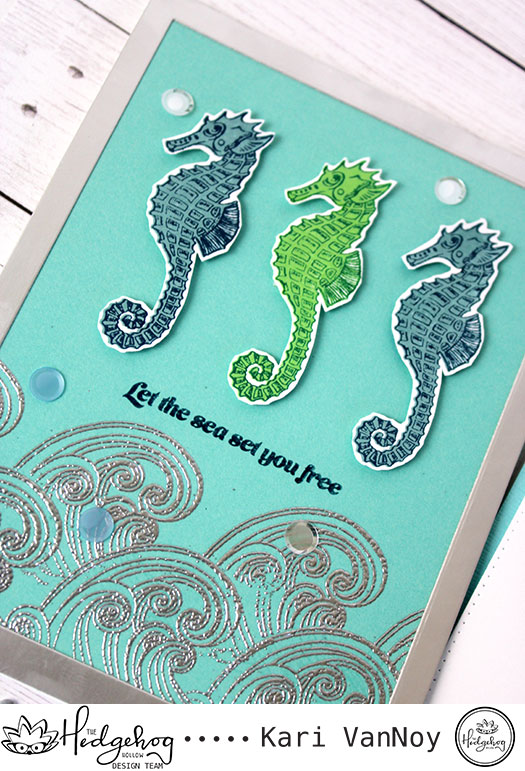
I did fussy cut out these seahorses (above), but the image is easy enough to cut out.

Silver embossed edge

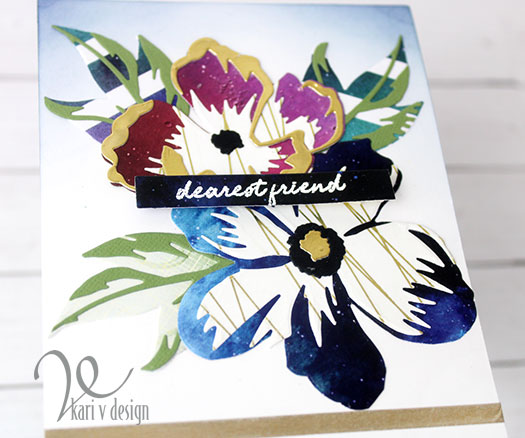
I’m often asked what products I used on my cards, so I’ve compiled a list for you using affiliate links when possible. When you purchase something using these links I may receive a small commission. These help me to keep up with blog costs and bring you more fun projects! Thank you so very much!


I hope I inspired you to try this method on any of your layering stamps! Thanks for stopping by.

Comments { 0 }
happy-birthday-owl

Happy 4th of July!

Just popping by to wish you a happy 4th of July! Here’s a cute image from Jessica Lynn Originals that I really enjoyed coloring for this day:

This is a digital image that I printed on Neenah solar white and colored up with Copics. I added some distress inks around the edges for the night sky and some star sequins. Hope you enjoyed!

Comments { 0 }
hibiscus-close-up

Altenew Day 6: Layered Die cuts with something extra

Hello! Today is the last day for my homework for the Altenew 3D floral focus class. We were challenged to mix up the 3D dies with stamping. However, I don’t own any layering stamps (yet), and so I thought I’d combine them with patterned paper!

I recently picked up this Summer Garden paper pack and there were some perfect papers in there for this challenge.

Pretty Patterned Paper combined with Garden Picks 3D Dies

I love this paper combined with the dies. I picked some pinks and dark maroon papers to match with the paper.

I put this card panel onto a grey card base. The sentiment is from another Altenew set.

Also in this paper pack was a striped beautiful background that I just couldn’t resist! So I made another card that was inspired by Therese Calvird’s color choices. She is always combining fun colors together that I wouldn’t think of, so I tried my hand at some fun colors for this one:

Hello Hibiscus

I started out with some teal blue hibiscus and added some fun yellows and purples and greens. It’s a fun color combo, I think. And how pretty is that striped background paper?

I added a fun Hello stamp that I fussy cut around and popped up on foam tape. Oh, and two of those leaves dies were cut from the Celestial paper pad.

I’m often asked what supplies I’ve used on my cards, so I’ve linked them below using affiliate links when possible. A big thank you if you purchase any products using these links. It helps me to keep up with blog costs and continue to bring you fun projects like these!


I hope you enjoyed these projects today. I’ve really enjoyed this Altenew class. It’s the first one I’ve ever taken and the first time using 3D dies and I learned so much. A big thanks to Altenew and Therese Calvird for a great class!

Thanks for stopping by!

Comments { 1 }
all-three-cards-2

Summer Backgrounds Inspired by Summer Treats!

Hello! I am so excited to bring you this post. I’ve been working on some BRIGHT, FUN Summer backgrounds that you will need sunglasses for! Lol. I have 3 backgrounds to share with you and then we are going to turn them into cards!

I have a video linked below and you can win PRIZES! These backgrounds were inspired by my favorite summer treats : a 50/50 bar (orange popsicle with vanilla ice cream inside), Pink Lemonade, and a Rainbow Snowcone. Can you guess which one belongs to which background?

Here’s a look at the cards:

Bright Summer Backgrounds are so vibrant!

Now, you may not be able to tell by this picture, but each of those backgrounds also has a glittery element to it. And they are THREE different techniques. So be sure to check out the video below or on YouTube:

I had a lot of fun creating these three bright cards for you. Also, you should know I’m a part of Jess and Laura’s Hooray for 3K YouTube hop and you can comment to win PRIZES! So be sure to head over to YouTube to comment and get all the details on how to win.

Inspired by: 50/50 bar Orange & Vanilla
Inspired by: Pink Lemonade
Inspired by: Rainbow Snowcone

I’m often asked about supplies I’ve used on my cards, so I’ve linked them all here for you. When possible, I’ve used affiliate links. When you click and purchase from these links I may receive a small commission, at no extra cost to you. These help me to keep up my blog and continue to bring you fun projects! Thanks for your support!


I hope you had a great time and got some bright, summery inspiration! Which card was your favorite? I’d love to know!

Comments { 0 }
galaxy-close-up

Flower in Space

Hi there! I know, that title sounds strange, but today as a part of the Altenew 3D Floral Focus class we were challenged to make a floral card using patterned paper and washi tape.

Wouldn’t you know it, the only Altenew patterned paper I own is the Celestial 6×6 paper pack. (Edited to add….since then I have ordered more and visited Scrapbook.com for the third time this week. Lol.)

Anyway, a space flower is kinda cool, right?

Dearest friend…

I used the celestial paper pack for the largest portion of the flower (the blues and purples) and some Gold Lined Washi tape for other portions of the flower. Those striped leaves are from the same paper pack. I kinda like striped leaves. 😉

To mimic those stripes, I used gold slim washi on the bottom of the panel to create 2 stripes. Then I added a little Chipped Sapphire ink blending to the top of the panel to balance that out. The struggle is real sometimes, Lol!

A few touches of gold

I saw Therese use gold foil paper on one of her die cut flowers and it was all over after that. I HAD to use gold foil paper for a layer. I used it on the smaller flower as the top layer; and also in the middle of the large flower. Love.

That sentiment is glorious and it’s from the Altenew Versatile Vases set. I heat embossed that on the Celestial paper and popped it up with foam tape.

In the process of making this card, I ended up with extra flowers and leaves. So I thought…why not put together another card?

Here’s my BONUS card:

Galaxy background paper is the best!
It’s a little crazy, but this kinda crazy is good.

I have to say, I’m really enjoying this class and creating some cards that have stretched my imagination.

There’s only one day left! Now excuse me while I pick up more supplies from Scrapbook.com. 🙂

Here’s my supply list! I use affiliate links where possible to help pay for blog costs and allow me to continue to bring you fun projects like these. Thanks for your support!


Thanks for stopping by!

Comments { 1 }