Archive | August, 2014
day-3-sunshine-stamped-die-cuts

Stretch Your Stamps Day 3 — Stamped die cuts

This online card class is so much fun! I’m loving how to learn to “Stretch Your Stamps” and today I was inspired by Debby Hughes. She is a master at clean and simple, and I think my card turned into a little bit more…it actually may be a mix between Debby’s class and Stephanie Klauck’s instruction.

Here is my card:

day-3-sunshine-stamped-die-cuts

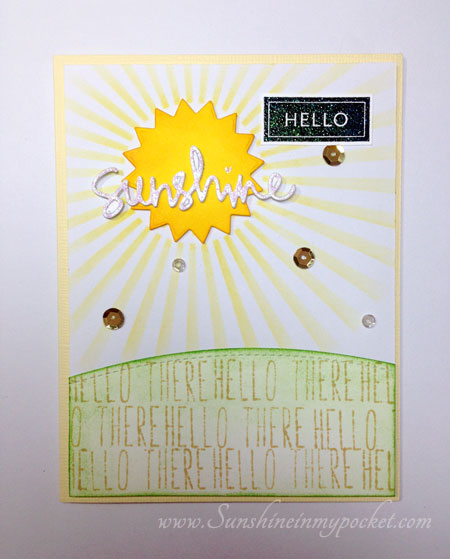
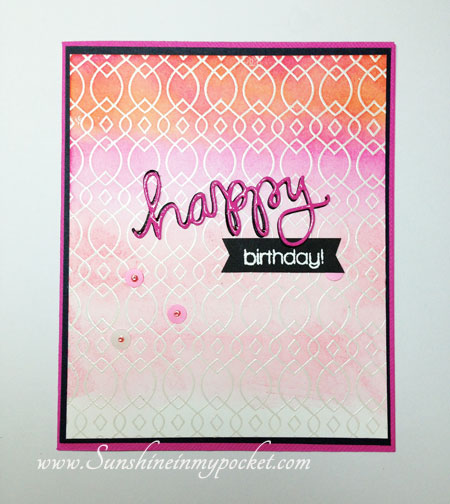
I used Milo’s ABCs (Lawn Fawn) on the grassy hill to add some punch! The “hello” sentiment is stamped with VersaMark Onyx black ink, then embossed with sparkle embossing powder. The die cuts are from Simon Says Stamp…and I die cut the sun out of yellow cardstock and then inked up the edges with orange marmalade Distress Ink.

At first I used some Wink of Stella on the sunshine die cut, but I didn’t think it added enough glitter. So I brought out the stickles! Finished it off with some gold and sparkling clear (Pretty Pink Posh) sequins.

I hope you like this happy card! I tend to LOVE anything sunshiny! 🙂


Comments { 3 }
day-2-ombre-distress

Stretch Your Stamps — Day 2 Ombre Backgrounds

I just love the Ombre look and Laura Sterckx hit it out of the park with her demo class in Day 2 of Stretch Your Stamps 2!
Here’s my take:

day-2-ombre-distress

I had a lot of fun with this one! I only have a few colors of distress ink, so I tried to get them to blend nicely: Picked Raspberry, Orange Marmalade, Worn Lipstick and Festive Berries.

I used the “Happy” die from Simon Says Stamp and white heat embossed the sentiment on a black banner. Added some flat sequins with a dot of liquid pearls in the center.

Comments { 0 }
red-and-hello

Hello, Red

red-and-hello

Here’s another look at my Little Red Riding Hood card. I love this stamp set from Avery Elle. When I saw it, I just knew I had to have it. See, I played Little Red Riding Hood in the school play when I was in 4th grade! I made my very own (shiny) red cape and I think I even still have the basket I used in that play.

Anyway, I’ll probably be playing with this set alot. 🙂

both-cards-red-and-hello-rainbow

Comments { 1 }
hello-to-you-rainbow

Stretch Your Stamps 2 — Day 1

“School” started today for me with Online Card Classes. The new Stretch Your Stamps 2 started out with some great projects! I was so inspired and even got some homework done today.

This is my version of the watercolor emboss resist background made into two cards:

both-cards-red-and-hello-rainbow

I love how they turned out! (my husband was even impressed…he liked the shiny 3-D effect on the “hello”)

I ended up rounding the bottom corners of the Red Riding Hood card:

red-and-hello

Aren’t they so happy?

hello-to-you-rainbow

That Kristina Werner is so creative!

I’ve got another card I’ll share later…I started it, but haven’t quite finished yet.
Looking forward to day 2!

Comments { 0 }
day-one-faux-water-2

Stretch Your Stamps 2 — Day 1 Faux Watercolor Background

I was inspired by Shari Carroll’s Faux Watercolor Background stamping in the Online Card Class (Stretch Your Stamps 2), and I just had to try it out. Now, this is not perfect, but I do think it turned out kinda fun!

day-one-faux-watercolor-background

I ended up using the second stamping, just like Shari did. I just liked the soft watercolor look. I added some rock candy glitter to the sentiment. You can see it a little better here:

day-one-faux-water-2

I added a few sparkling clear sequins to finish it off. I think I’ll keep practicing this technique!

Comments { 0 }